MultiCloud Deployment of Service Mesh
This page explains how to deploy a service mesh in a multicloud environment.
Prerequisites
Cluster Requirements
- Cluster Type and Version: Determine the type and version of your current cluster to ensure that the service mesh you install can run properly on it.
- Reliable IP Address: The control plane cluster must provide a reliable IP address for other data plane clusters to access the control plane.
- Authorization: The cluster joining the mesh needs to provide a remote key with sufficient permissions, allowing Mspider to install components on the cluster and for Istio control plane to access the API Server of other clusters.
Multi-Cluster Region Planning
In Istio, regions, zones, and subzones are concepts used to maintain service availability in a multi-cluster deployment. Specifically:
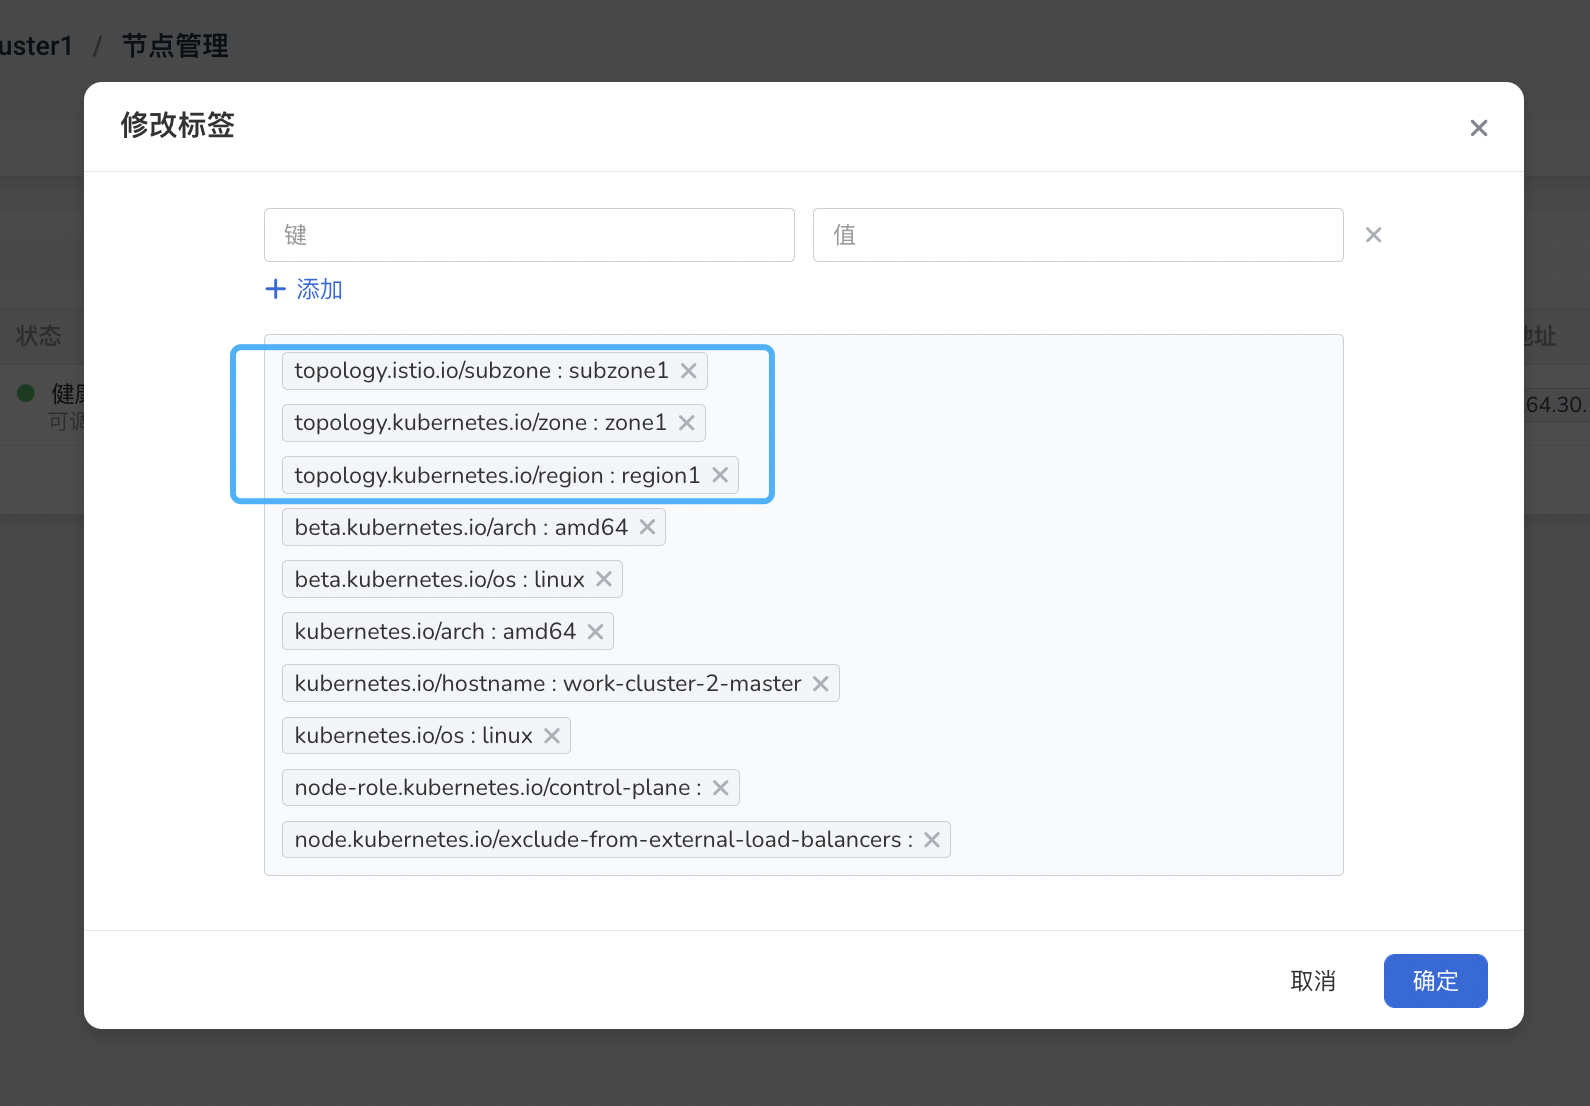
- Region represents a major geographical area, usually referring to a data center region of the cloud provider. In Kubernetes, the label
topology.kubernetes.io/regionidentifies the region of a node. - Zone represents a smaller area within a data center, typically representing a sub-region. In Kubernetes, the label
topology.kubernetes.io/zoneidentifies the zone of a node. - SubZone is an even smaller area within a zone. Since Kubernetes does not have the concept of partitions, Istio introduces a custom node label
topology.istio.io/subzoneto define a partition.
These concepts help Istio manage service availability across different regions. For example, in a multi-cluster deployment, if a service fails in Zone A, Istio can automatically reroute the service traffic to Zone B to ensure service availability.
To configure this, you need to add the corresponding labels to each node in the cluster:
| Areas | Labels |
|---|---|
| Region | topology.kubernetes.io/region |
| Zone | topology.kubernetes.io/zone |
| SubZone | topology.istio.io/subzone |
Adding labels can be done by finding the corresponding cluster in the container management platform and configuring labels for the respective nodes.
Mesh Planning
Mesh Basic Information
- Mesh ID
- Mesh Version
- Mesh Cluster
Network Planning
Verify the network connectivity between clusters and configure accordingly. This section mainly focuses on two parts of the multi-network mode configuration:
- Plan network IDs
- Deploy and configure East-West mesh
- Expose the mesh control plane to other working clusters.
There are two network modes:
- Single Network Mode
Determine if the Pod networks between clusters can communicate directly. If the Pod networks can communicate directly, it means they are in the same network mode. However, if there is a conflict in Pod networks, a different network mode needs to be selected.
- Multi-Network Mode
If the networks between clusters are not connected, assign network IDs to the clusters and install East-West gateways in different network regions. Configure relevant settings. The specific steps are explained in the following chapter Installation and Configuration of Mesh Components in Different Network Modes.
Planning Form
Consolidate the cluster and mesh-related planning mentioned above into a form for easier reference.
Cluster Planning
| Cluster Name | Cluster Type | Cluster Pod Subnet (podSubnet) | Pod Network Connectivity | Cluster Nodes & Network Regions | Cluster Version | Master IP |
|---|---|---|---|---|---|---|
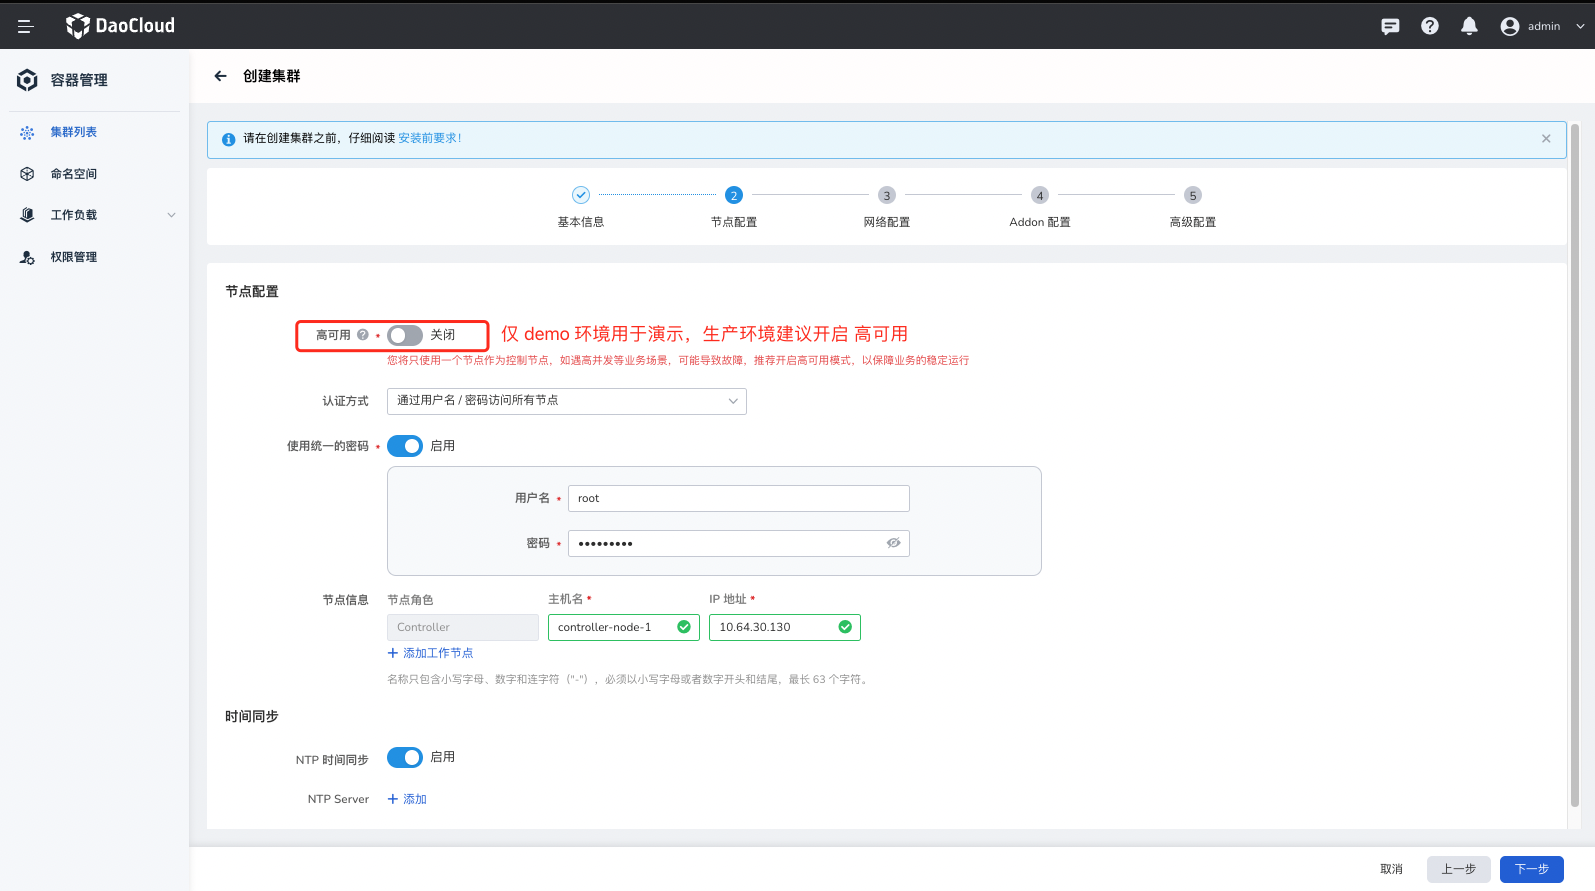
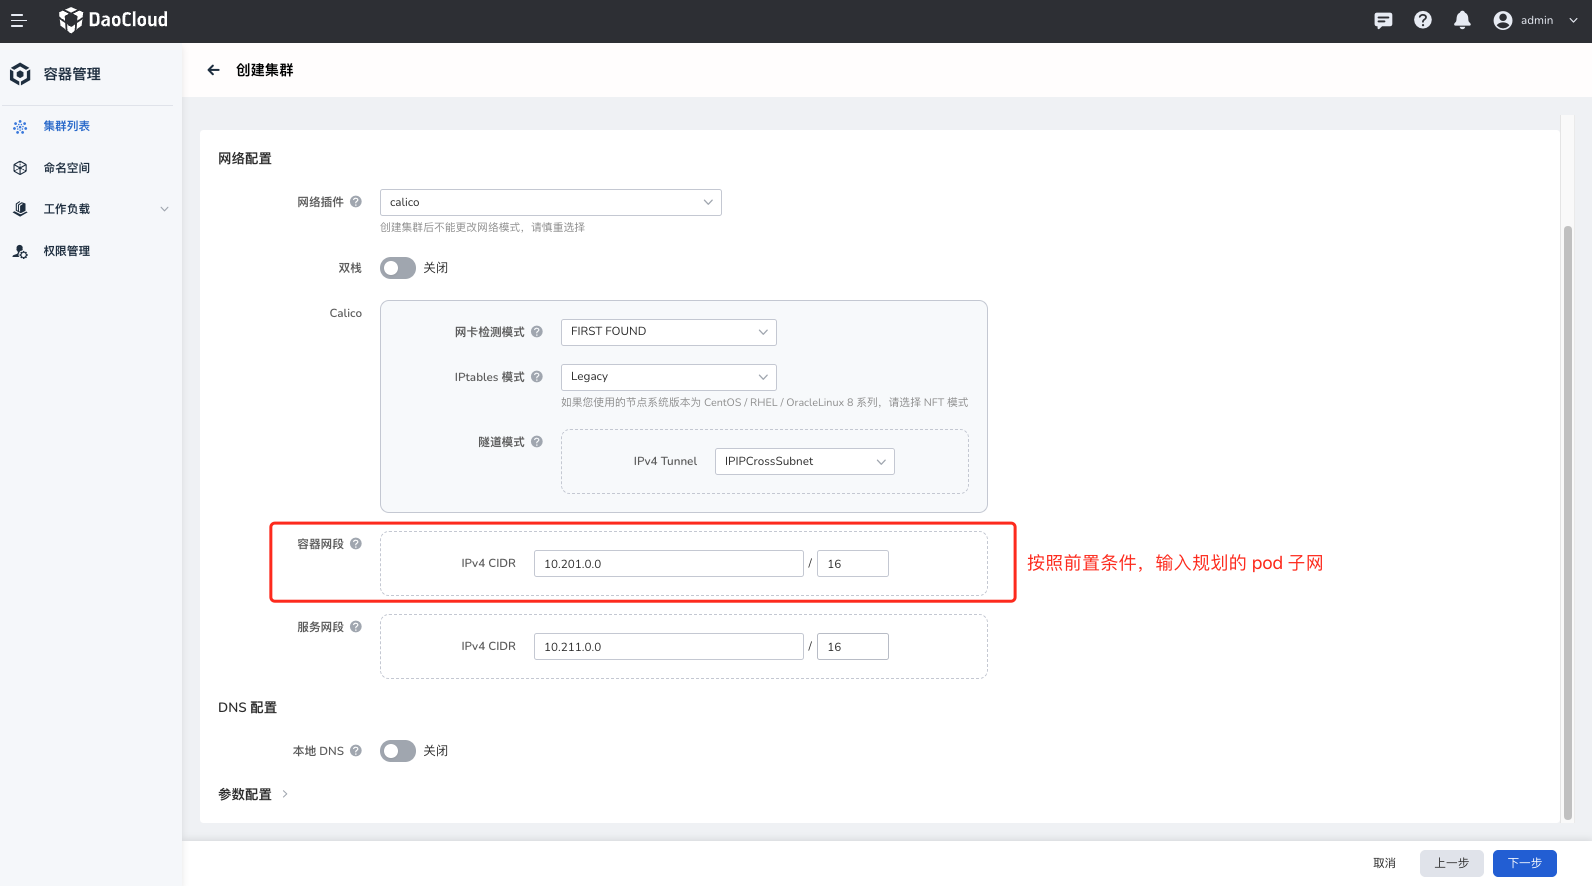
| mdemo-cluster1 | Standard k8s | "10.201.0.0/16" | - | master: region1/zone1/subzone1 | 1.25 | 10.64.30.130 |
| mdemo-cluster2 | Standard k8s | "10.202.0.0/16" | - | master: region1/zone2/subzone2 | 1.25 | 10.6.230.5 |
| mdemo-cluster3 | Standard k8s | "10.100.0.0/16" | - | master: region1/zone3/subzone3 | 1.25 | 10.64.30.131 |
Mesh Planning
| ConfigMap | Value |
|---|---|
| Mesh ID | mdemo-mesh |
| Mesh Mode | Managed Mode |
| Network Mode | Multi-Network Mode (Requires East-West Gateway Installation and Network ID Planning) |
| Mesh Version | 1.15.3-mspider |
| Hosted Cluster | mdemo-cluster1 |
| Work Clusters | mdemo-cluster1, mdemo-cluster2, mdemo-cluster3 |
Network Planning
Based on the information provided in the previous form, there is no network connectivity between clusters. Therefore, the mesh is in multi-network mode, and the following configurations need to be planned:
| Cluster Name | Cluster Mesh Role | Cluster Network Identifier (Network ID) | Hosted-Istiod LB IP | East-West LB IP | Ingress LB IP |
|---|---|---|---|---|---|
| mdemo-cluster1 | Hosted Cluster, Work Cluster | network-c1 | 10.64.30.71 | 10.64.30.73 | 10.64.30.72 |
| mdemo-cluster2 | Work Cluster | network-c2 | - | 10.6.136.29 | - |
| mdemo-cluster3 | Work Cluster | network-c3 | - | 10.64.30.77 | - |
Intergrating Clusters and Component Preparation
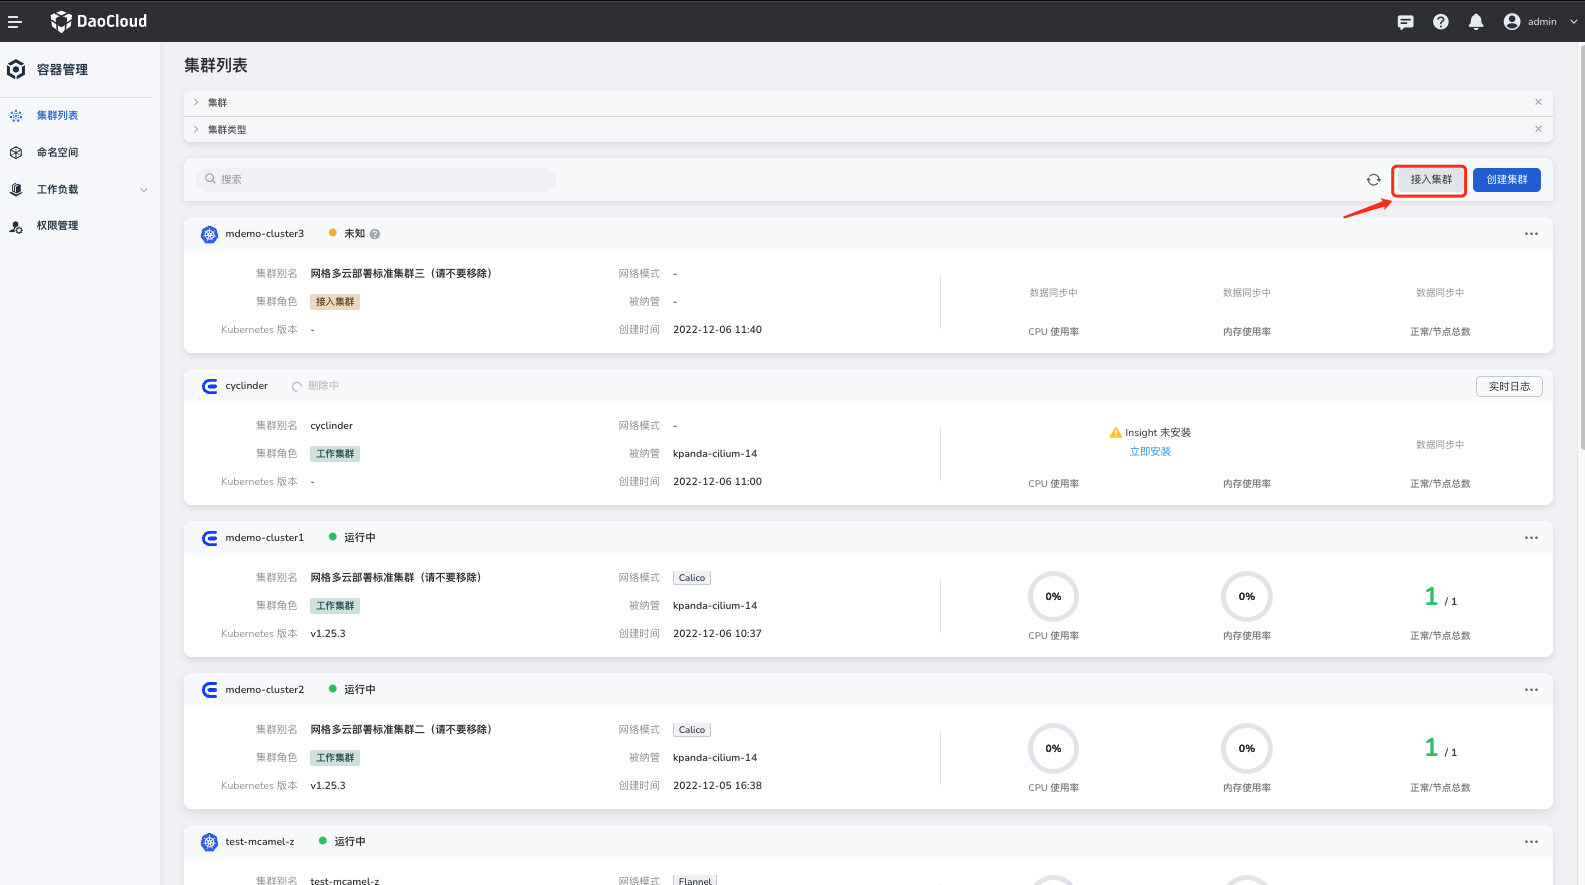
Users need to prepare clusters that meet the requirements. The clusters can be newly created (the cluster creation capability of the container management platform can be used), or they can be existing clusters.
However, all clusters required for the subsequent mesh must be integrated into the container management platform.
Intergrating Clusters
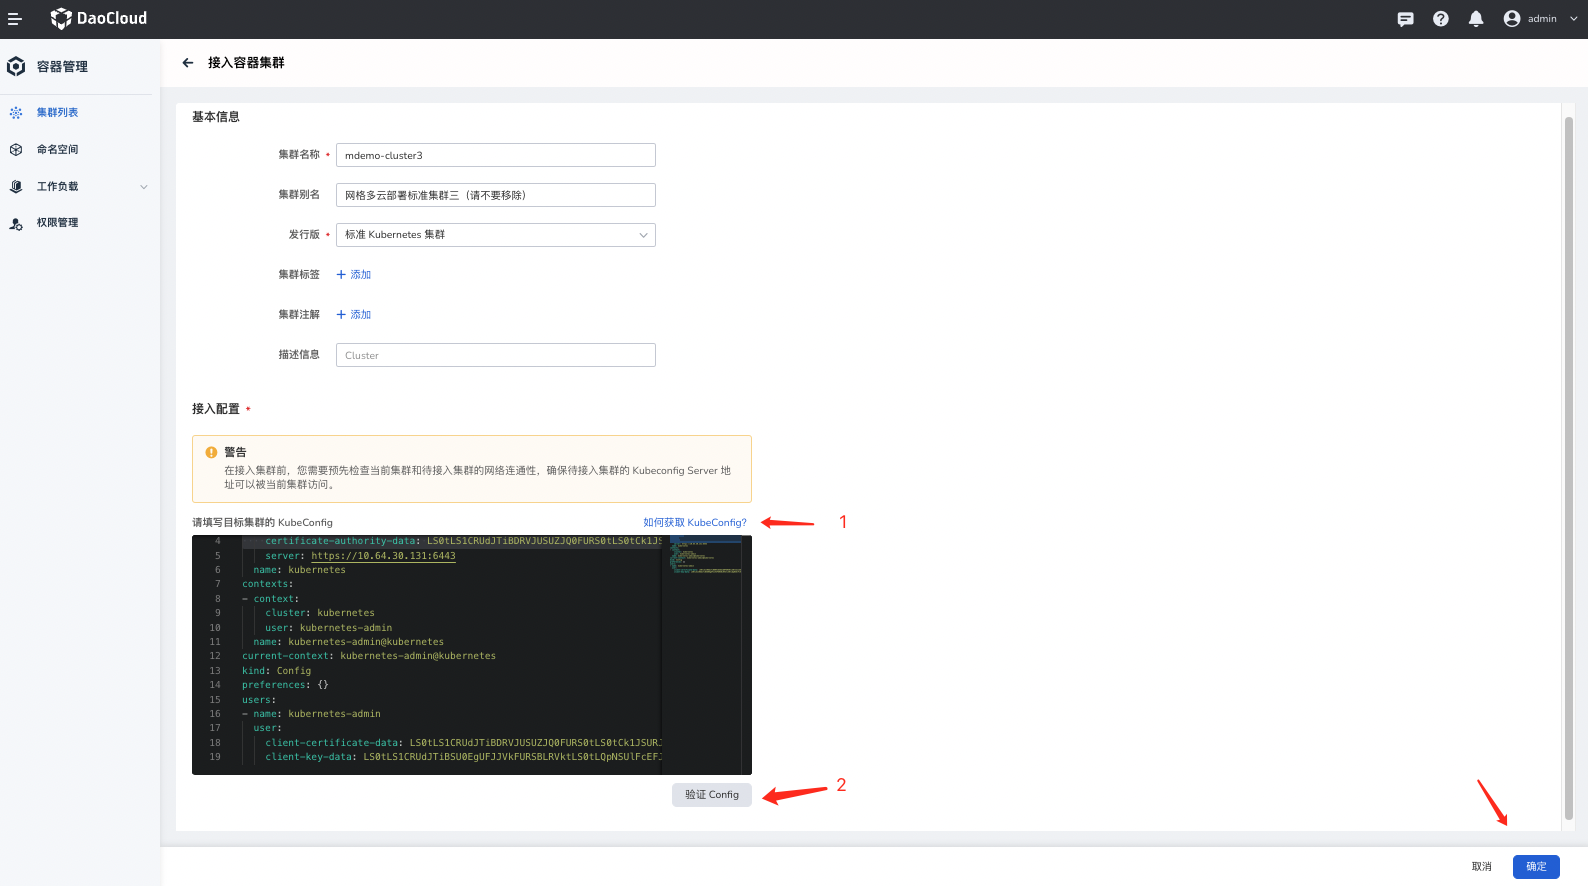
If the clusters were not created through the container management platform, such as existing clusters or clusters created using custom methods (e.g., kubeadm or Kind clusters), they need to be integrated into the container management platform.
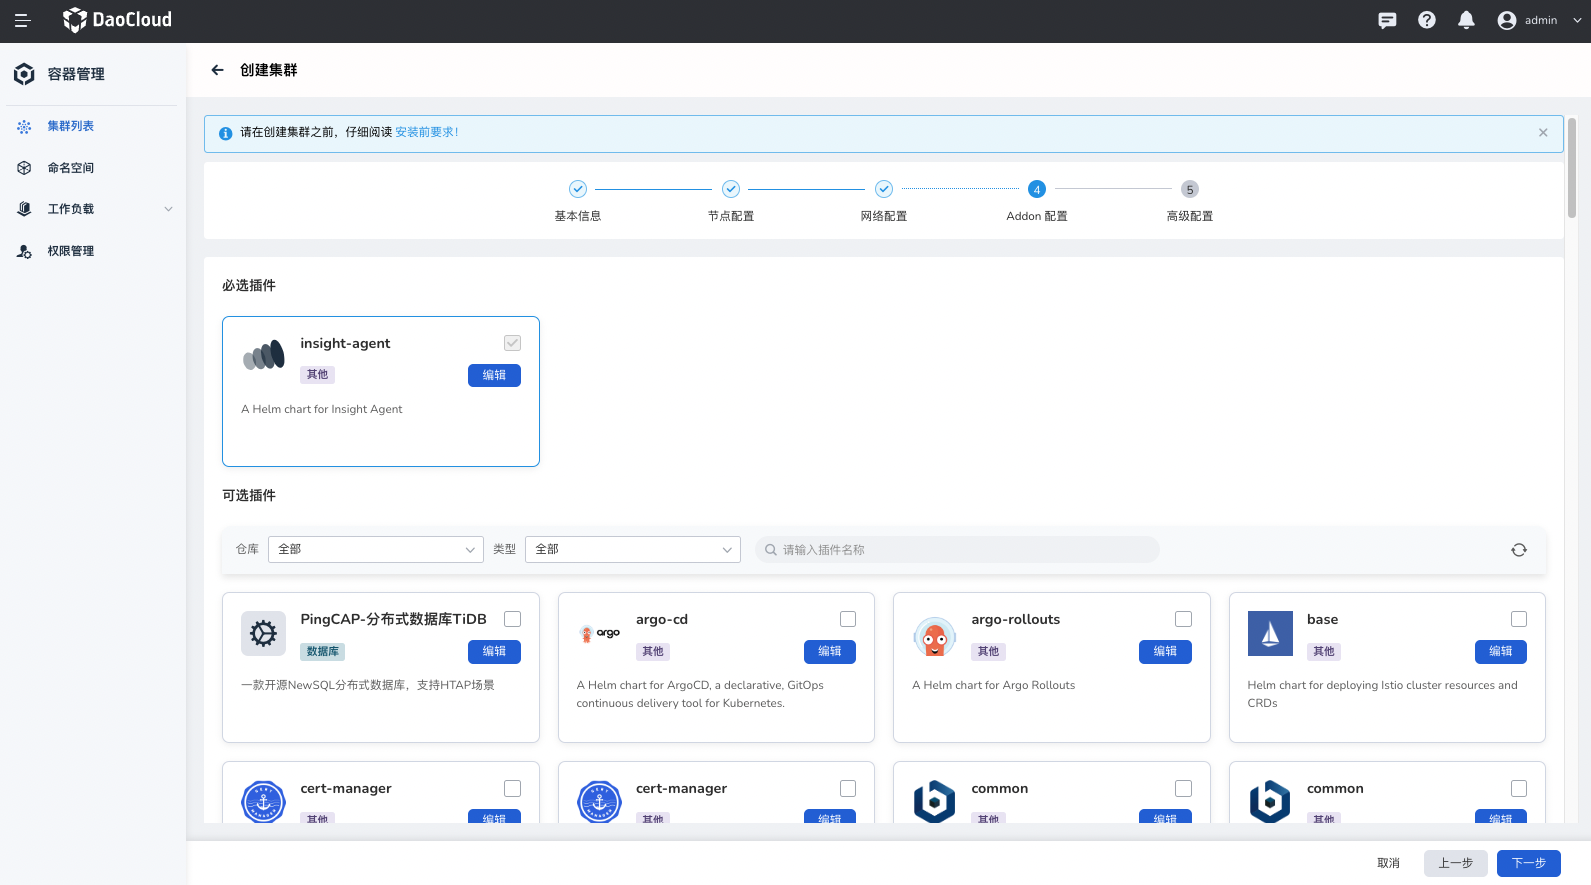
Confirming Observability Components (Optional)
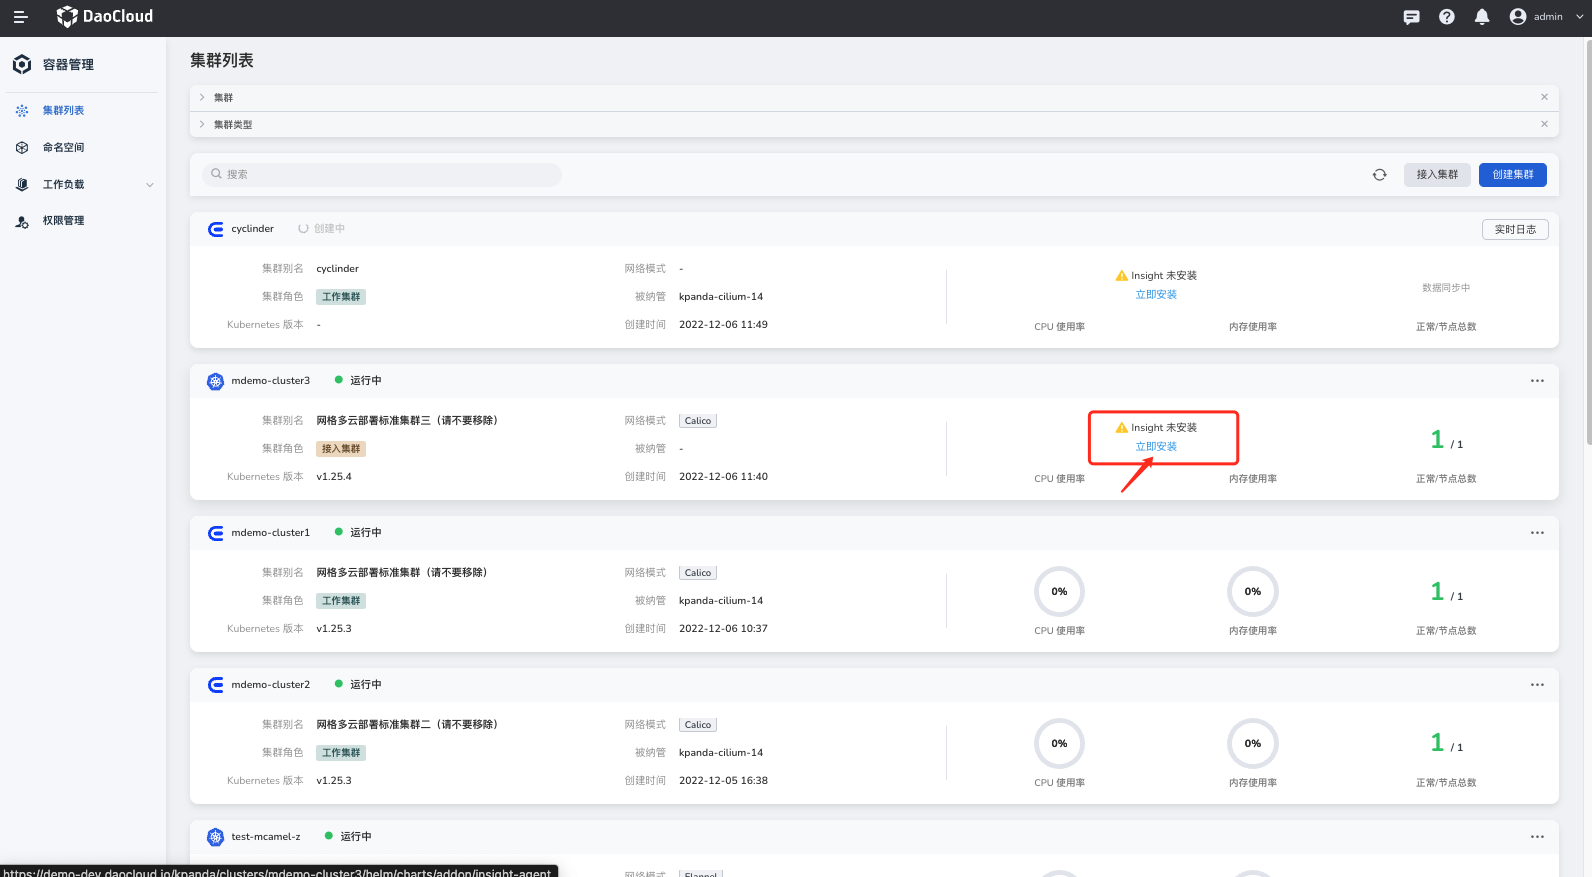
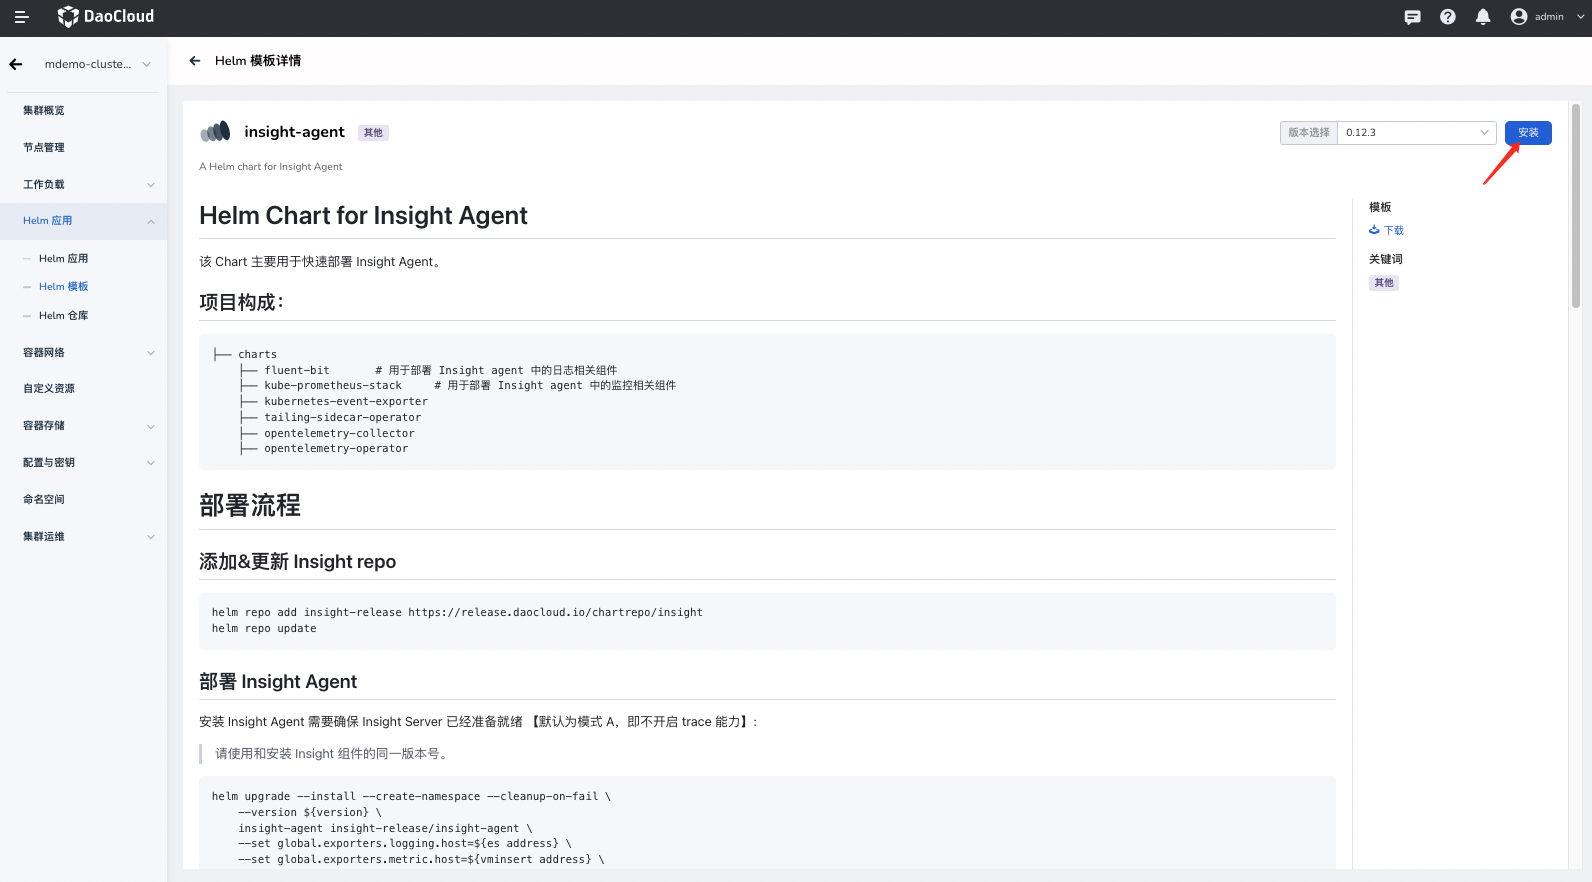
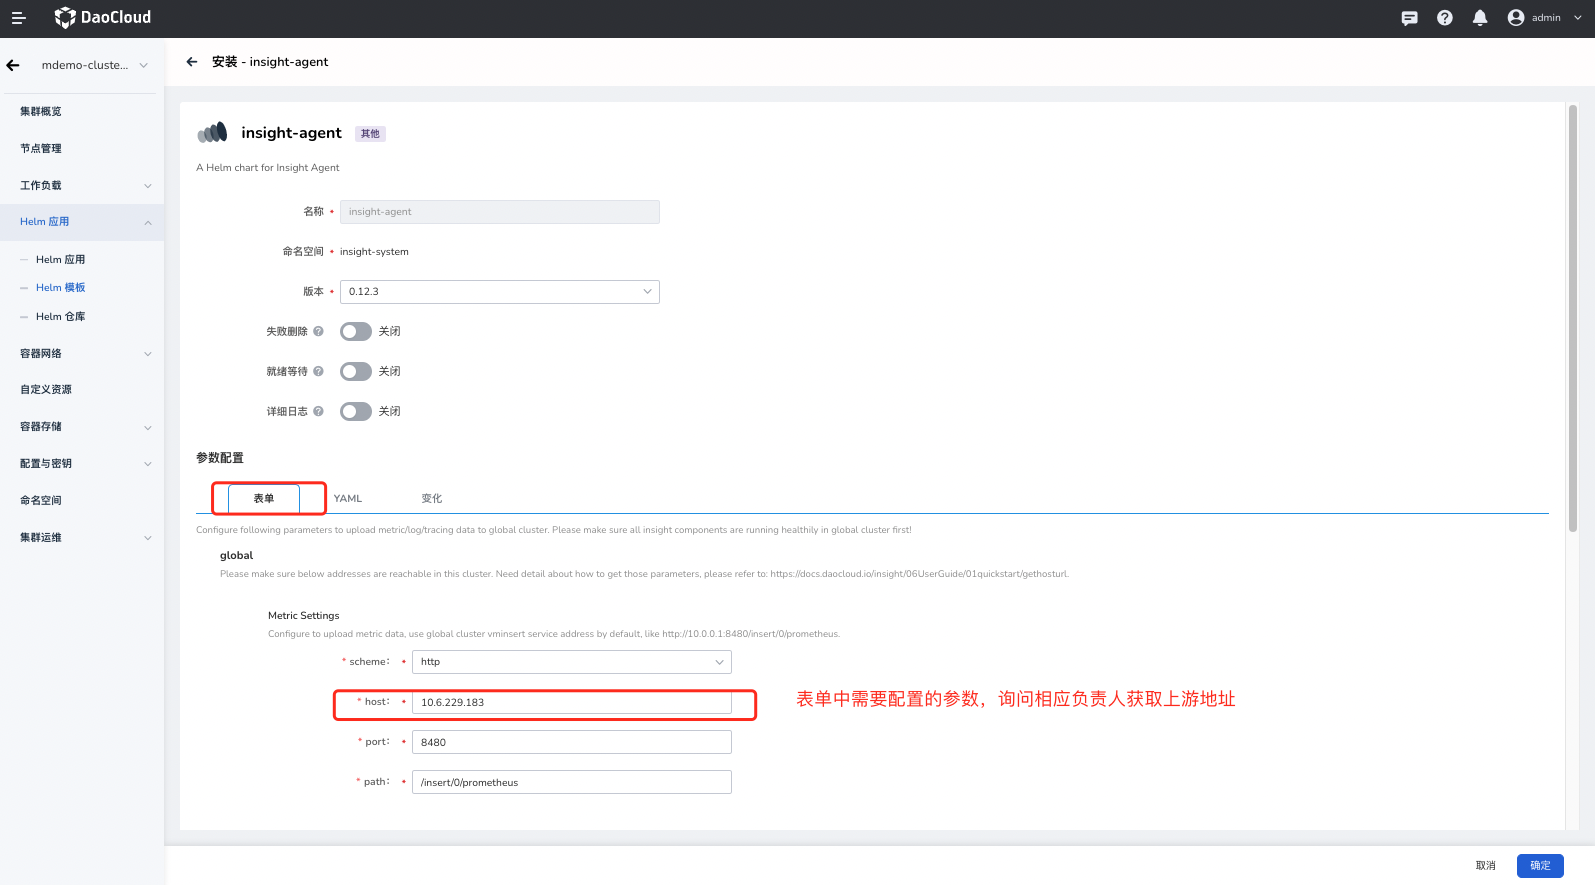
Observability is a key capability of the mesh, and one of the critical observability components is the Insight Agent. Therefore, if you want to have observability capabilities for the mesh, you need to install this component.
Clusters created through the container management platform will have the Insight Agent component installed by default.
For other methods, you need to go to the container management interface, find "Helm Apps" in your cluster, and select "insight-agent" to install.
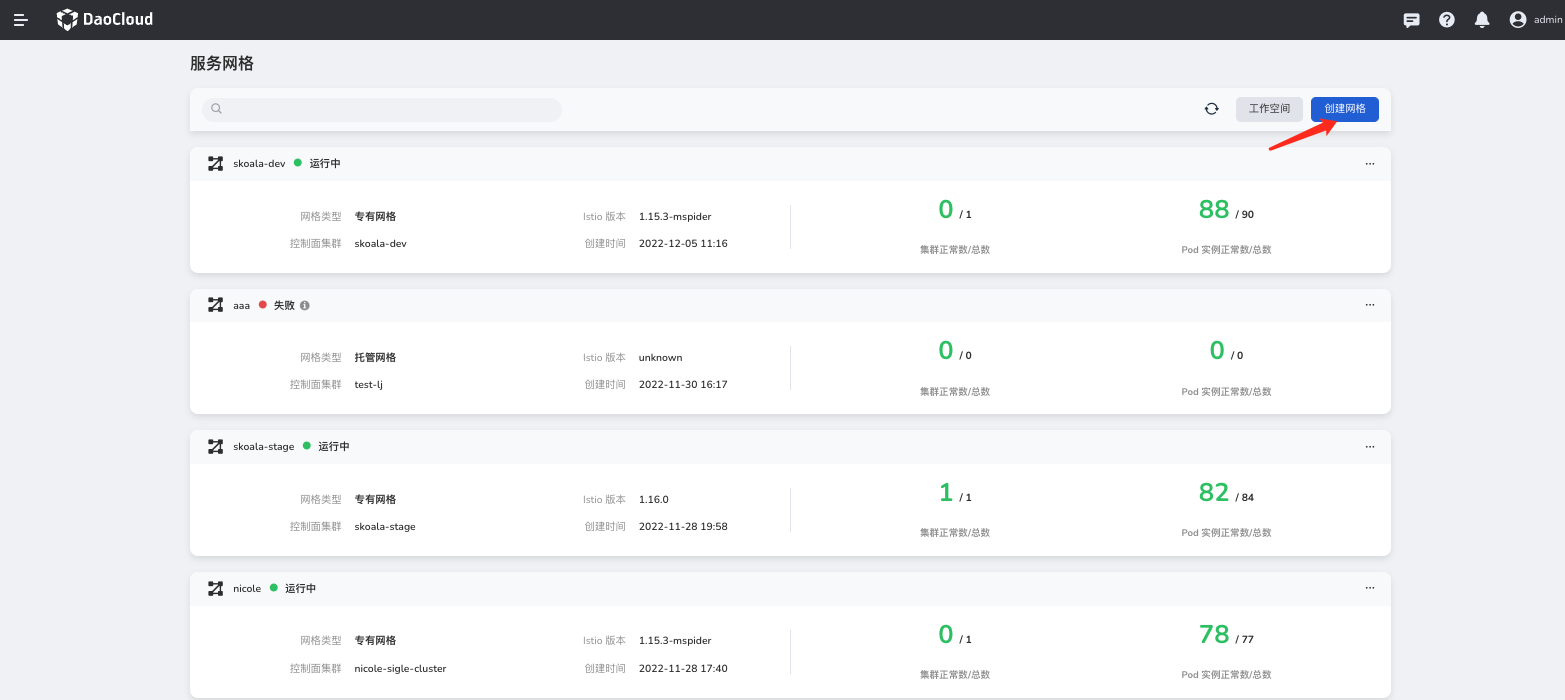
Mesh Deployment
Create a mesh using the service mesh and add the planned clusters to the corresponding mesh.
Create a Mesh
First, go to the mesh management page and click Create Mesh :
The specific parameters for creating a mesh are shown in the image:
- Select "Hosted Mesh" as the mesh mode. In a multicloud environment, only hosted mesh mode can manage multiple clusters.
- Enter a unique mesh name.
- Select a pre-selected mesh version that meets the prerequisites.
- Choose the cluster where the hosted control plane is located.
- Load Balancer IP: This parameter is required for exposing the control plane's Istiod. It needs to be prepared in advance.
- Container Registry: In a private cloud environment, you need to upload the required mesh images to a repository. For public clouds, it is recommended to use
release.daocloud.io/mspider.
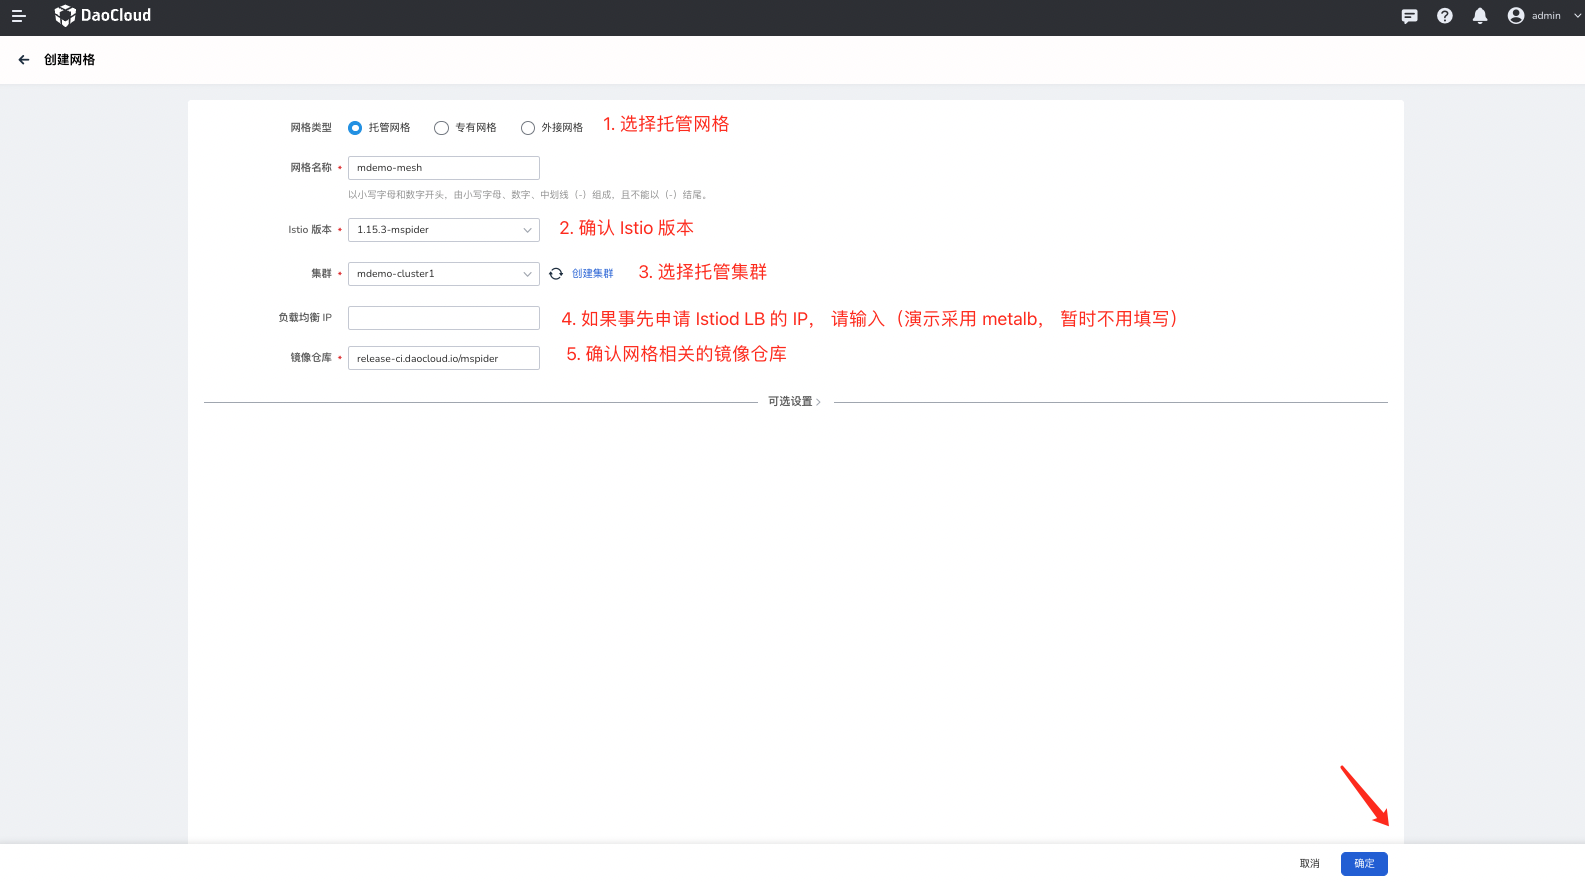
The mesh will be in the "Creating" state, and you need to wait for the creation to complete. The status will change from "Creating" to "Running."
Expose the Hosted Istiod of the Mesh Control Plane
Confirm the Hosted Mesh Control Plane Services
After ensuring that the mesh is in a normal state, check if the services under the istio-system namespace in the control plane cluster mdemo-cluster1 have successfully bound to LoadBalancer IPs.
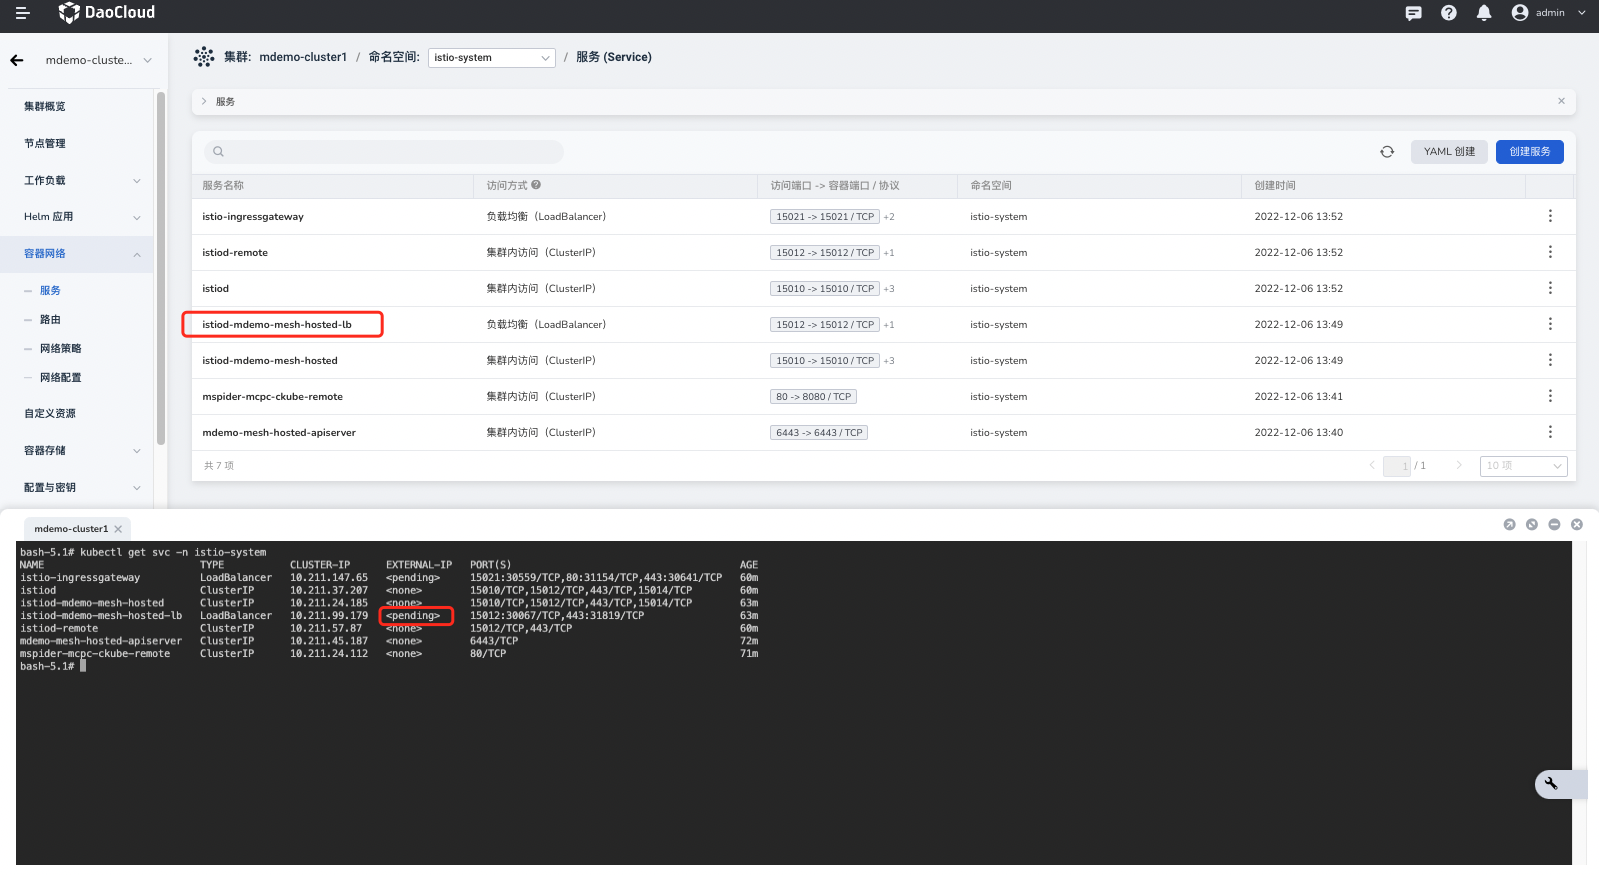
If the service istiod-mdemo-cluster-hosted-lb of the hosted mesh control plane does not have a LoadBalancer IP assigned, additional steps are required.
Allocate EXTERNAL IP
The method for requesting or allocating LoadBalancer IPs may differ in different environments, especially in public cloud environments. You need to create LoadBalancer IPs according to the methods provided by your public cloud provider.
In this demonstration, we use Metallb to allocate IP addresses to the corresponding LoadBalancer services. For deployment and configuration details, refer to the section on Installing and Configuring Metallb.
After deploying Metallb, check the Hosted Control Plane Services again.
Verify the Smoothness of the Hosted Control Plane Istiod's EXTERNAL IP
To verify the connectivity of the hosted control plane Istiod in a non-hosted cluster environment, you can use curl. If it returns a 400 error, it indicates that the network connection is successful:
Confirm and Configure the Hosted Control Plane Istiod Parameters
-
Obtain the EXTERNAL IP of the hosted control plane service
In the control plane cluster mdemo-cluster1 of the mesh mdemo-mesh , confirm that the hosted control plane service istiod-mdemo-mesh-hosted-lb has been assigned a LoadBalancer IP, and record its IP address. An example is shown below:
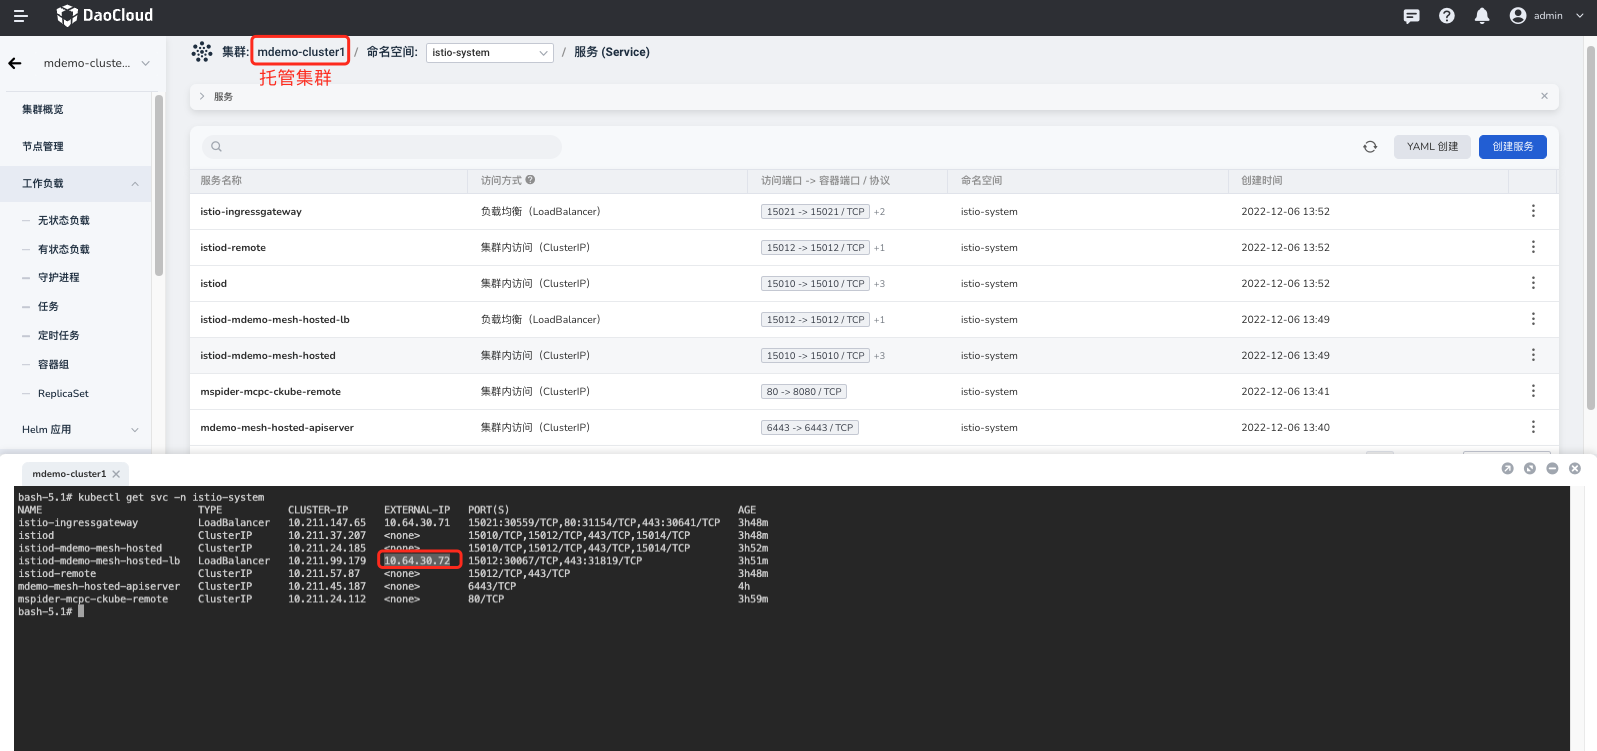
Confirm that the EXTERNAL-IP of the hosted control plane service istiod-mdemo-mesh-hosted-lb is
10.64.30.72. -
Manually configure the Istiod parameters for the hosted control plane
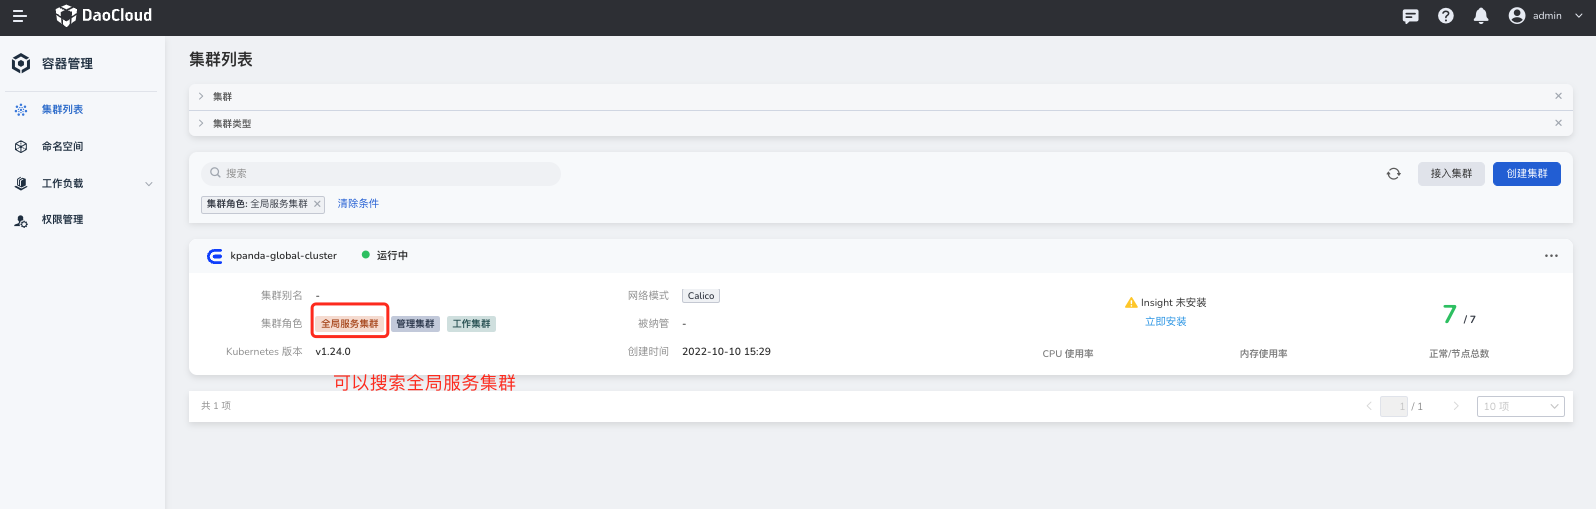
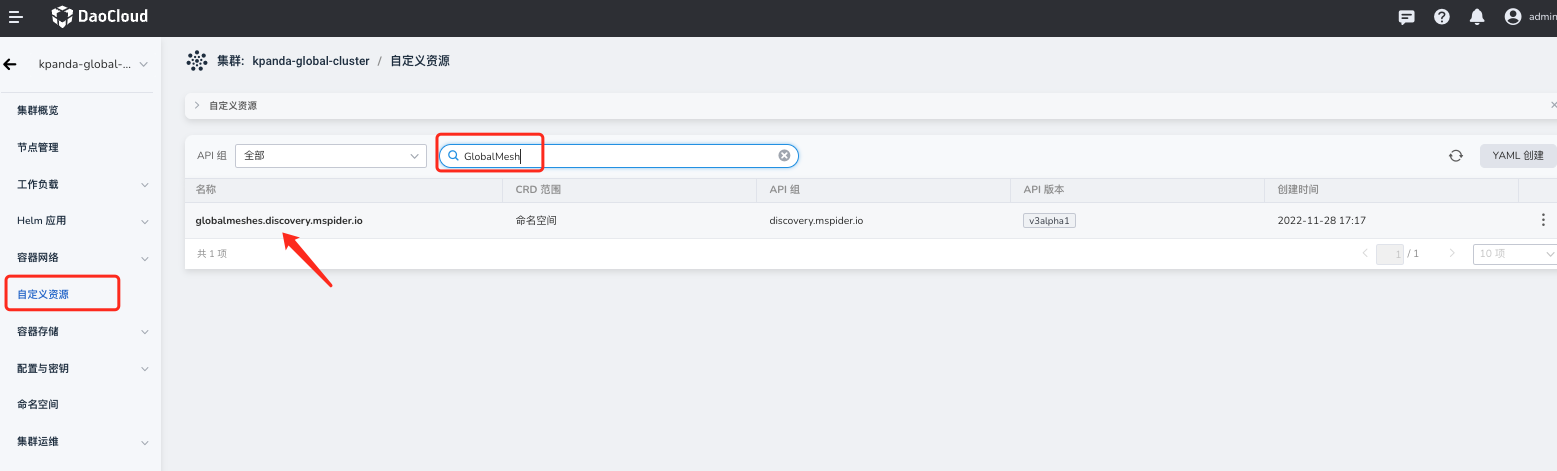
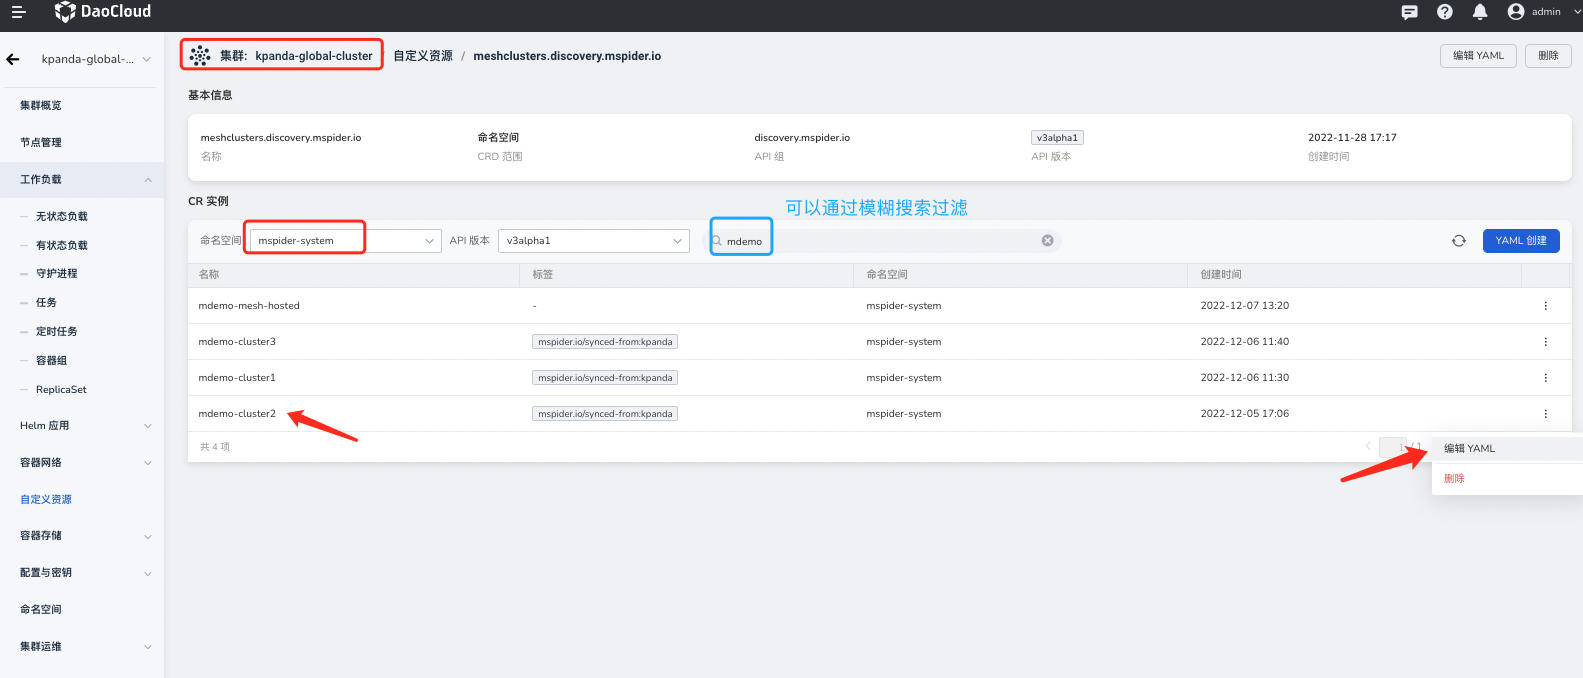
First, access the global control plane cluster kpanda-global-cluster in the container management platform (if you're unsure about the location of the relevant cluster, you can ask the responsible person or refer to Querying the Global Service Cluster).
- Search for the resource GlobalMesh in the Custom Resources module.
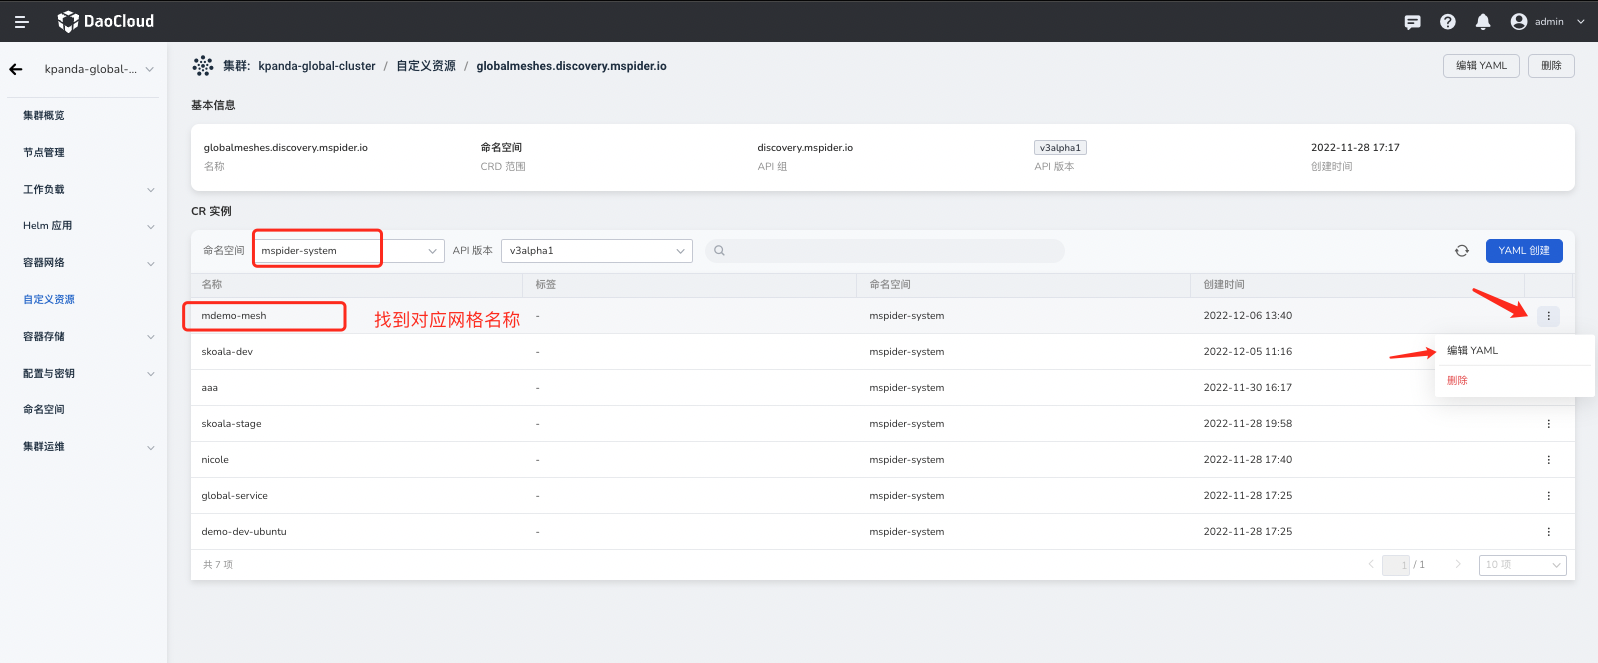
- Find the corresponding mesh mdemo-mesh in the mspider-system namespace.
-
Edit the YAML file.
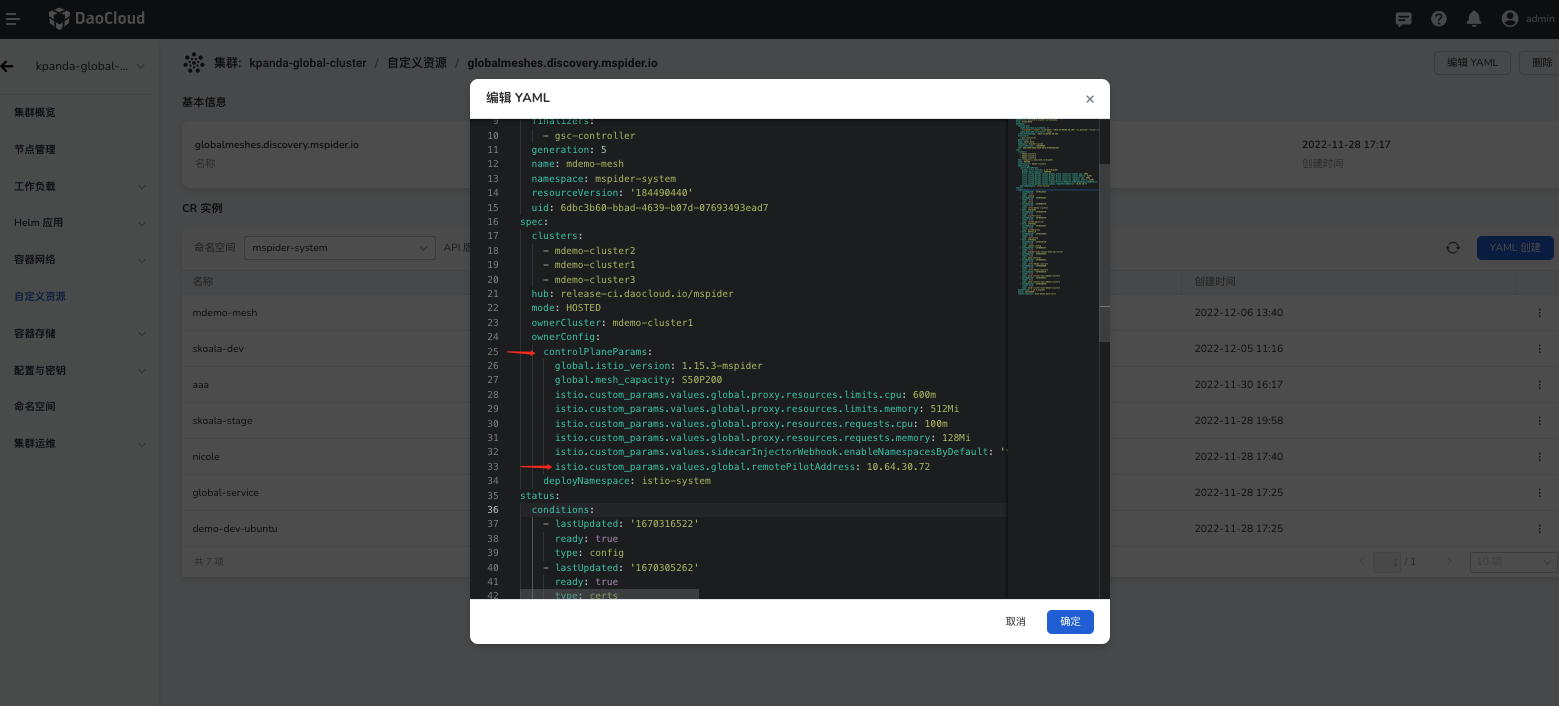
-
In the YAML file, add the parameter
istio.custom_params.values.global.remotePilotAddressunder the field.spec.ownerConfig.controlPlaneParams. - Set its value to the EXTERNAL-IP address of istiod-mdemo-mesh-hosted-lb recorded earlier:
10.64.30.72.
Add the Work Cluster
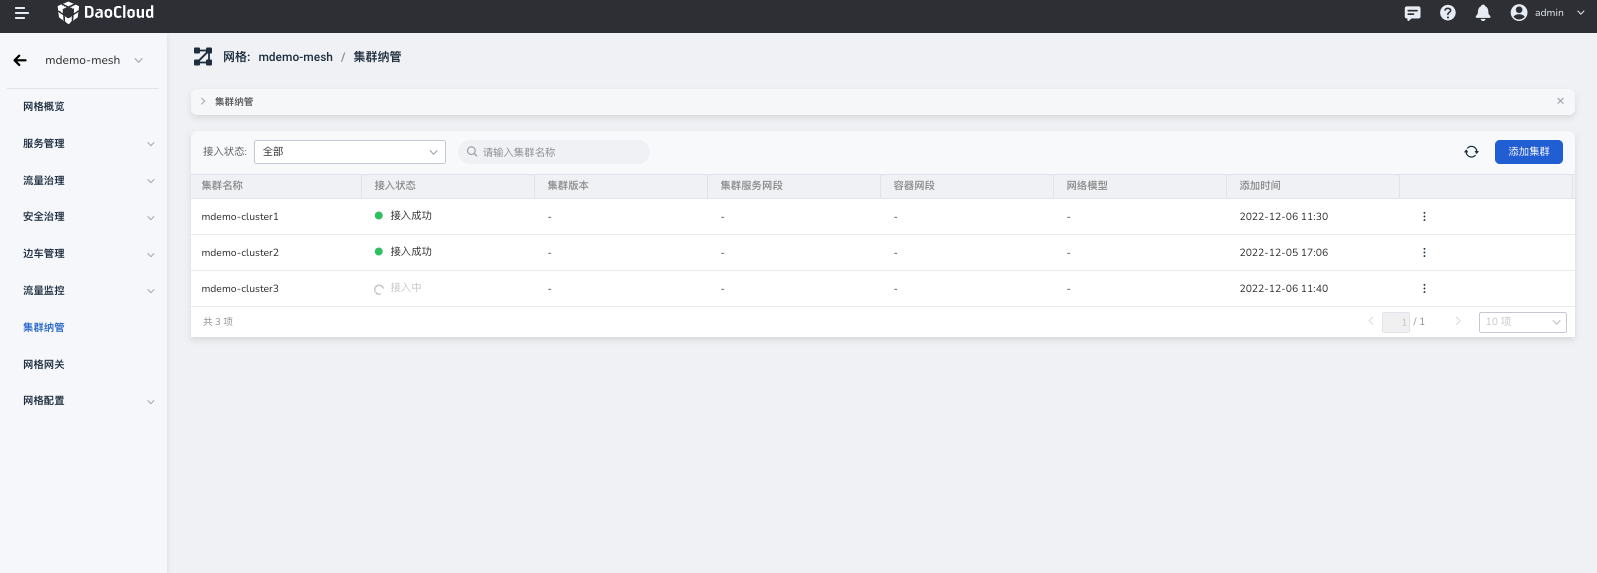
Add a cluster to the service mesh through the graphical interface.
-
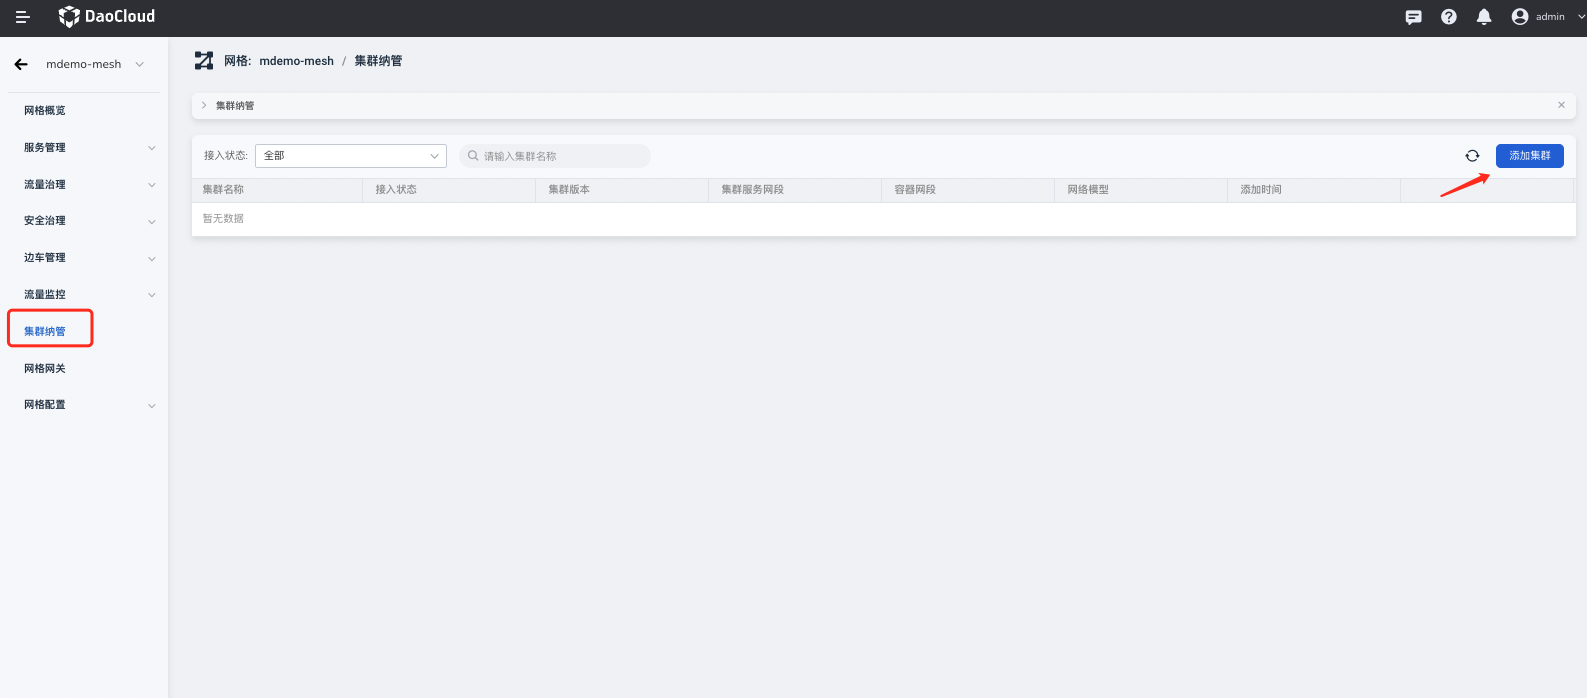
After the control plane of the mesh is successfully created, select the corresponding mesh and go to the mesh management page -> Cluster Management -> Add Cluster :
-
Select the desired work cluster and wait for the installation of mesh components in the cluster to complete.
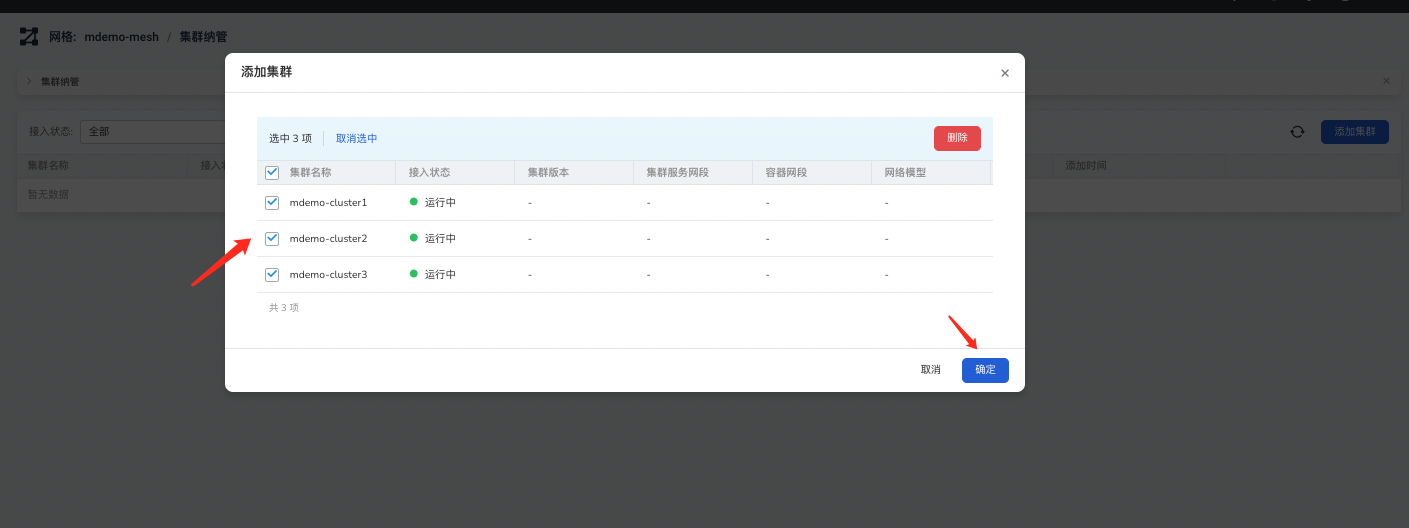
-
During the integration process, the cluster status will change from "Connecting" to "Connected":
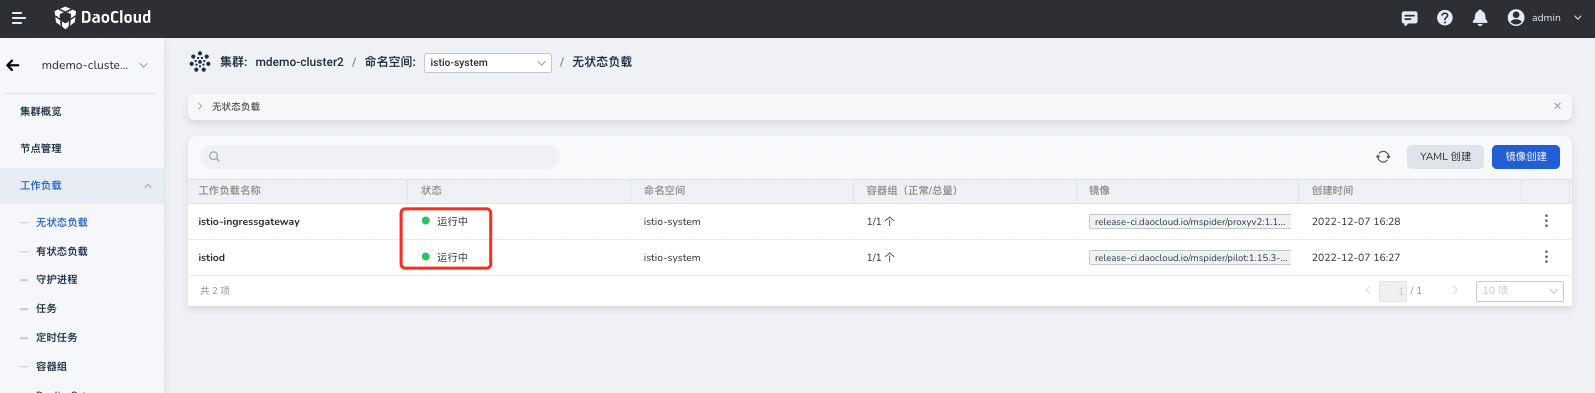
Check if the MultiCloud Control Plane is Working Properly
Since the current work cluster has a different network than the control plane cluster pods, you need to expose the Istiod of the control plane to the public network as described in the Expose the Hosted Istiod section above.
To verify if the Istio-related components in the work cluster are running properly, check if the istio-ingressgateway in the istio-system namespace of the work cluster is functioning correctly:
Installation and Configuration of Mesh Components for Different Network Modes
This section is divided into two parts:
- Configuring the "Network ID" for all work clusters
- Installing the East-West Gateway in clusters with non-interconnected networks
Let's first address the question: Why do we need to install an East-West Gateway? Since the Pod networks between work clusters cannot directly communicate, there can be network issues when services communicate across clusters. Istio provides a solution called the East-West Gateway. When the target service is in a different network, its traffic will be forwarded to the East-West Gateway of the target cluster, which will then route the request to the actual target service.
Now that we understand the principle of the East-West Gateway mentioned above, another question arises: How does Istio differentiate services in different networks? Istio requires users to define the "Network ID" explicitly when installing Istio in each work cluster, which is why it is the first step.
Manually Configure the "Network ID" for Work Clusters
Due to the differences in work cluster networks, the "Network ID" needs to be manually configured for each work cluster. If the Pod networks between clusters can directly communicate in your environment, you can configure them with the same "Network ID".
Let's begin configuring the "Network ID" following these steps:
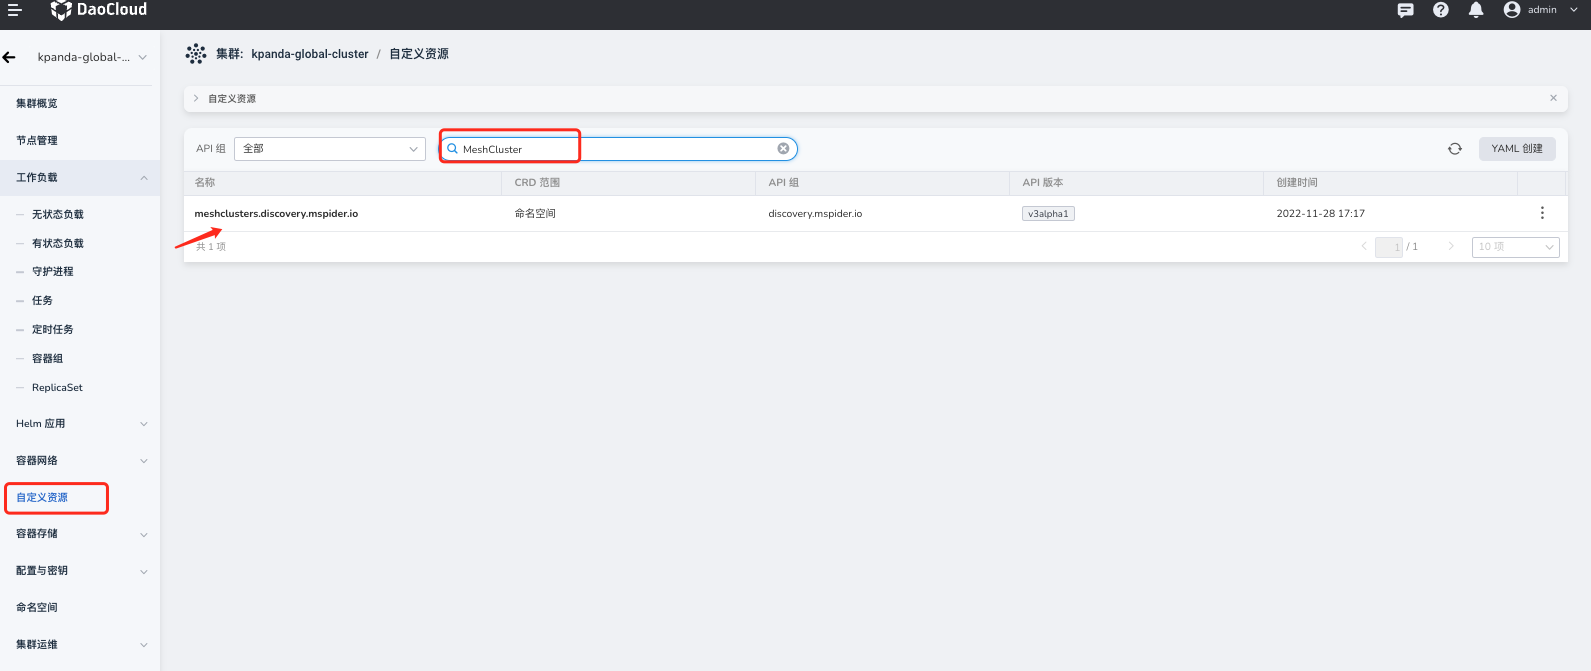
- First, access the global control plane cluster kpanda-global-cluster (if you're unsure about the location of the relevant cluster, you can ask the responsible person or refer to Querying the Global Service Cluster).
- In the Custom Resources module, search for the resource MeshCluster .
- Find the work clusters that have been added to the mesh under the mspider-system namespace. For this example, the work clusters are: mdemo-cluster2 and mdemo-cluster3 .
-
Take mdemo-cluster2 as an example and edit the YAML file.
- Find the field
.spec.meshedParams[].paramsin the YAML and add the "Network ID" field to the parameter list. - Notes for the parameter list:
- Confirm that global.meshID: mdemo-mesh represents the same mesh ID.
- Confirm that the cluster role
global.clusterRole: HOSTED_WORKLOAD_CLUSTERrepresents a work cluster.
- Add the parameter
istio.custom_params.values.global.networkwith the value of the Network ID from the initial planning form: network-c2
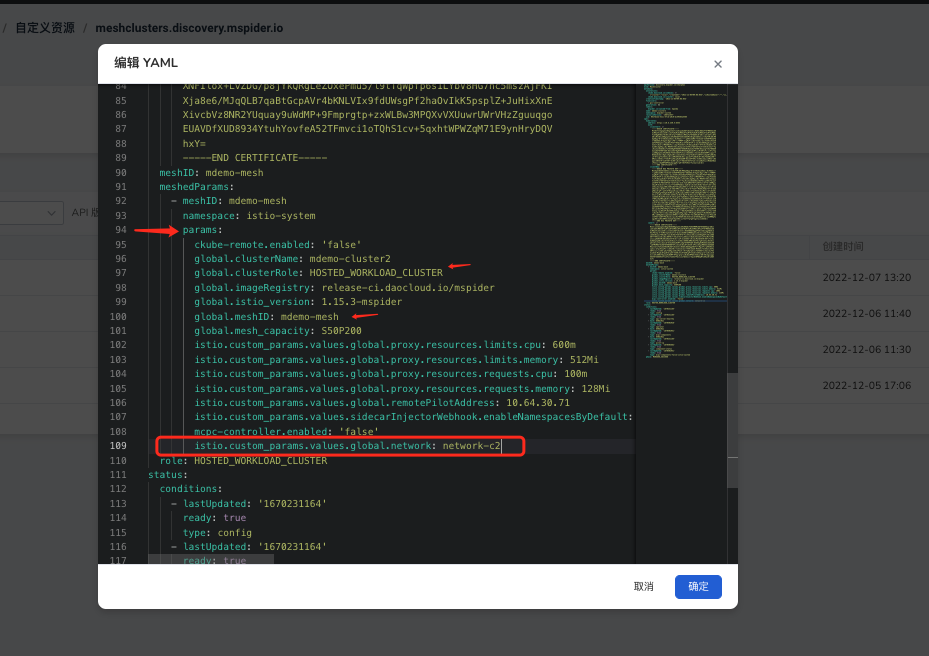
- Find the field
Repeat the above steps for all work clusters ( mdemo-cluster1 , mdemo-cluster2 , mdemo-cluster3 ) by adding the "Network ID".
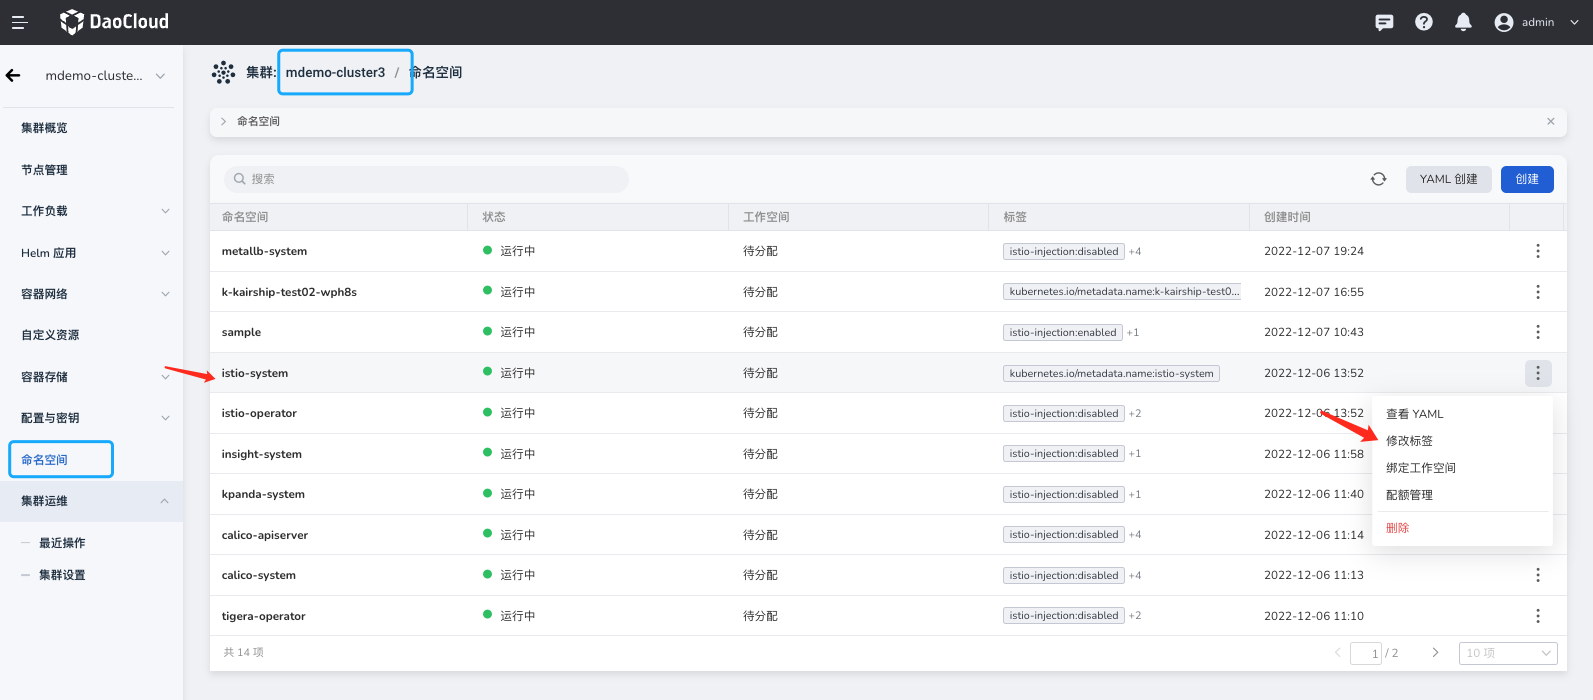
Identify the "Network ID" for the istio-system in Work Clusters
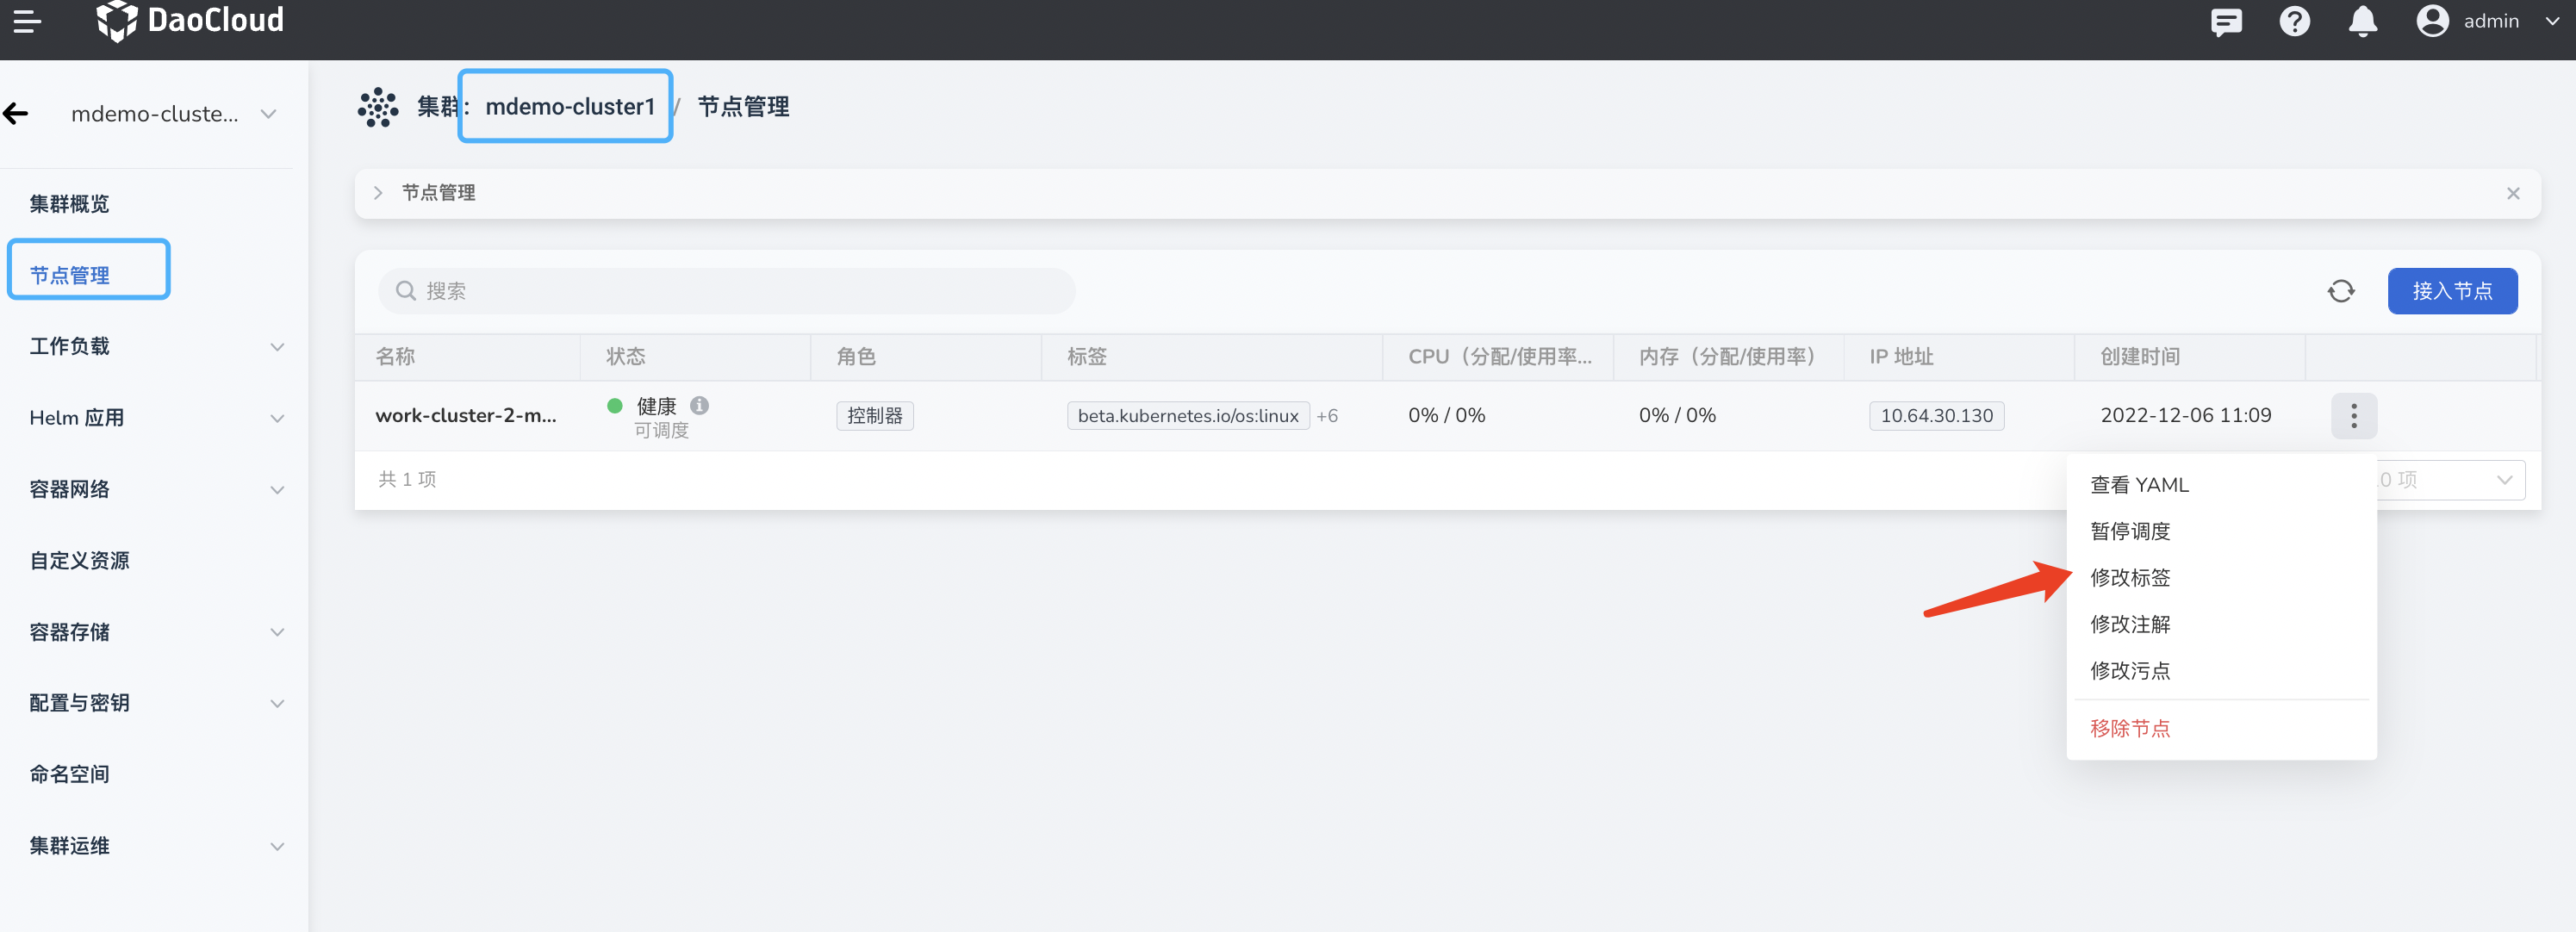
In the container management platform, go to the corresponding work cluster namespaces ( mdemo-cluster1 , mdemo-cluster2 , mdemo-cluster3 ) and add a label to identify the network.
- Label Key:
topology.istio.io/network - Label Value: ${CLUSTER_NET}
Using mdemo-cluster3 as an example, locate the Namespace and select istio-system for editing the labels.

Manually Install the East-West Gateway
Create Gateway Instance
After confirming that all Istio-related components in the work clusters are ready, you can proceed with installing the East-West Gateway.
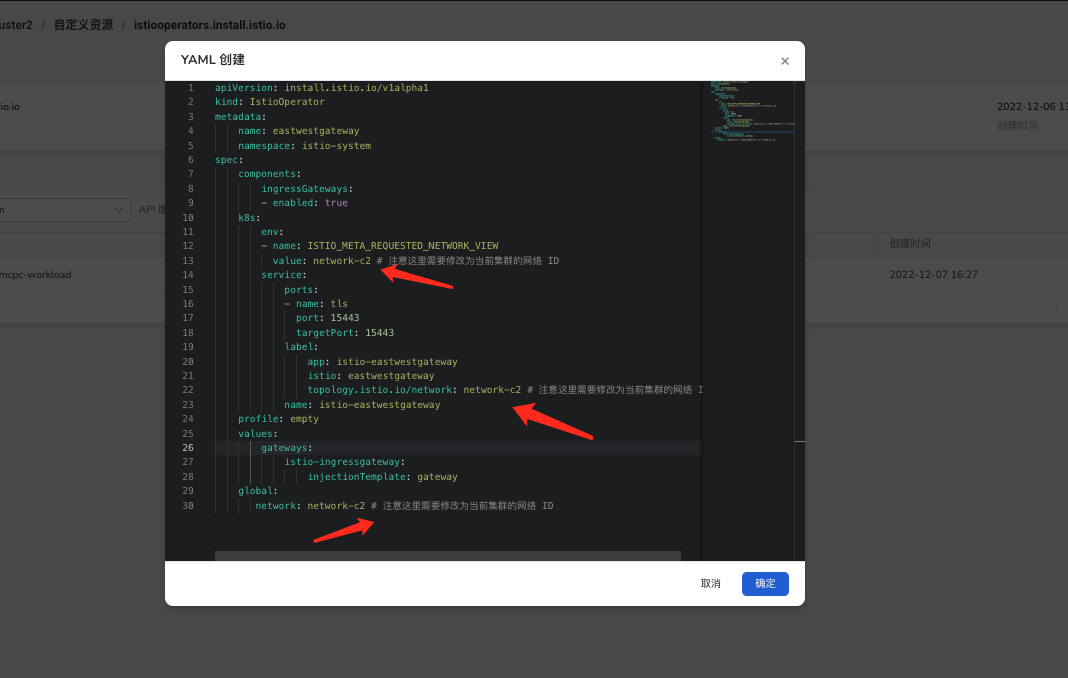
Install the East-West Gateway in the work cluster using the IstioOperator resource. The YAML for the East-West Gateway is as follows:
Note
Be sure to modify the parameters based on the "Network ID" of the current cluster.
The creation process is as follows:
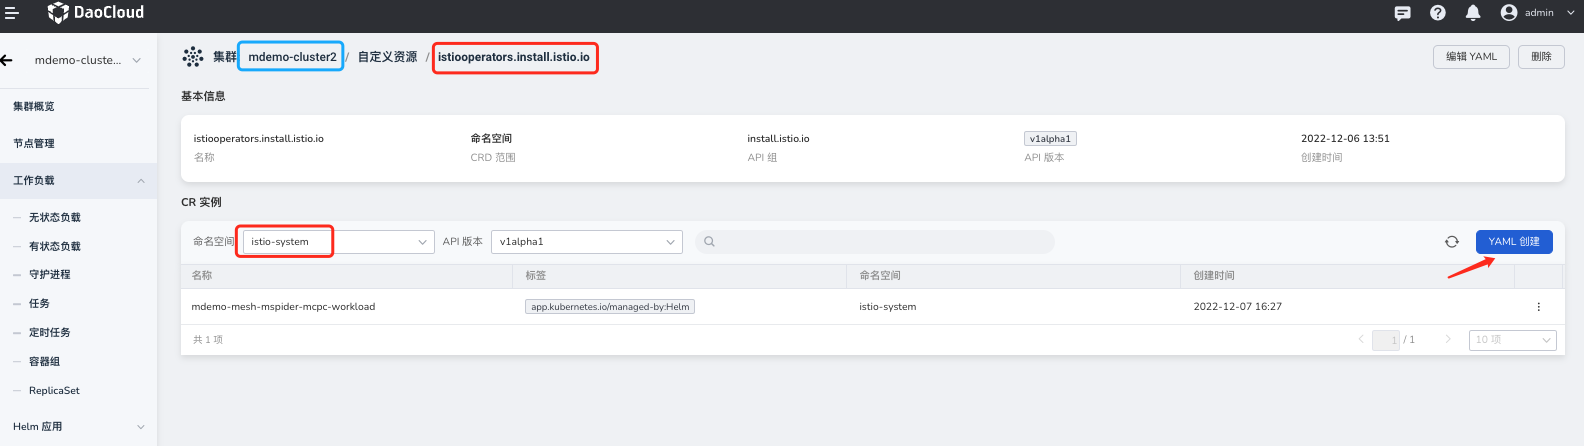
- Access the corresponding work cluster in the container management platform.
- Search for IstioOperator in the Custom Resources module.
- Select the istio-system namespace.
- Click Create YAML .
Create East-West Gateway Resource
Create a rule in the mesh's "Gateway Rules" to create the East-West Gateway:
apiVersion: networking.istio.io/v1beta1
kind: Gateway
metadata:
  name: cross-network-gateway
  namespace: istio-system
spec:
  selector:
    istio: eastwestgateway
  servers:
    - hosts:
        - "*.local"
      port:
        name: tls
        number: 15443
        protocol: TLS
      tls:
        mode: AUTO_PASSTHROUGH
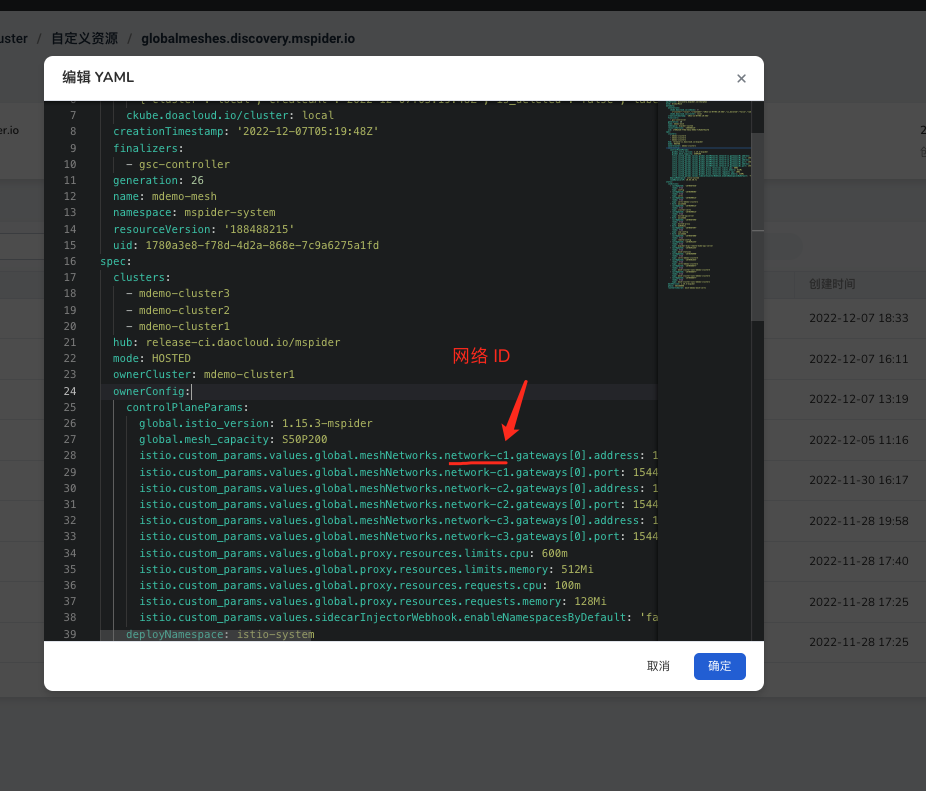
Configure Global Mesh Network Settings
After installing the East-West Gateway and configuring the gateway resolution rules, you need to declare the East-West Gateway configuration in all clusters.
-
Access the global control plane cluster kpanda-global-cluster in the container management platform (if unsure, ask the responsible person or refer to Querying the Global Service Cluster).
-
In the Custom Resources section, search for the resource GlobalMesh .
-
Find the corresponding mesh mdemo-mesh under the mspider-system namespace.
-
Edit the YAML file.
- Add a series of
istio.custom_params.values.global.meshNetworksparameters in the.spec.ownerConfig.controlPlaneParamsfield in the YAML.
- Add a series of
# These two lines are required
# Format: istio.custom_params.values.global.meshNetworks.${CLUSTER_NET_ID}.gateways[0].address
#         istio.custom_params.values.global.meshNetworks.${CLUSTER_NET_ID}.gateways[0].port

istio.custom_params.values.global.meshNetworks.network-c1.gateways[0].address: 10.64.30.73  # cluster1
istio.custom_params.values.global.meshNetworks.network-c1.gateways[0].port: '15443'  # cluster3 East-West Gateway port
istio.custom_params.values.global.meshNetworks.network-c2.gateways[0].address: 10.6.136.29  # cluster2
istio.custom_params.values.global.meshNetworks.network-c2.gateways[0].port: '15443'  # cluster2 East-West Gateway port
istio.custom_params.values.global.meshNetworks.network-c3.gateways[0].address: 10.64.30.77  # cluster3
istio.custom_params.values.global.meshNetworks.network-c3.gateways[0].port: '15443'  # cluster3 East-West Gateway port
Network Connectivity Demo Application and Verification
Deploying the Demo
The main applications are helloworld and sleep (these two demos are test applications provided by Istio).
Cluster Deployment Overview:
| Cluster | helloworld and Version | sleep |
|---|---|---|
| mdemo-cluster1 |  VERSION=vc1 VERSION=vc1 | |
| mdemo-cluster1 | VERSION=vc2 | |
| mdemo-cluster1 | VERSION=vc3 | |
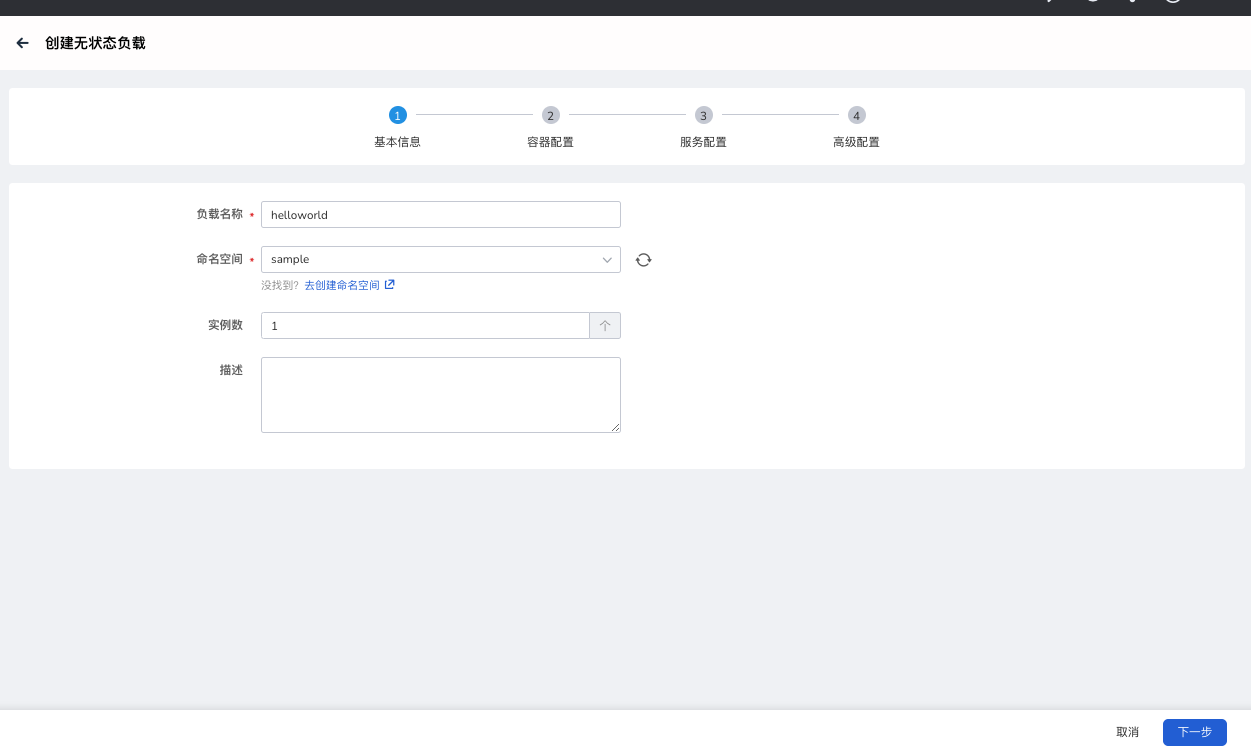
Deploying the Demo in the Container Management Platform
It is recommended to use the container management platform to create corresponding workloads and applications. Find the corresponding cluster in the container management platform and follow the steps below:
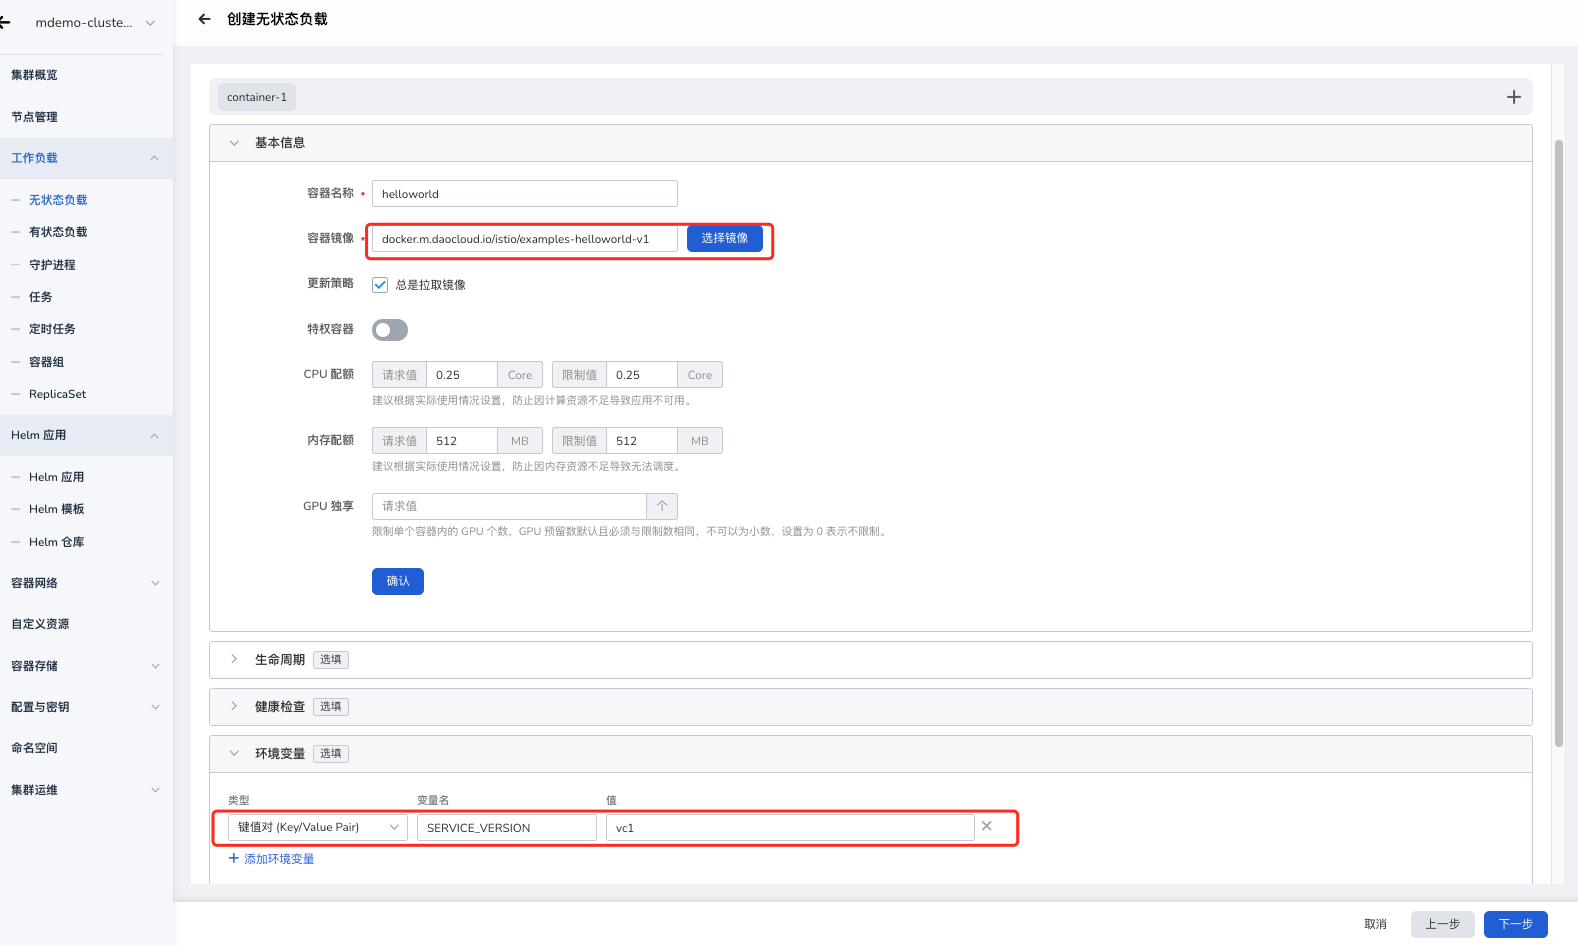
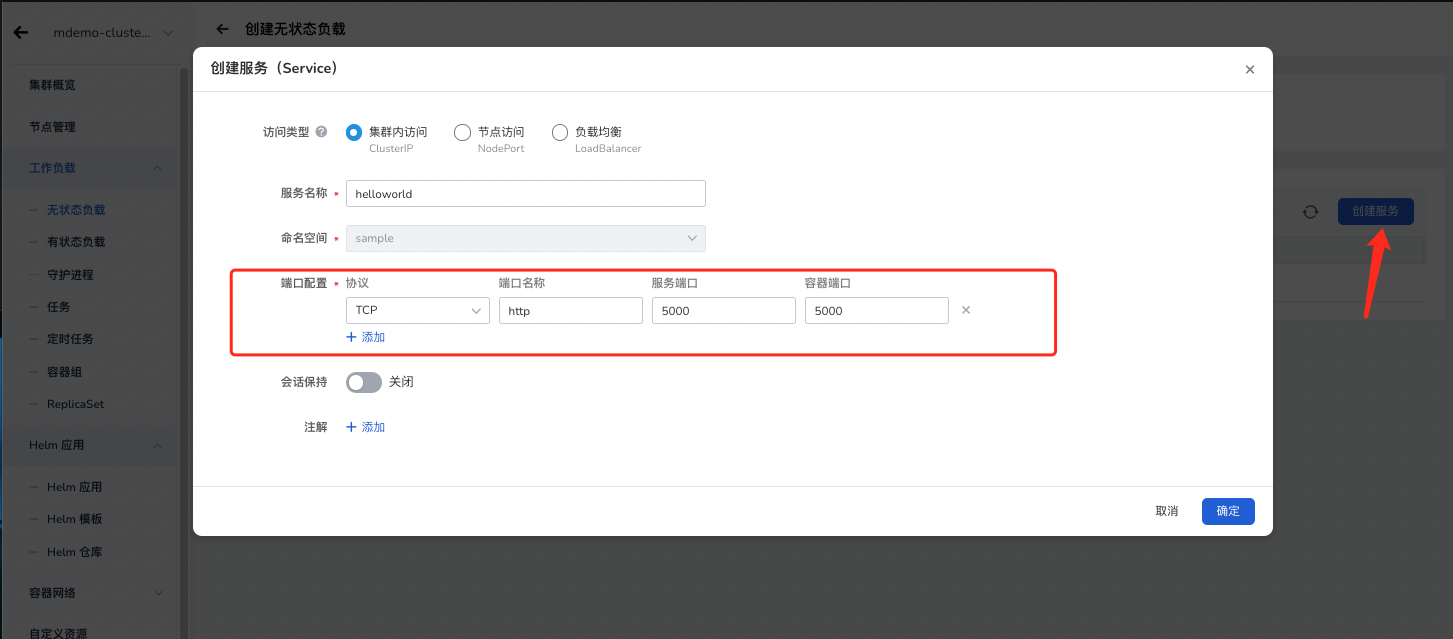
Using mdemo-cluster1 as an example, deploy helloworld with vc1 version:
Important points for each cluster:
-
Image addresses:
- helloworld: docker.m.daocloud.io/istio/examples-helloworld-v1
- Sleep: curlimages/curl
-
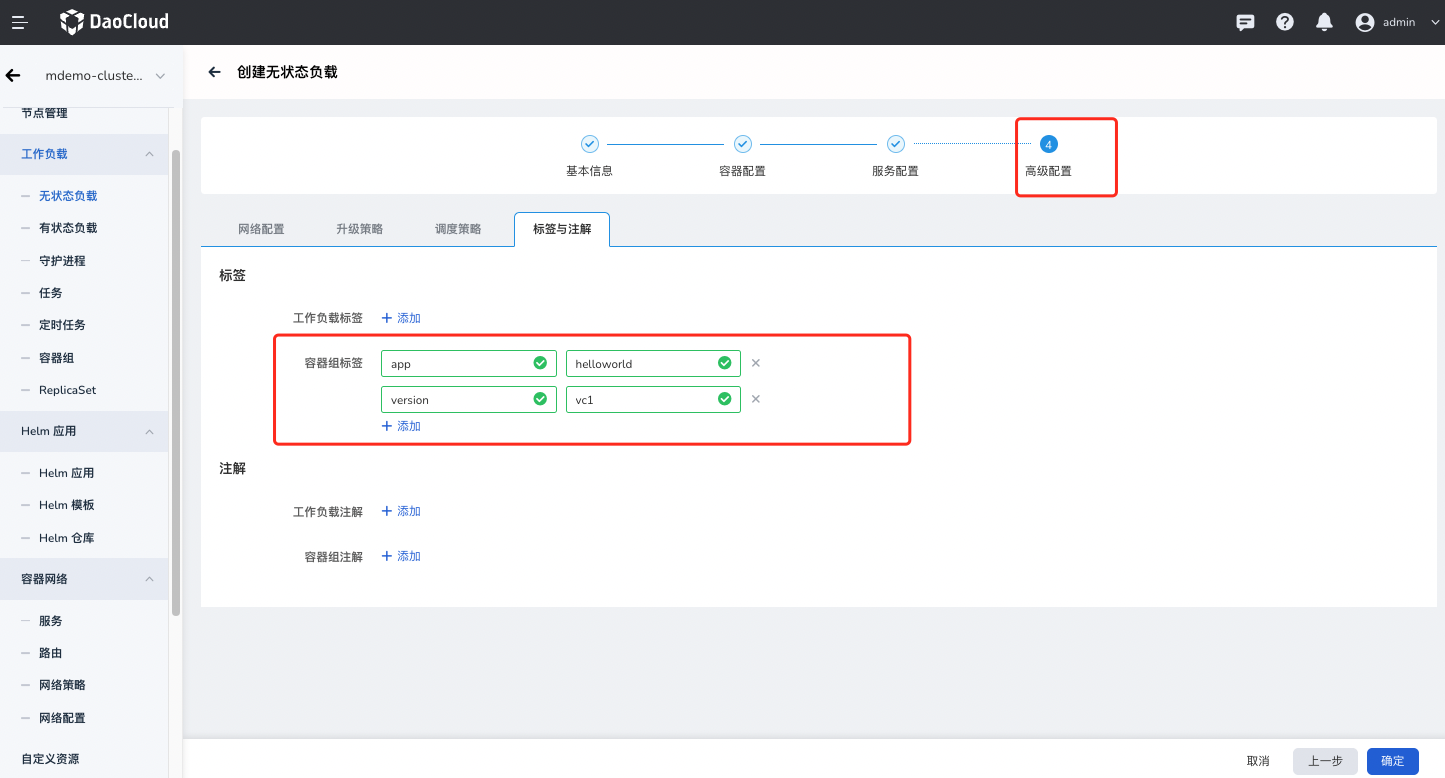
Add the following labels to the helloworld workload:
- app: helloworld
- version: ${VERSION}
-
Add the corresponding version environment variable to the helloworld workload:
- SERVICE_VERSION: ${VERSION}
Deploying the Demo via Command Line
During the deployment process, you will need the following configuration files:
Verifying the Demo Cluster Network
Expansion
Other Cluster Creation Methods
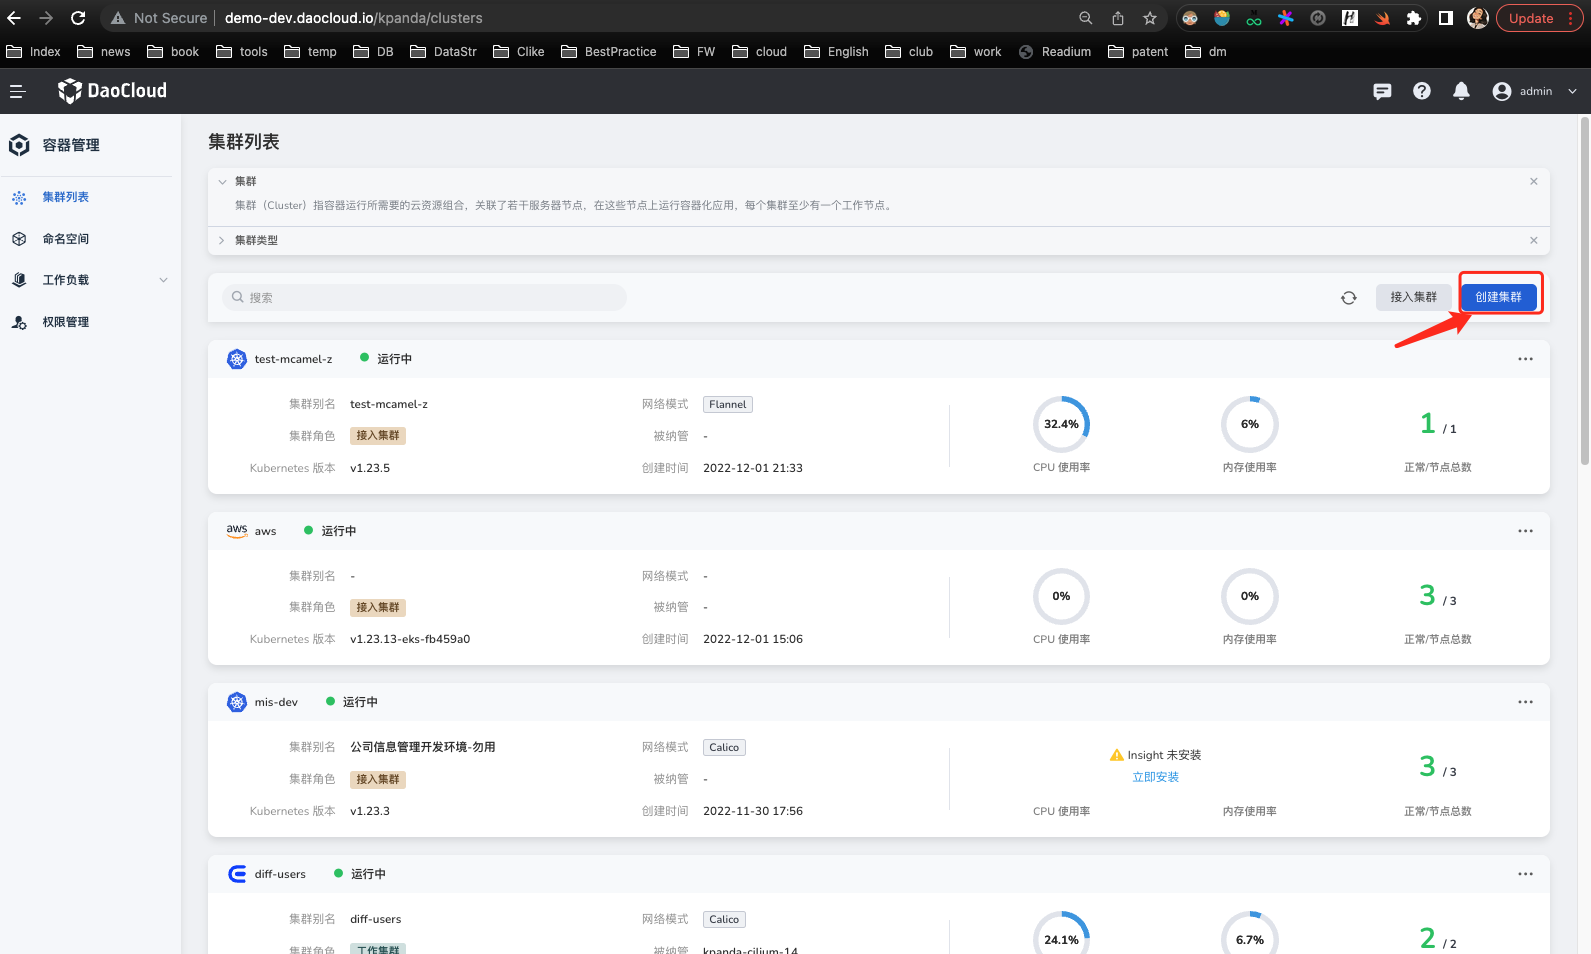
Creating Clusters via Container Management Platform
There are multiple ways to create clusters, and it is recommended to use the cluster creation feature in the container management platform. However, users have the flexibility to choose other methods. The alternative solutions provided in this document can be found in the Other Cluster Creation Methods section of the expansion chapter.
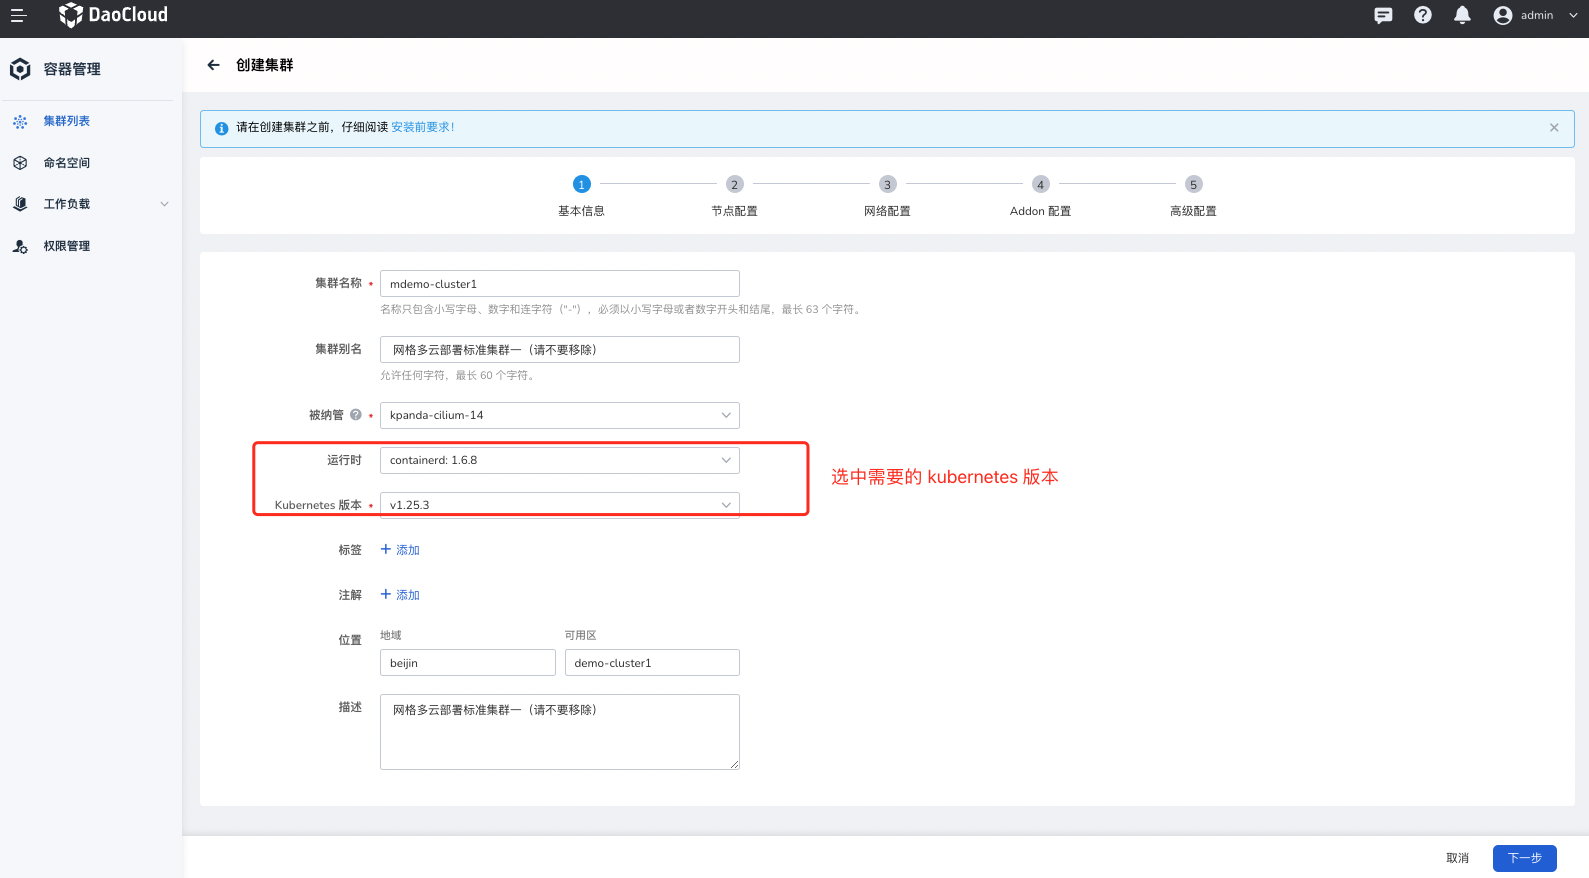
You can select additional components that need to be expanded for your cluster, and the observability capability of the mesh relies on Insight-agent.
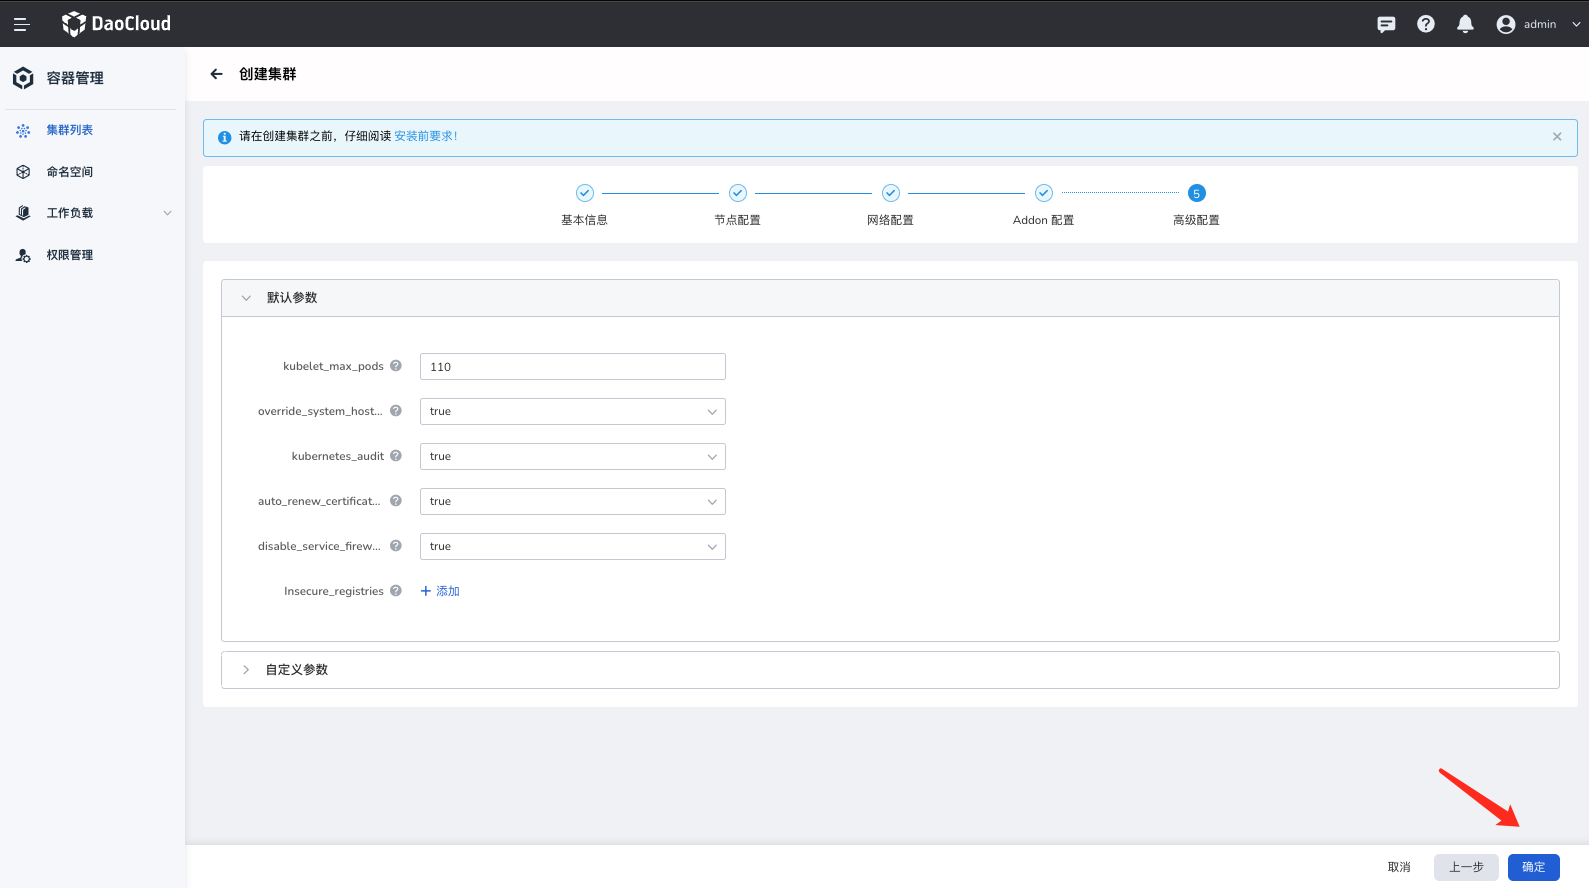
If your cluster requires more advanced configurations, you can add them in this step.
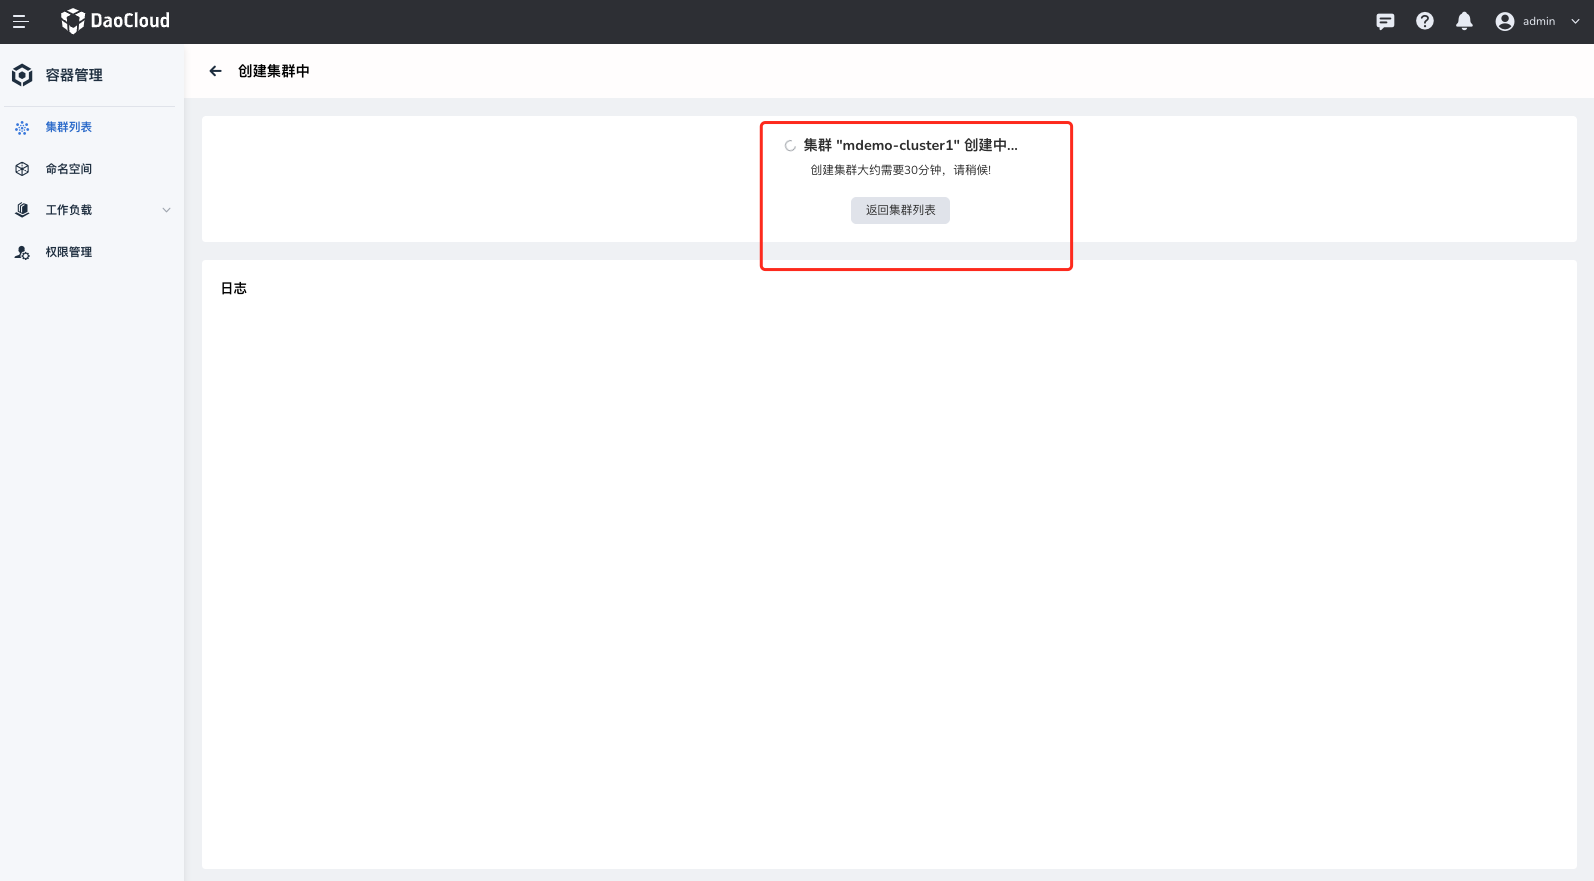
Cluster creation may take approximately 30 minutes.
Create cluster via kubeadm
kubeadm init --image-repository registry.aliyuncs.com/google_containers \
             --apiserver-advertise-address=10.64.30.131 \
             --service-cidr=10.111.0.0/16 \
             --pod-network-cidr=10.100.0.0/16 \
             --cri-socket /var/run/cri-dockerd.sock
Create kind cluster
Metallb Installation and Configuration
Demo Cluster Metallb Network Pool Planning Record
| Cluster Name | IP Pool | IP Allocation |
|---|---|---|
| mdemo-cluster1 | 10.64.30.71-10.64.30.73 | - |
| mdemo-cluster2 | 10.6.136.25-10.6.136.29 | - |
| mdemo-cluster3 | 10.64.30.75-10.64.30.77 | - |
Installation
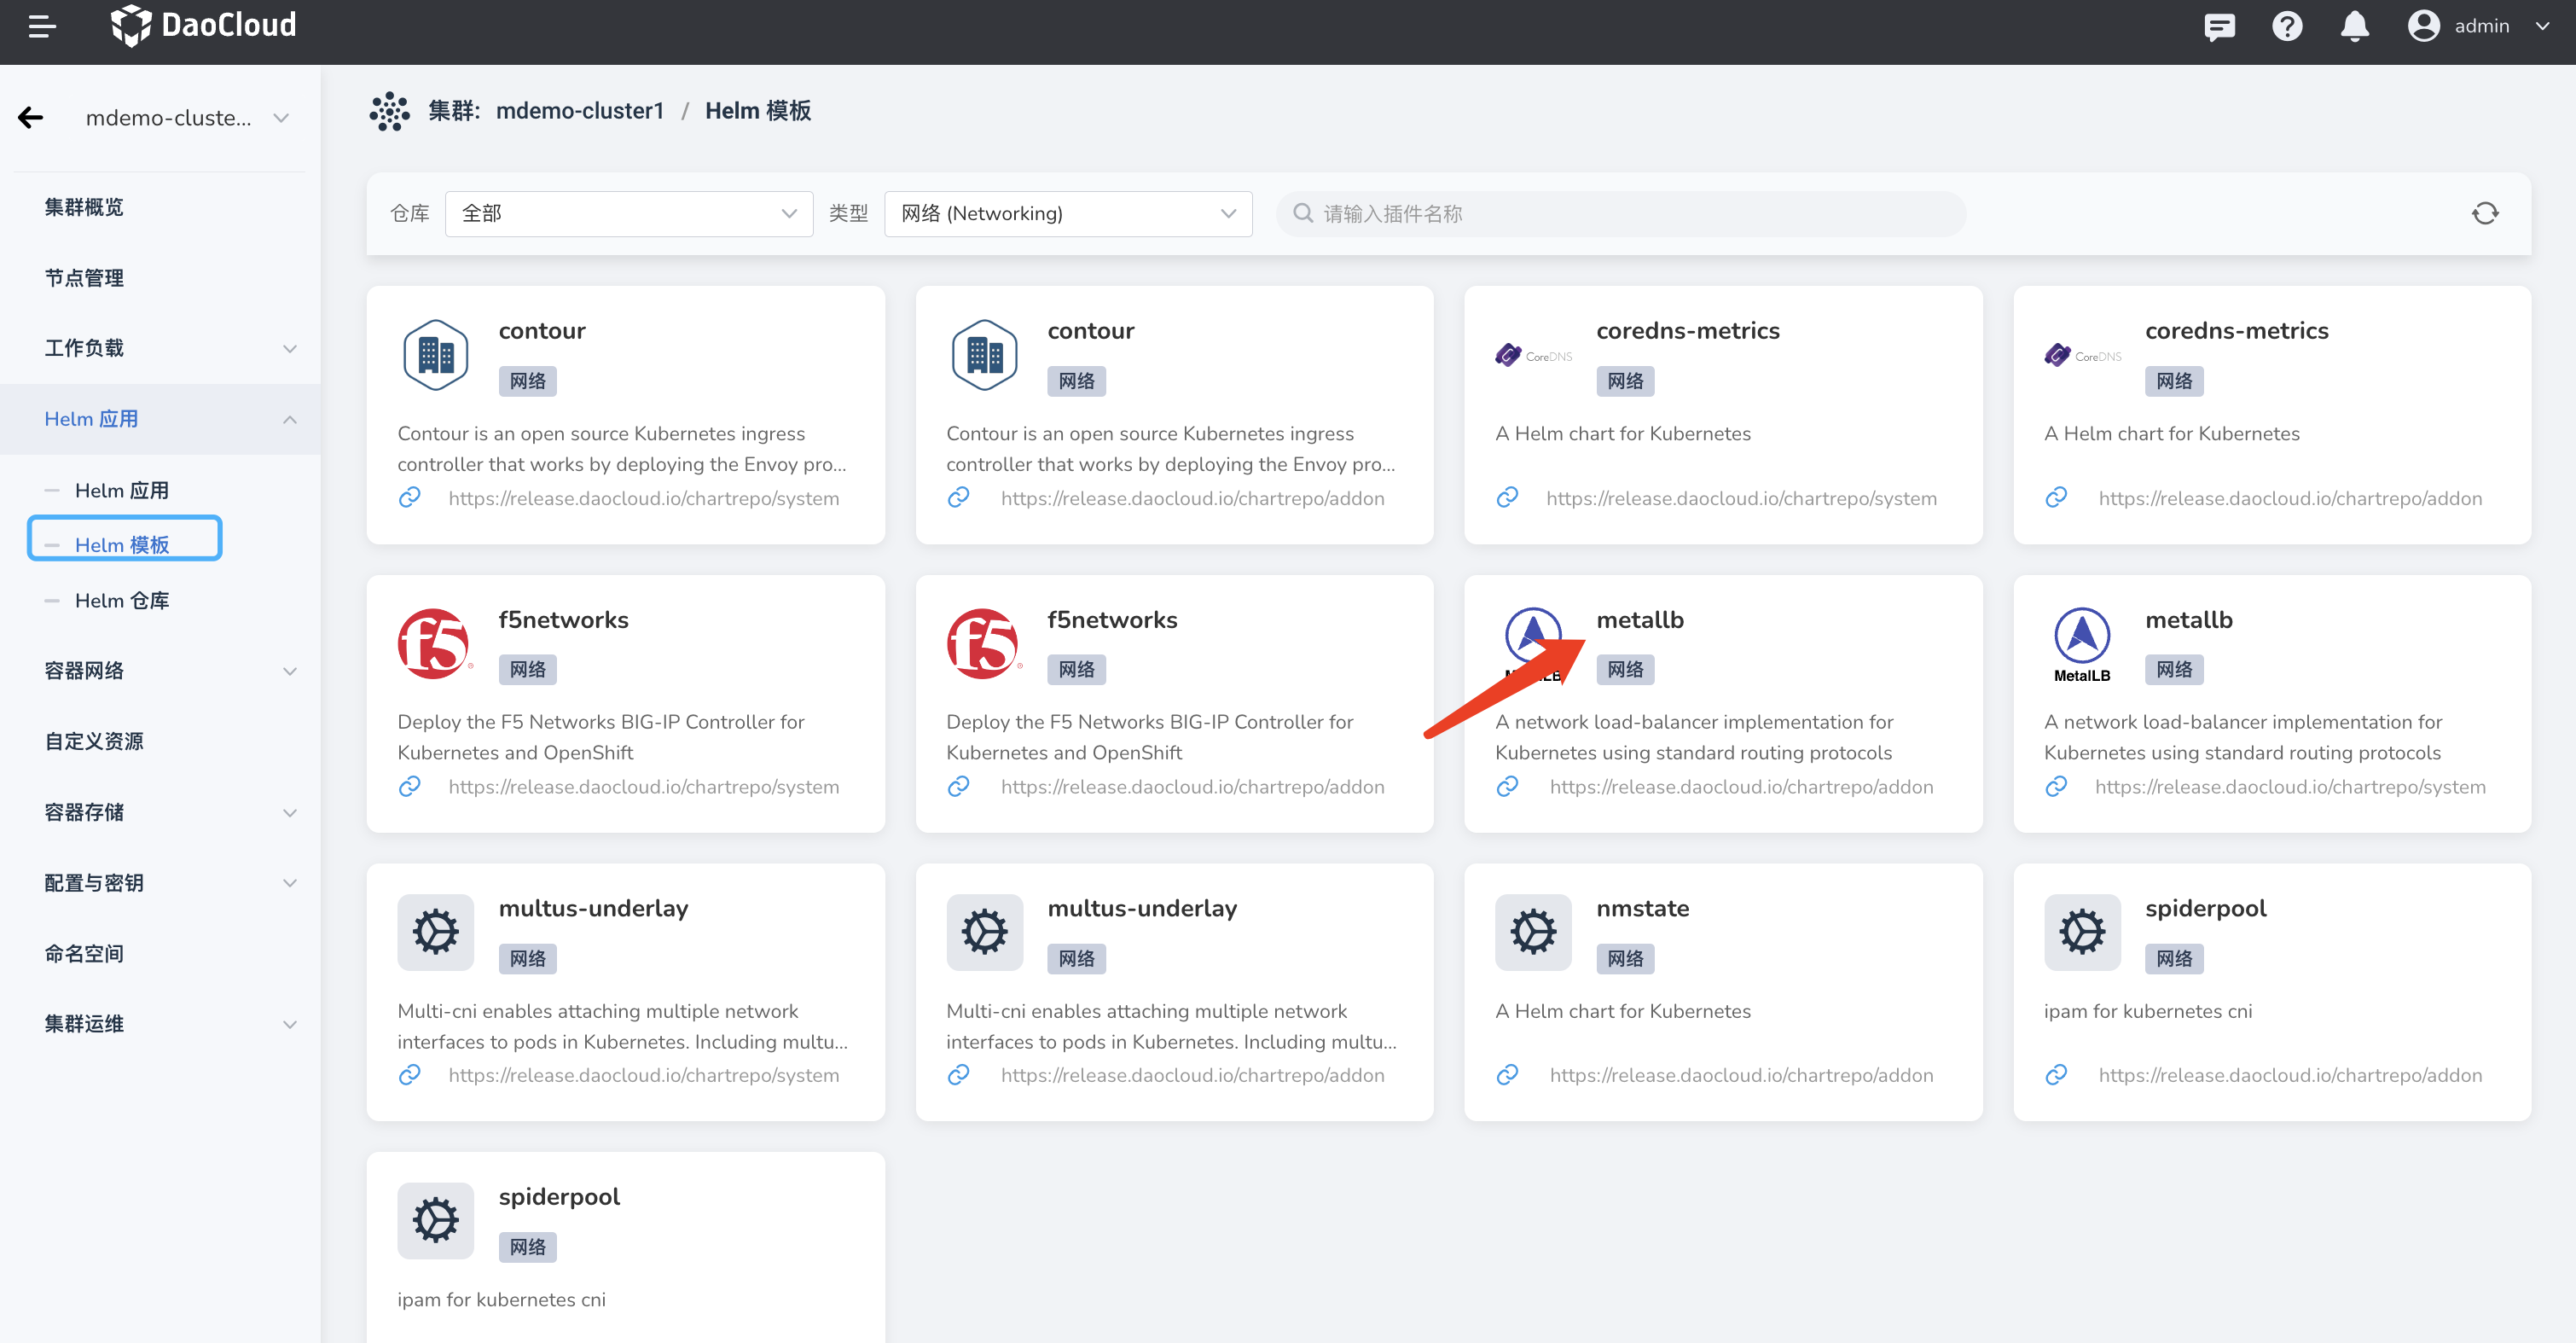
Helm Installation in Container Management Platform
It is recommended to use the Helm Apps -> Helm Charts -> find metallb -> Install option in the container management platform.

Manual Installation
Refer to the MetalLB official documentation.
Note: If the cluster's CNI uses calico, you need to disable calico's BGP mode, otherwise it will affect the normal operation of MetalLB.
Assigning Specific IPs to Corresponding Services
kubectl annotate service -n istio-system istiod-mdemo-mesh-hosted-lb metallb.universe.tf/address-pool='first-pool'
Verification
Querying Global Service Clusters
Through the container management platform's cluster list interface, search for Cluster Role: Global Service Cluster .