Build AI Cluster with Macvlan
This page describes how to provide RDMA communication capabilities for containers based on the Macvlan technology when building an AI cluster. It applies to RoCE network scenarios.
Based on the RDMA shared device plugin, a Macvlan interface is inserted into the container, and the RDMA device of the master interface can be shared with the container. Therefore:
-
The RDMA system needs to work in shared mode, and all containers share the RDMA device of the master NIC on the host. Its characteristic is that in each newly started container, the available GID index of its RDMA device is always incrementing, not a fixed value.
-
Creating a Macvlan interface on an InfiniBand IPOIB NIC is not supported. Therefore, this solution only applies to RoCE network scenarios and cannot be used in InfiniBand network scenarios.
Comparison with the SR-IOV CNI RDMA Solution
| Comparison dimension | Macvlan shared RDMA solution | SR-IOV CNI isolated RDMA solution |
|---|---|---|
| Network isolation | All containers share the RDMA device, poor isolation | Each container has a dedicated RDMA device, better isolation |
| Performance | Relatively high performance | Hardware passthrough, the best performance |
| Resource utilization | High resource utilization | Low, limited by the number of VFs supported by the hardware |
| Configuration | Relatively simple configuration | Complex configuration, requires hardware support and setup |
| Compatibility | Good compatibility, works in most environments | Depends on hardware support, poor compatibility |
| Applicable scenario | Most scenarios, including bare metal and virtual machines | Bare metal only, not virtual machine scenarios |
| Cost | Low cost, no additional hardware support required | High cost, requires SR-IOV-capable hardware |
| RDMA protocol | Supports RoCE, does not support InfiniBand | Supports both RoCE and InfiniBand |
Solution
This page uses the following typical AI cluster topology as an example to describe how to set up Spiderpool.
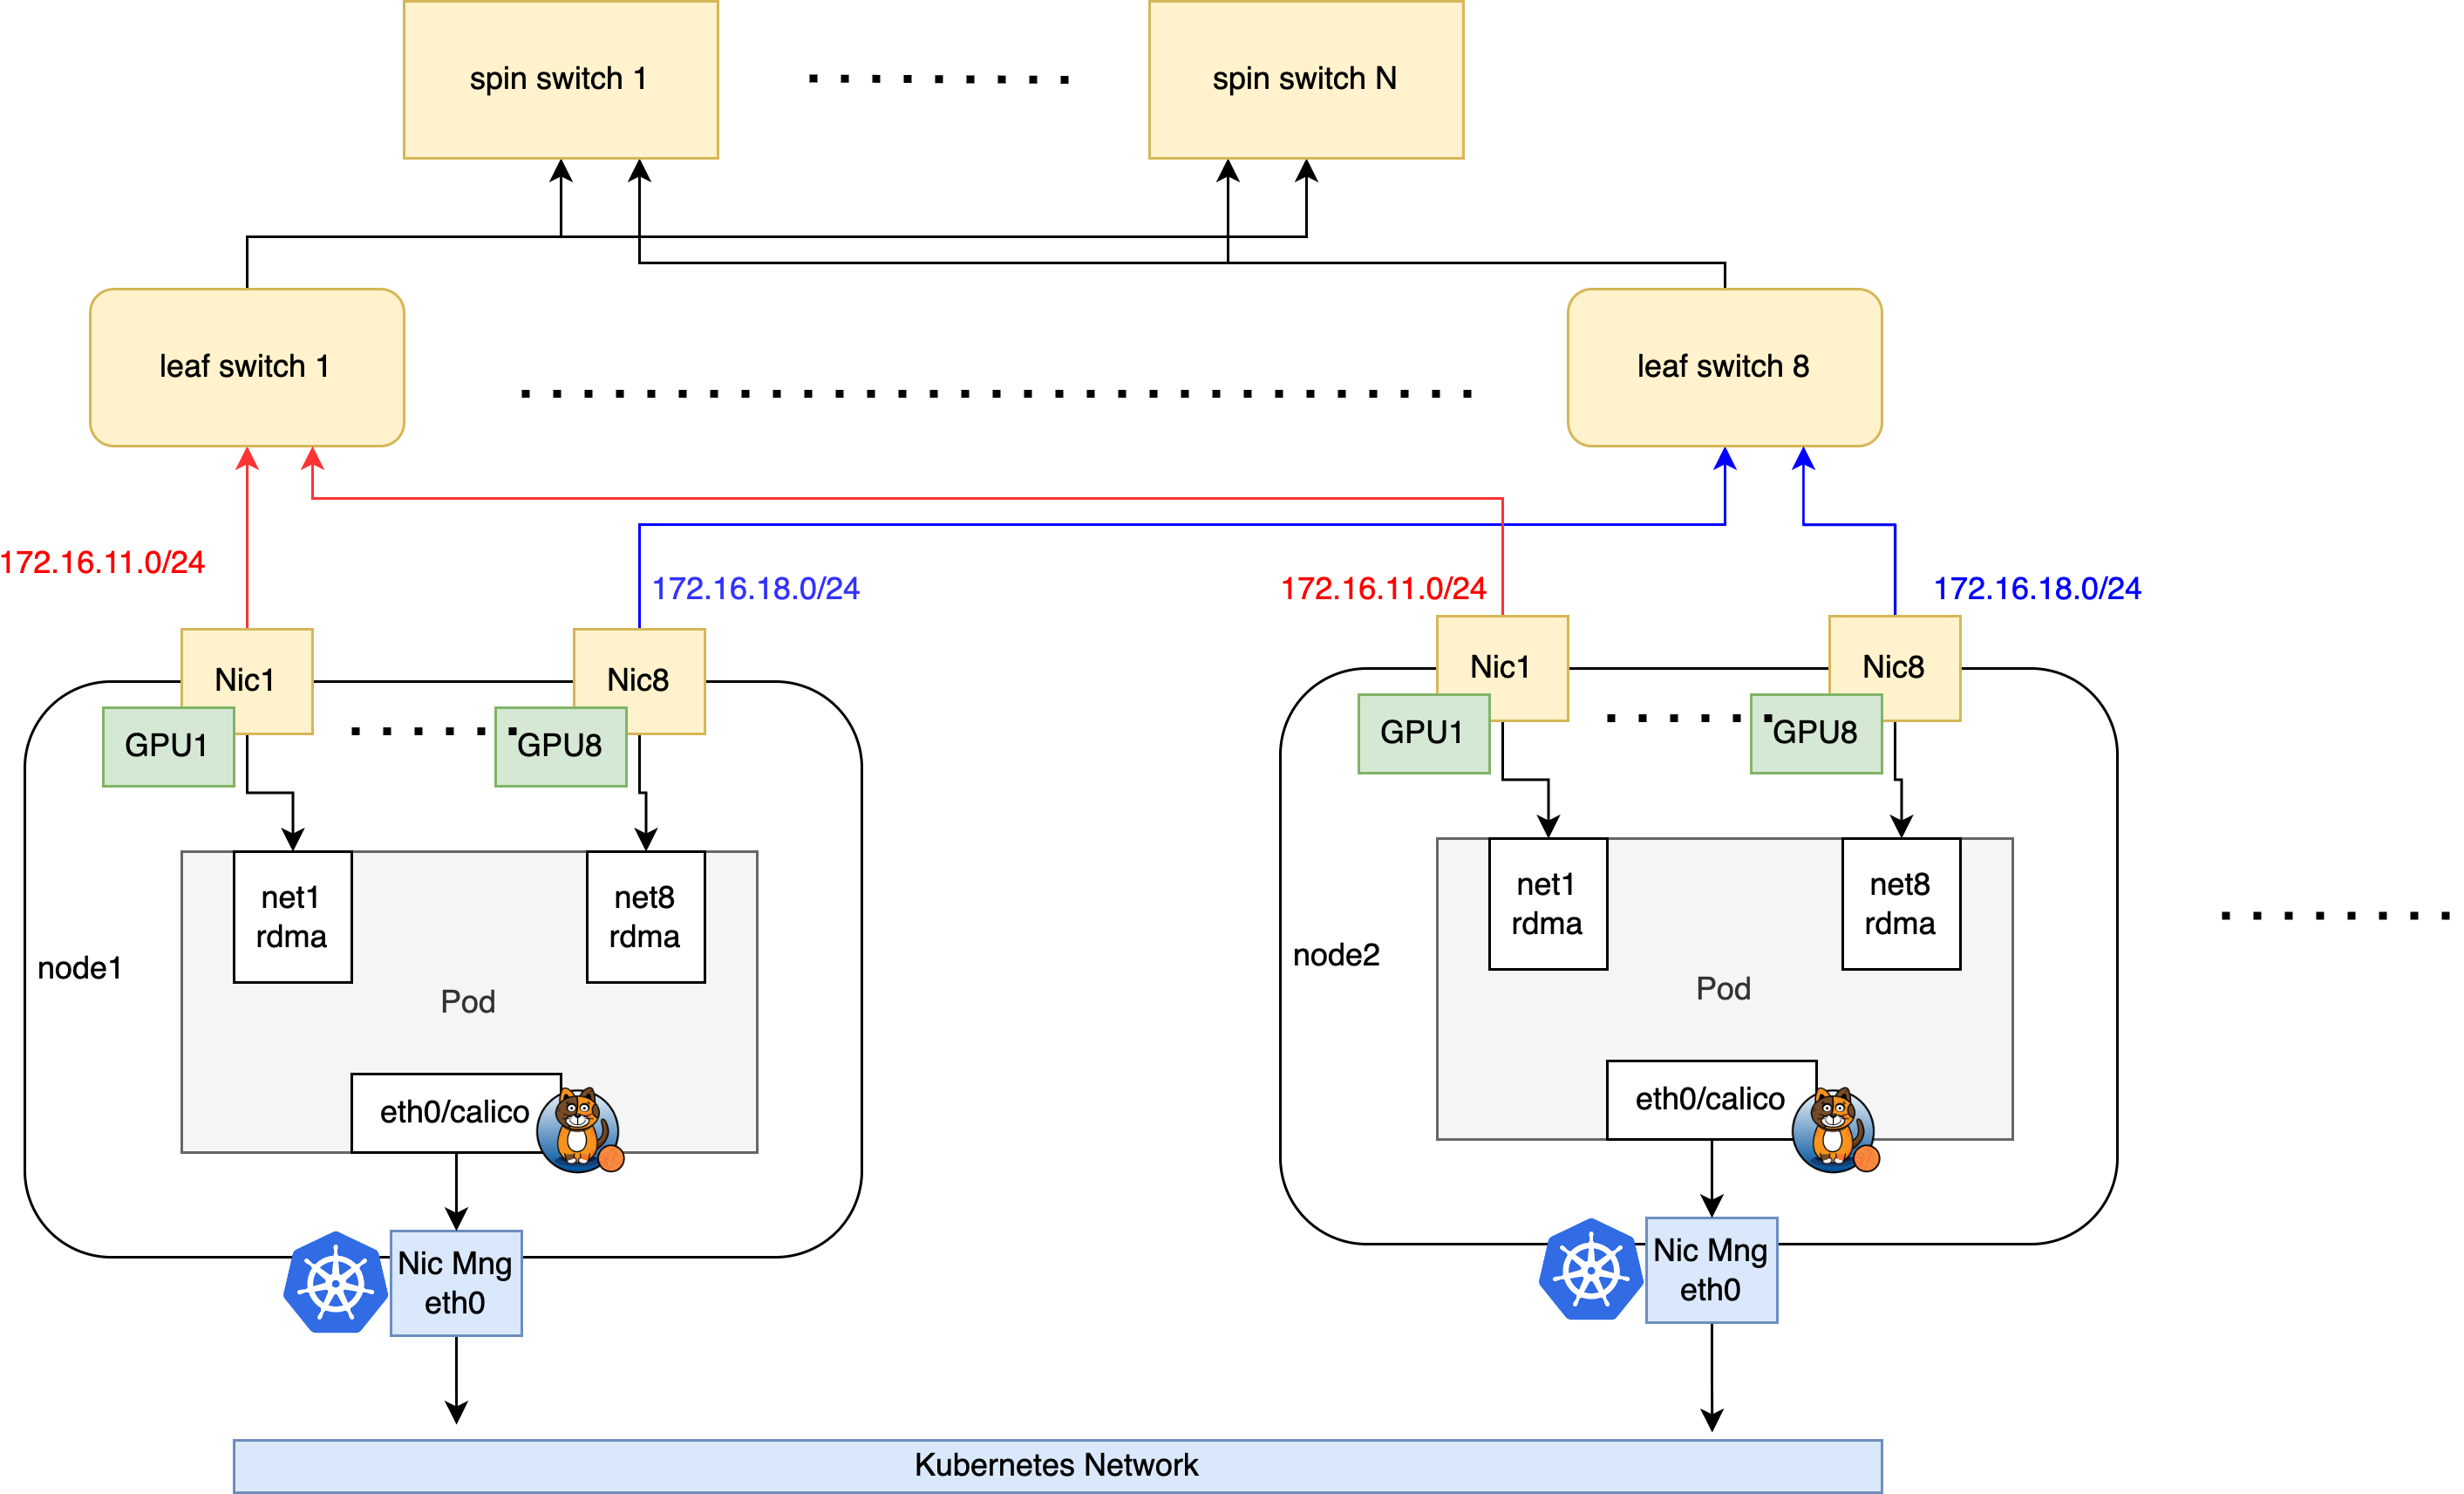
The network plan of the cluster is as follows:
-
Run Calico CNI on the eth0 NIC of the node to carry Kubernetes traffic. AI workloads are assigned a default Calico NIC for control-plane communication.
-
Use Mellanox ConnectX5 NICs with RDMA capabilities on the nodes to carry the RDMA traffic of AI computing, and connect the NICs to the rail optimized network. AI workloads are additionally assigned the Macvlan virtual interfaces of all RDMA NICs to ensure high-speed network communication for GPUs.
Installation Requirements
-
Refer to Spiderpool installation requirements.
-
Prepare the Helm binary on the host.
-
Install a Kubernetes cluster, with kubelet working on the host eth0 NIC shown in Figure 1.
-
Install Calico as the default CNI of the cluster, using the host eth0 NIC as the traffic forwarding NIC of Calico. If it is not installed, refer to the official documentation or install it with the following commands:
kubectl apply -f https://github.com/projectcalico/calico/blob/master/manifests/calico.yaml
kubectl wait --for=condition=ready -l k8s-app=calico-node  pod -n kube-system
# set calico to work on host eth0
kubectl set env daemonset -n kube-system calico-node IP_AUTODETECTION_METHOD=kubernetes-internal-ip
# set calico to work on host eth0
kubectl set env daemonset -n kube-system calico-node IP6_AUTODETECTION_METHOD=kubernetes-internal-ip
Host Preparation
-
Install the RDMA NIC driver
For Mellanox NICs, you can download the NVIDIA OFED official driver and install it on the host with the following commands:
For Mellanox NICs, you can also install the driver in a containerized way to batch install the driver for all Mellanox NICs on the cluster hosts. Run the following commands. Note that this process requires internet access to fetch some installation packages. When all ofed Pods enter the ready state, the OFED driver installation on the hosts is complete.
helm repo add spiderchart https://spidernet-io.github.io/charts helm repo update helm search repo ofed # pelase replace the following values with your actual environment # for china user, it could set `--set image.registry=nvcr.m.daocloud.io` to use a domestic registry helm install ofed-driver spiderchart/ofed-driver -n kube-system \ --set image.OSName="ubuntu" \ --set image.OSVer="22.04" \ --set image.Arch="amd64" -
Set the RDMA subsystem on the host to shared mode. This is a requirement for providing RDMA devices to containers in Macvlan scenarios.
-
Set the RDMA working mode of the NIC (InfiniBand or Ethernet)
-
Confirm the working modes supported by the NIC: in this example environment, the host is equipped with a Mellanox ConnectX 5 VPI NIC. Query the RDMA devices to confirm that the NIC driver is installed.
$ rdma link
  link mlx5_0/1 state ACTIVE physical_state LINK_UP netdev ens6f0np0
  link mlx5_1/1 state ACTIVE physical_state LINK_UP netdev ens6f1np1
  .......
Confirm the working mode of the NIC. The following output indicates that the NIC works in Ethernet mode and can implement RoCE communication.
The following output indicates that the NIC works in InfiniBand mode and can implement InfiniBand communication.
If the NIC does not work in the expected mode, run the following commands to confirm that the NIC supports configuring the LINK_TYPE parameter. If this parameter is not available, replace the NIC with a supported model.
$ mst start # check the card's PCIE $ lspci -nn | grep Mellanox 86:00.0 Infiniband controller [0207]: Mellanox Technologies MT27800 Family [ConnectX-5] [15b3:1017] 86:00.1 Infiniband controller [0207]: Mellanox Technologies MT27800 Family [ConnectX-5] [15b3:1017] ....... # check whether the network card supports parameters LINK_TYPE $ mlxconfig -d 86:00.0 q | grep LINK_TYPE LINK_TYPE_P1 IB(1) -
Batch set the working mode of the NICs: get the batch setting script.
-
-
Set the IP address, MTU, and policy routing for all RDMA NICs
In RDMA scenarios, both switches and host NICs usually work with larger MTU values to improve performance.
Because a Linux host has only one default route by default, in multi-NIC scenarios you need to set policy default routes for different NICs to ensure that tasks in hostnetwork mode can run All-to-All and other communication patterns properly.
Get the ubuntu NIC configuration script and run the following reference commands.
$ chmod +x ./setNicAddr.sh # Configure the NIC $ INTERFACE="eno3np2" IPV4_IP="172.16.0.10/24" IPV4_GATEWAY="172.16.0.1" \ MTU="4200" ENABLE_POLICY_ROUTE="true" ./setNicAddr.sh # View the NIC IP and MTU $ ip a s eno3np2 4: eno3np2: <BROADCAST,MULTICAST,UP,LOWER_UP> mtu 4200 qdisc mq state UP group default qlen 1000 link/ether 38:68:dd:59:44:4a brd ff:ff:ff:ff:ff:ff altname enp8s0f2np2 inet 172.16.0.10/24 brd 172.16.0.255 scope global eno3np2 valid_lft forever preferred_lft forever inet6 fe80::3a68:ddff:fe59:444a/64 scope link proto kernel_ll valid_lft forever preferred_lft forever # View the policy routing $ ip rule 0: from all lookup local 32763: from 172.16.0.10 lookup 152 proto static 32766: from all lookup main 32767: from all lookup default $ ip rou show table 152 default via 172.16.0.1 dev eno3np2 proto static -
Configure the host RDMA lossless network
In high-performance network scenarios, the RDMA network is very sensitive to packet loss. Once packet loss and retransmission occur, performance drops sharply. Therefore, to keep RDMA network performance unaffected, the packet loss rate must be kept below 1e-05 (one in a hundred thousand), and zero packet loss is the best. For RoCE networks, you can use the PFC + ECN mechanism to ensure no packet loss during network transmission.
Refer to Configure the RDMA lossless network.
Configuring a lossless network requires an RDMA RoCE network environment, not InfiniBand. Configuring a lossless network requires the switch to support the PFC + ECN mechanism, and the configuration must be aligned with the host side, otherwise it will not work.
-
Enable GPUDirect RMDA
When installing or using gpu-operator:
-
Enable the Helm installation option:
--set driver.rdma.enabled=true --set driver.rdma.useHostMofed=true. gpu-operator installs the nvidia-peermem kernel module and enables GPUDirect RMDA to accelerate the forwarding performance between the GPU and the RDMA NIC. Run the following command on the host to confirm that the kernel module is installed. -
Enable the Helm installation option:
--set gdrcopy.enabled=true. gpu-operator installs the gdrcopy kernel module to accelerate the forwarding performance between GPU memory and CPU memory. Run the following command on the host to confirm that the kernel module is installed.
-
Install Spiderpool
-
Install Spiderpool with Helm and enable the rdmaSharedDevicePlugin component
helm repo add spiderpool https://spidernet-io.github.io/spiderpool
helm repo update spiderpool
kubectl create namespace spiderpool
helm install spiderpool spiderpool/spiderpool -n spiderpool --set rdma.rdmaSharedDevicePlugin.install=true
If you are a user in China, you can specify the parameter
--set global.imageRegistryOverride=ghcr.m.daocloud.ioto use a domestic image registry. Setting the command line parameters--set spiderpoolAgent.prometheus.enabled --set spiderpoolAgent.prometheus.enabledRdmaMetric=trueand--set grafanaDashboard.install=trueenables the RDMA metrics exporter and the Grafana dashboard. For more information, see RDMA metrics.After completion, the installed components are as follows:
$ kubectl get pod -n spiderpool spiderpool-agent-9sllh 1/1 Running 0 1m spiderpool-agent-h92bv 1/1 Running 0 1m spiderpool-controller-7df784cdb7-bsfwv 1/1 Running 0 1m spiderpool-init 0/1 Completed 0 1m spiderpool-rdma-shared-device-plugin-9xsm9 1/1 Running 0 1m spiderpool-rdma-shared-device-plugin-nxvlx 1/1 Running 0 1m -
Configure k8s-rdma-shared-dev-plugin to identify the RDMA shared device resources on each host
Modify the following ConfigMap to create 8 RDMA shared devices, each of which is affine to one GPU device. For detailed ConfigMap configuration, refer to the Mellanox official documentation.
  ....
  config.json: |
    {
     "periodicUpdateInterval": 300,
     "configList": [
        {
         "resourcePrefix": "spidernet.io",
         "resourceName": "shared_cx5_gpu1",
         "rdmaHcaMax": 100,
         "selectors": { "ifNames": ["enp11s0f0np0"] }
       },
       ....
       {
         "resourcePrefix": "spidernet.io",
         "resourceName": "shared_cx5_gpu8",
         "rdmaHcaMax": 100,
         "selectors": { "ifNames": ["enp18s0f0np0"] }
       }
     ]
After completing the configuration above, check the available resources of the nodes to confirm that each node correctly identifies and reports the 8 RDMA device resources.
$ kubectl get no -o json | jq -r '[.items[] | {name:.metadata.name, allocable:.status.allocatable}]' [ { "name": "ai-10-1-16-1", "allocable": { "cpu": "40", "pods": "110", "spidernet.io/shared_cx5_gpu1": "100", "spidernet.io/shared_cx5_gpu2": "100", ... "spidernet.io/shared_cx5_gpu8": "100", ... } }, ... ] -
Create the CNI configuration and the corresponding IPPool resources
For Ethernet networks, configure all GPU-affine Macvlan NICs and create the corresponding IP address pools. The following example configures the NIC and IP address pool affine to GPU1.
cat <<EOF | kubectl apply -f -

apiVersion: spiderpool.spidernet.io/v2beta1
kind: SpiderIPPool
metadata:
  name: gpu1-net11
spec:
  gateway: 172.16.11.254
  subnet: 172.16.11.0/16
  ips:
    - 172.16.11.1-172.16.11.200
---
apiVersion: spiderpool.spidernet.io/v2beta1
kind: SpiderMultusConfig
metadata:
  name: gpu1-macvlan
  namespace: spiderpool
spec:
  cniType: macvlan
  rdmaResourceName: spidernet.io/shared_cx5_gpu1
  macvlan:
    master: ["enp11s0f0np0"]
    ippools:
      ipv4: ["gpu1-net11"]
EOF
By default, the MTU of a Pod NIC is the same as the MTU of its Macvlan NIC. In some special communication scenarios, you need to customize the MTU of the Pod to meet the requirements of different data packets. You can customize the MTU of the Pod in the following way:
apiVersion: spiderpool.spidernet.io/v2beta1
kind: SpiderMultusConfig
metadata:
  name: gpu1-macvlan
  namespace: spiderpool
spec:
  cniType: macvlan
  rdmaResourceName: spidernet.io/shared_cx5_gpu1
  macvlan:
    master: ["enp11s0f0np0"]
    mtu: 1480
    ippools:
      ipv4: ["gpu1-net11"]
Note: the MTU value should not be greater than the MTU of the Macvlan master NIC, otherwise the Pod cannot be created.
Create a Test Application
-
Create a group of DaemonSet applications on the specified nodes
In the following example, the annotation
v1.multus-cni.io/default-networkspecifies the use of the default Calico NIC for control-plane communication, and the annotationk8s.v1.cni.cncf.io/networksattaches the 8 GPU-affine NICs for RDMA communication and configures 8 RDMA resources.Note: RDMA network resources can be automatically injected into applications. See Automatically inject RDMA resources based on Webhook.
helm repo add spiderchart https://spidernet-io.github.io/charts
helm repo update
helm search repo rdma-tools

# run daemonset on worker1 and worker2
cat <<EOF > values.yaml
# for china user , it could add these to use a domestic registry
#image:
#  registry: ghcr.m.daocloud.io

# just run daemonset in nodes 'worker1' and 'worker2'
affinity:
  nodeAffinity:
    requiredDuringSchedulingIgnoredDuringExecution:
      nodeSelectorTerms:
      - matchExpressions:
        - key: kubernetes.io/hostname
          operator: In
          values:
          - worker1
          - worker2

# macvlan interfaces
extraAnnotations:
  k8s.v1.cni.cncf.io/networks: |-
    [{"name":"gpu1-macvlan","namespace":"spiderpool"},
    {"name":"gpu2-macvlan","namespace":"spiderpool"},
    {"name":"gpu3-macvlan","namespace":"spiderpool"},
    {"name":"gpu4-macvlan","namespace":"spiderpool"},
    {"name":"gpu5-macvlan","namespace":"spiderpool"},
    {"name":"gpu6-macvlan","namespace":"spiderpool"},
    {"name":"gpu7-macvlan","namespace":"spiderpool"},
    {"name":"gpu8-macvlan","namespace":"spiderpool"}]

# macvlan resource
resources:
  limits:
    spidernet.io/shared_cx5_gpu1: 1
    spidernet.io/shared_cx5_gpu2: 1
    spidernet.io/shared_cx5_gpu3: 1
    spidernet.io/shared_cx5_gpu4: 1
    spidernet.io/shared_cx5_gpu5: 1
    spidernet.io/shared_cx5_gpu6: 1
    spidernet.io/shared_cx5_gpu7: 1
    spidernet.io/shared_cx5_gpu8: 1
    #nvidia.com/gpu: 1
EOF

helm install rdma-tools spiderchart/rdma-tools -f ./values.yaml
During the creation of the container network namespace, Spiderpool runs a connectivity test on the gateway of the Macvlan interface. If all Pods of the application above start successfully, it means the VF devices on each node are connected and normal RDMA communication is possible.
-
Check the network namespace status of the container
Enter the network namespace of any Pod and confirm that there are 9 NICs:
kubectl exec [POD] [COMMAND] is DEPRECATED and will be removed in a future version. Use kubectl exec [POD] -- [COMMAND] instead.
root@rdma-tools-4v8t8:/# ip a
   1: lo: <LOOPBACK,UP,LOWER_UP> mtu 65536 qdisc noqueue state UNKNOWN group default qlen 1000
       link/loopback 00:00:00:00:00:00 brd 00:00:00:00:00:00
       inet 127.0.0.1/8 scope host lo
          valid_lft forever preferred_lft forever
       inet6 ::1/128 scope host
          valid_lft forever preferred_lft forever
   2: tunl0@NONE: <NOARP> mtu 1480 qdisc noop state DOWN group default qlen 1000
       link/ipip 0.0.0.0 brd 0.0.0.0
   3: eth0@if356: <BROADCAST,MULTICAST,UP,LOWER_UP> mtu 1480 qdisc noqueue state UP group default qlen 1000
       link/ether ca:39:52:fc:61:cd brd ff:ff:ff:ff:ff:ff link-netnsid 0
       inet 10.233.119.164/32 scope global eth0
          valid_lft forever preferred_lft forever
       inet6 fe80::c839:52ff:fefc:61cd/64 scope link
          valid_lft forever preferred_lft forever
   269: net1: <BROADCAST,MULTICAST,UP,LOWER_UP> mtu 1500 qdisc mq state UP group default qlen 1000
       link/ether 3a:97:49:35:79:95 brd ff:ff:ff:ff:ff:ff
       inet 172.16.11.10/24 brd 10.1.19.255 scope global net1
          valid_lft forever preferred_lft forever
       inet6 fe80::3897:49ff:fe35:7995/64 scope link
          valid_lft forever preferred_lft forever
   239: net2: <BROADCAST,MULTICAST,UP,LOWER_UP> mtu 1500 qdisc mq state UP group default qlen 1000
       link/ether 1e:b6:13:0e:2a:d5 brd ff:ff:ff:ff:ff:ff
       inet 172.16.12.10/24 brd 10.1.19.255 scope global net1
          valid_lft forever preferred_lft forever
       inet6 fe80::1cb6:13ff:fe0e:2ad5/64 scope link
          valid_lft forever preferred_lft forever
   .....
Check the routing configuration. Spiderpool automatically reconciles policy routing for each NIC, ensuring that external requests received on a NIC return the reply traffic from that NIC:
root@rdma-tools-4v8t8:/# ip rule
0:  from all lookup local
32762:  from 172.16.11.10 lookup 107
32763:  from 172.16.12.10 lookup 106
32764:  from 172.16.13.10 lookup 105
32765:  from 172.16.14.10 lookup 104
32765:  from 172.16.15.10 lookup 103
32765:  from 172.16.16.10 lookup 102
32765:  from 172.16.17.10 lookup 101
32765:  from 172.16.18.10 lookup 100
32766:  from all lookup main
32767:  from all lookup default

root@rdma-tools-4v8t8:/# ip route show table 100
    default via 172.16.11.254 dev net1
The main routing table ensures that Calico network traffic, ClusterIP traffic, and local host communication traffic are all forwarded from the Calico NIC.
root@rdma-tools-4v8t8:/# ip r show table main
    default via 169.254.1.1 dev eth0
    172.16.11.0/24 dev net1 proto kernel scope link src 172.16.11.10
    172.16.12.0/24 dev net2 proto kernel scope link src 172.16.12.10
    172.16.13.0/24 dev net3 proto kernel scope link src 172.16.13.10
    172.16.14.0/24 dev net4 proto kernel scope link src 172.16.14.10
    172.16.15.0/24 dev net5 proto kernel scope link src 172.16.15.10
    172.16.16.0/24 dev net6 proto kernel scope link src 172.16.16.10
    172.16.17.0/24 dev net7 proto kernel scope link src 172.16.17.10
    172.16.18.0/24 dev net8 proto kernel scope link src 172.16.18.10
    10.233.0.0/18 via 10.1.20.4 dev eth0 src 10.233.119.164
    10.233.64.0/18 via 10.1.20.4 dev eth0 src 10.233.119.164
    10.233.119.128 dev eth0 scope link src 10.233.119.164
    169.254.0.0/16 via 10.1.20.4 dev eth0 src 10.233.119.164
    169.254.1.1 dev eth0 scope link
Confirm that there are 8 RDMA devices.
-
Confirm that RDMA send and receive works properly between Pods across nodes
Open a terminal, enter one Pod, and start the service:
Open another terminal, enter another Pod, and access the service:
Automatically Inject RDMA Network Resources Based on Webhook
In the steps above, we showed how to use the SR-IOV technology to provide RDMA communication capabilities for containers in RoCE and InfiniBand network environments. However, configuring an AI application with multiple NICs makes the process complex. To simplify this process, Spiderpool supports classifying a group of NIC configurations through the annotations (cni.spidernet.io/rdma-resource-inject or cni.spidernet.io/network-resource-inject). Users only need to add the same annotation to the application as the NIC configuration, and Spiderpool automatically injects all corresponding NICs and network resources with the same annotation into the application through the webhook. cni.spidernet.io/rdma-resource-inject applies only to AI scenarios and automatically injects RDMA NICs and RDMA resources; cni.spidernet.io/network-resource-inject can be used not only in AI scenarios but also in Underlay scenarios. In the future we hope to unify both scenarios with cni.spidernet.io/network-resource-inject.
This feature only supports NIC configurations with the cniTypes [macvlan, ipvlan, sriov, ib-sriov, ipoib].
-
Currently, the Spiderpool webhook for automatically injecting RDMA network resources is disabled by default and needs to be enabled manually.
After enabling the webhook for automatically injecting network resources, you can update the configuration by updating the podResourceInject field in the ConfigMap spiderpool-config.
Use
podResourceInject.namespacesExcludeto specify the namespaces where RDMA network resources are not injected.Use
podResourceInject.namespacesIncludeto specify the namespaces where RDMA network resources are injected. If neitherpodResourceInject.namespacesExcludenorpodResourceInject.namespacesIncludeis specified, RDMA network resources are injected into all namespaces by default.Currently, after changing the configuration, you need to restart spiderpool-controller for the configuration to take effect.
-
When creating all SpiderMultusConfig instances of the AI computing network, add an annotation with the key "cni.spidernet.io/rdma-resource-inject" or "cni.spidernet.io/network-resource-inject". The value can be customized.
apiVersion: spiderpool.spidernet.io/v2beta1 kind: SpiderIPPool metadata: name: gpu1-net11 spec: gateway: 172.16.11.254 subnet: 172.16.11.0/16 ips: - 172.16.11.1-172.16.11.200 --- apiVersion: spiderpool.spidernet.io/v2beta1 kind: SpiderMultusConfig metadata: name: gpu1-sriov namespace: spiderpool annotations: cni.spidernet.io/rdma-resource-inject: rdma-network spec: cniType: macvlan macvlan: master: ["enp11s0f0np0"] rdmaResourceName: spidernet.io/gpu1rdma ippools: ipv4: ["gpu1-net11"] -
When creating an AI application, add the same annotation to the application:
Note: when using the webhook to automatically inject network resources, do not add other network configuration annotations to the application (such as
k8s.v1.cni.cncf.io/networksandipam.spidernet.io ippools), otherwise the automatic resource injection will be affected.
-
After the Pod is created, you can observe that the Pod is automatically injected with the NIC annotation and the RDMA resources.
...
spec:
  template:
    metadata:
      annotations:
          k8s.v1.cni.cncf.io/networks: |-
            [{"name":"gpu1-sriov","namespace":"spiderpool"},
            {"name":"gpu2-sriov","namespace":"spiderpool"},
            {"name":"gpu3-sriov","namespace":"spiderpool"},
            {"name":"gpu4-sriov","namespace":"spiderpool"},
            {"name":"gpu5-sriov","namespace":"spiderpool"},
            {"name":"gpu6-sriov","namespace":"spiderpool"},
            {"name":"gpu7-sriov","namespace":"spiderpool"},
            {"name":"gpu8-sriov","namespace":"spiderpool"}]
     ....
     resources:
       limits:
         spidernet.io/gpu1rdma: 1
         spidernet.io/gpu2rdma: 1
         spidernet.io/gpu3rdma: 1
         spidernet.io/gpu4rdma: 1
         spidernet.io/gpu5rdma: 1
         spidernet.io/gpu6rdma: 1
         spidernet.io/gpu7rdma: 1
         spidernet.io/gpu8rdma: 1