Cross-Cluster Backup and Recovery of MySQL Application and Data
This demonstration will show how to use the application backup feature in DCE 5.0 to perform cross-cluster backup migration for a stateful application.
Note
The current operator should have admin privileges on the DCE 5.0 platform.
Prepare the Demonstration Environment
Prepare Two Clusters
main-cluster will be the source cluster for backup data, and recovery-cluster will be the target cluster for data recovery.
| Cluster | IP | Nodes |
|---|---|---|
| main-cluster | 10.6.175.100 | 1 node |
| recovery-cluster | 10.6.175.110 | 1 node |
Set Up MinIO Configuration
| MinIO Server Address | Bucket | Username | Password |
|---|---|---|---|
| http://10.7.209.110:9000 | mysql-demo | root | dangerous |
Deploy NFS Storage Service in Both Clusters
Note
NFS storage service needs to be deployed on all nodes in both the source and target clusters.
-
Install the dependencies required for NFS on all nodes in both clusters.
yum install nfs-utils iscsi-initiator-utils nfs-utils iscsi-initiator-utils nfs-utils iscsi-initiator-utils -yExpected output
[root@g-master1 ~]# kubectl apply -f nfs.yaml clusterrole.rbac.authorization.k8s.io/nfs-provisioner-runner created clusterrolebinding.rbac.authorization.k8s.io/run-nfs-provisioner created role.rbac.authorization.k8s.io/leader-locking-nfs-provisioner created rolebinding.rbac.authorization.k8s.io/leader-locking-nfs-provisioner created serviceaccount/nfs-provisioner created service/nfs-provisioner created deployment.apps/nfs-provisioner created storageclass.storage.k8s.io/nfs created -
Prepare NFS storage service for the MySQL application.
Log in to any control node of both main-cluster and recovery-cluster . Use the command vi nfs.yaml to create a file named nfs.yaml on the node, and copy the following YAML content into the nfs.yaml file.
<details>
<summary>nfs.yaml</summary>
```yaml
kind: ClusterRole
apiVersion: rbac.authorization.k8s.io/v1
metadata:
name: nfs-provisioner-runner
namespace: nfs-system
rules:
- apiGroups: [""]
    resources: ["persistentvolumes"]
    verbs: ["get", "list", "watch", "create", "delete"]
- apiGroups: [""]
    resources: ["persistentvolumeclaims"]
    verbs: ["get", "list", "watch", "update"]
- apiGroups: ["storage.k8s.io"]
    resources: ["storageclasses"]
    verbs: ["get", "list", "watch"]
- apiGroups: [""]
    resources: ["events"]
    verbs: ["create", "update", "patch"]
- apiGroups: [""]
    resources: ["services", "endpoints"]
    verbs: ["get"]
- apiGroups: ["extensions"]
    resources: ["podsecuritypolicies"]
    resourceNames: ["nfs-provisioner"]
    verbs: ["use"]
---
kind: ClusterRoleBinding
apiVersion: rbac.authorization.k8s.io/v1
metadata:
name: run-nfs-provisioner
subjects:
- kind: ServiceAccount
    name: nfs-provisioner
    # replace with namespace where provisioner is deployed
    namespace: default
roleRef:
kind: ClusterRole
name: nfs-provisioner-runner
apiGroup: rbac.authorization.k8s.io
---
kind: Role
apiVersion: rbac.authorization.k8s.io/v1
metadata:
name: leader-locking-nfs-provisioner
rules:
- apiGroups: [""]
    resources: ["endpoints"]
    verbs: ["get", "list", "watch", "create", "update", "patch"]
---
kind: RoleBinding
apiVersion: rbac.authorization.k8s.io/v1
metadata:
name: leader-locking-nfs-provisioner
subjects:
- kind: ServiceAccount
    name: nfs-provisioner
    # replace with namespace where provisioner is deployed
    namespace: default
roleRef:
kind: Role
name: leader-locking-nfs-provisioner
apiGroup: rbac.authorization.k8s.io
---
apiVersion: v1
kind: ServiceAccount
metadata:
name: nfs-provisioner
---
kind: Service
apiVersion: v1
metadata:
name: nfs-provisioner
labels:
    app: nfs-provisioner
spec:
ports:
    - name: nfs
    port: 2049
    - name: nfs-udp
    port: 2049
    protocol: UDP
    - name: nlockmgr
    port: 32803
    - name: nlockmgr-udp
    port: 32803
    protocol: UDP
    - name: mountd
    port: 20048
    - name: mountd-udp
    port: 20048
    protocol: UDP
    - name: rquotad
    port: 875
    - name: rquotad-udp
    port: 875
    protocol: UDP
    - name: rpcbind
    port: 111
    - name: rpcbind-udp
    port: 111
    protocol: UDP
    - name: statd
    port: 662
    - name: statd-udp
    port: 662
    protocol: UDP
selector:
    app: nfs-provisioner
---
kind: Deployment
apiVersion: apps/v1
metadata:
name: nfs-provisioner
spec:
selector:
    matchLabels:
    app: nfs-provisioner
replicas: 1
strategy:
    type: Recreate
template:
    metadata:
    labels:
        app: nfs-provisioner
    spec:
    serviceAccount: nfs-provisioner
    containers:
        - name: nfs-provisioner
        resources:
            limits:
            cpu: "1"
            memory: "4294967296"
        image: release.daocloud.io/velero/nfs-provisioner:v3.0.0
        ports:
            - name: nfs
            containerPort: 2049
            - name: nfs-udp
            containerPort: 2049
            protocol: UDP
            - name: nlockmgr
            containerPort: 32803
            - name: nlockmgr-udp
            containerPort: 32803
            protocol: UDP
            - name: mountd
            containerPort: 20048
            - name: mountd-udp
            containerPort: 20048
            protocol: UDP
            - name: rquotad
            containerPort: 875
            - name: rquotad-udp
            containerPort: 875
            protocol: UDP
            - name: rpcbind
            containerPort: 111
            - name: rpcbind-udp
            containerPort: 111
            protocol: UDP
            - name: statd
            containerPort: 662
            - name: statd-udp
            containerPort: 662
            protocol: UDP
        securityContext:
            capabilities:
            add:
                - DAC_READ_SEARCH
                - SYS_RESOURCE
        args:
            - "-provisioner=example.com/nfs"
        env:
            - name: POD_IP
            valueFrom:
                fieldRef:
                fieldPath: status.podIP
            - name: SERVICE_NAME
            value: nfs-provisioner
            - name: POD_NAMESPACE
            valueFrom:
                fieldRef:
                fieldPath: metadata.namespace
        imagePullPolicy: "IfNotPresent"
        volumeMounts:
            - name: export-volume
            mountPath: /export
    volumes:
        - name: export-volume
        hostPath:
            path: /data
---
kind: StorageClass
apiVersion: storage.k8s.io/v1
metadata:
name: nfs
provisioner: example.com/nfs
mountOptions:
- vers=4.1
```
</details>
-
Run the nfs.yaml file on the control nodes of both clusters.
-
Check the status of the NFS Pod and wait for its status to become running (approximately 2 minutes).
Deploy MySQL Application
-
Prepare a PVC (Persistent Volume Claim) based on NFS storage for the MySQL application to store its data.
Use the command vi pvc.yaml to create a file named pvc.yaml on the node, and copy the following YAML content into the pvc.yaml file.
-
Run the pvc.yaml file using the kubectl tool on the node.
-
Deploy the MySQL application.
Use the command vi mysql.yaml to create a file named mysql.yaml on the node, and copy the following YAML content into the mysql.yaml file.
mysql.yaml
apiVersion: apps/v1 kind: Deployment metadata: labels: app: mysql-deploy name: mysql-deploy namespace: default spec: progressDeadlineSeconds: 600 replicas: 1 revisionHistoryLimit: 10 selector: matchLabels: app: mysql-deploy strategy: rollingUpdate: maxSurge: 25% maxUnavailable: 25% type: RollingUpdate template: metadata: creationTimestamp: null labels: app: mysql-deploy name: mysql-deploy spec: containers: - args: - --ignore-db-dir=lost+found env: - name: MYSQL_ROOT_PASSWORD value: dangerous image: release.daocloud.io/velero/mysql:5 imagePullPolicy: IfNotPresent name: mysql-deploy ports: - containerPort: 3306 protocol: TCP resources: limits: cpu: "1" memory: "4294967296" terminationMessagePath: /dev/termination-log terminationMessagePolicy: File volumeMounts: - mountPath: /var/lib/mysql name: data dnsPolicy: ClusterFirst restartPolicy: Always schedulerName: default-scheduler securityContext: fsGroup: 999 terminationGracePeriodSeconds: 30 volumes: - name: data persistentVolumeClaim: claimName: mydata -
Run the mysql.yaml file using the kubectl tool on the node.
-
Check the status of the MySQL Pod.
Run
kubectl get pod | grep mysqlto view the status of the MySQL Pod and wait for its status to become running (approximately 2 minutes).Note
- If the MySQL Pod remains in a non-running state for a long time, it is usually because NFS dependencies are not installed on all nodes in the cluster.
- Run kubectl describe pod ${mysql pod name} to view detailed information about the Pod.
- If there is an error message like MountVolume.SetUp failed for volume "pvc-4ad70cc6-df37-4253-b0c9-8cb86518ccf8" : mount failed: exit status 32 , please delete the previous resources by executing kubectl delete -f nfs.yaml/pvc.yaml/mysql.yaml and start from deploying the NFS service again.
-
Write data to the MySQL application.
To verify the success of the data migration later, you can use a script to write test data to the MySQL application.
-
Use the command vi insert.sh to create a script named insert.sh on the node, and copy the following content into the script.
insert.sh
#!/bin/bash function rand(){ min=$1 max=$(($2-$min+1)) num=$(date +%s%N) echo $(($num%$max+$min)) } function insert(){ user=$(date +%s%N | md5sum | cut -c 1-9) age=$(rand 1 100) sql="INSERT INTO test.users(user_name, age)VALUES('${user}', ${age});" echo -e ${sql} kubectl exec deploy/mysql-deploy -- mysql -uroot -pdangerous -e "${sql}" } kubectl exec deploy/mysql-deploy -- mysql -uroot -pdangerous -e "CREATE DATABASE IF NOT EXISTS test;" kubectl exec deploy/mysql-deploy -- mysql -uroot -pdangerous -e "CREATE TABLE IF NOT EXISTS test.users(user_name VARCHAR(10) NOT NULL,age INT UNSIGNED)ENGINE=InnoDB DEFAULT CHARSET=utf8;" while true;do insert sleep 1 done -
Add permission to insert.sh and run this script.
Expected output
mysql: [Warning] Using a password on the command line interface can be insecure. mysql: [Warning] Using a password on the command line interface can be insecure. INSERT INTO test.users(user_name, age)VALUES('dc09195ba', 10); mysql: [Warning] Using a password on the command line interface can be insecure. INSERT INTO test.users(user_name, age)VALUES('80ab6aa28', 70); mysql: [Warning] Using a password on the command line interface can be insecure. INSERT INTO test.users(user_name, age)VALUES('f488e3d46', 23); mysql: [Warning] Using a password on the command line interface can be insecure. INSERT INTO test.users(user_name, age)VALUES('e6098695c', 93); mysql: [Warning] Using a password on the command line interface can be insecure. INSERT INTO test.users(user_name, age)VALUES('eda563e7d', 63); mysql: [Warning] Using a password on the command line interface can be insecure. INSERT INTO test.users(user_name, age)VALUES('a4d1b8d68', 17); mysql: [Warning] Using a password on the command line interface can be insecure. -
Press Ctrl + C on the keyboard simultaneously to pause the script execution.
-
Go to the MySQL Pod and check the data written in MySQL.
Expected output
[root@g-master1 ~]# kubectl exec deploy/mysql-deploy -- mysql -uroot -pdangerous -e "SELECT * FROM test.users;"
mysql: [Warning] Using a password on the command line interface can be insecure.
user_name   age
dc09195ba   10
80ab6aa28   70
f488e3d46   23
e6098695c   93
eda563e7d   63
a4d1b8d68   17
ea47546d9   86
a34311f2e   47
740cefe17   33
ede85ea28   65
b6d0d6a0e   46
f0eb38e50   44
c9d2f28f5   72
8ddaafc6f   31
3ae078d0e   23
6e041631e   96
-
Install Velero Plugin on Both Clusters
Note
The velero plugin needs to be installed on both the source and target clusters.
Refer to the Install Velero Plugin documentation and the MinIO configuration below to install the velero plugin on the main-cluster and recovery-cluster .
| MinIO Server Address | Bucket | Username | Password |
|---|---|---|---|
| http://10.7.209.110:9000 | mysql-demo | root | dangerous |
Note
When installing the plugin, replace S3url with the MinIO server address prepared for this demonstration, and replace the bucket with an existing bucket in MinIO.
Backup MySQL Application and Data
-
Add a unique label, backup=mysql , to the MySQL application and PVC data. This will facilitate resource selection during backup.
-
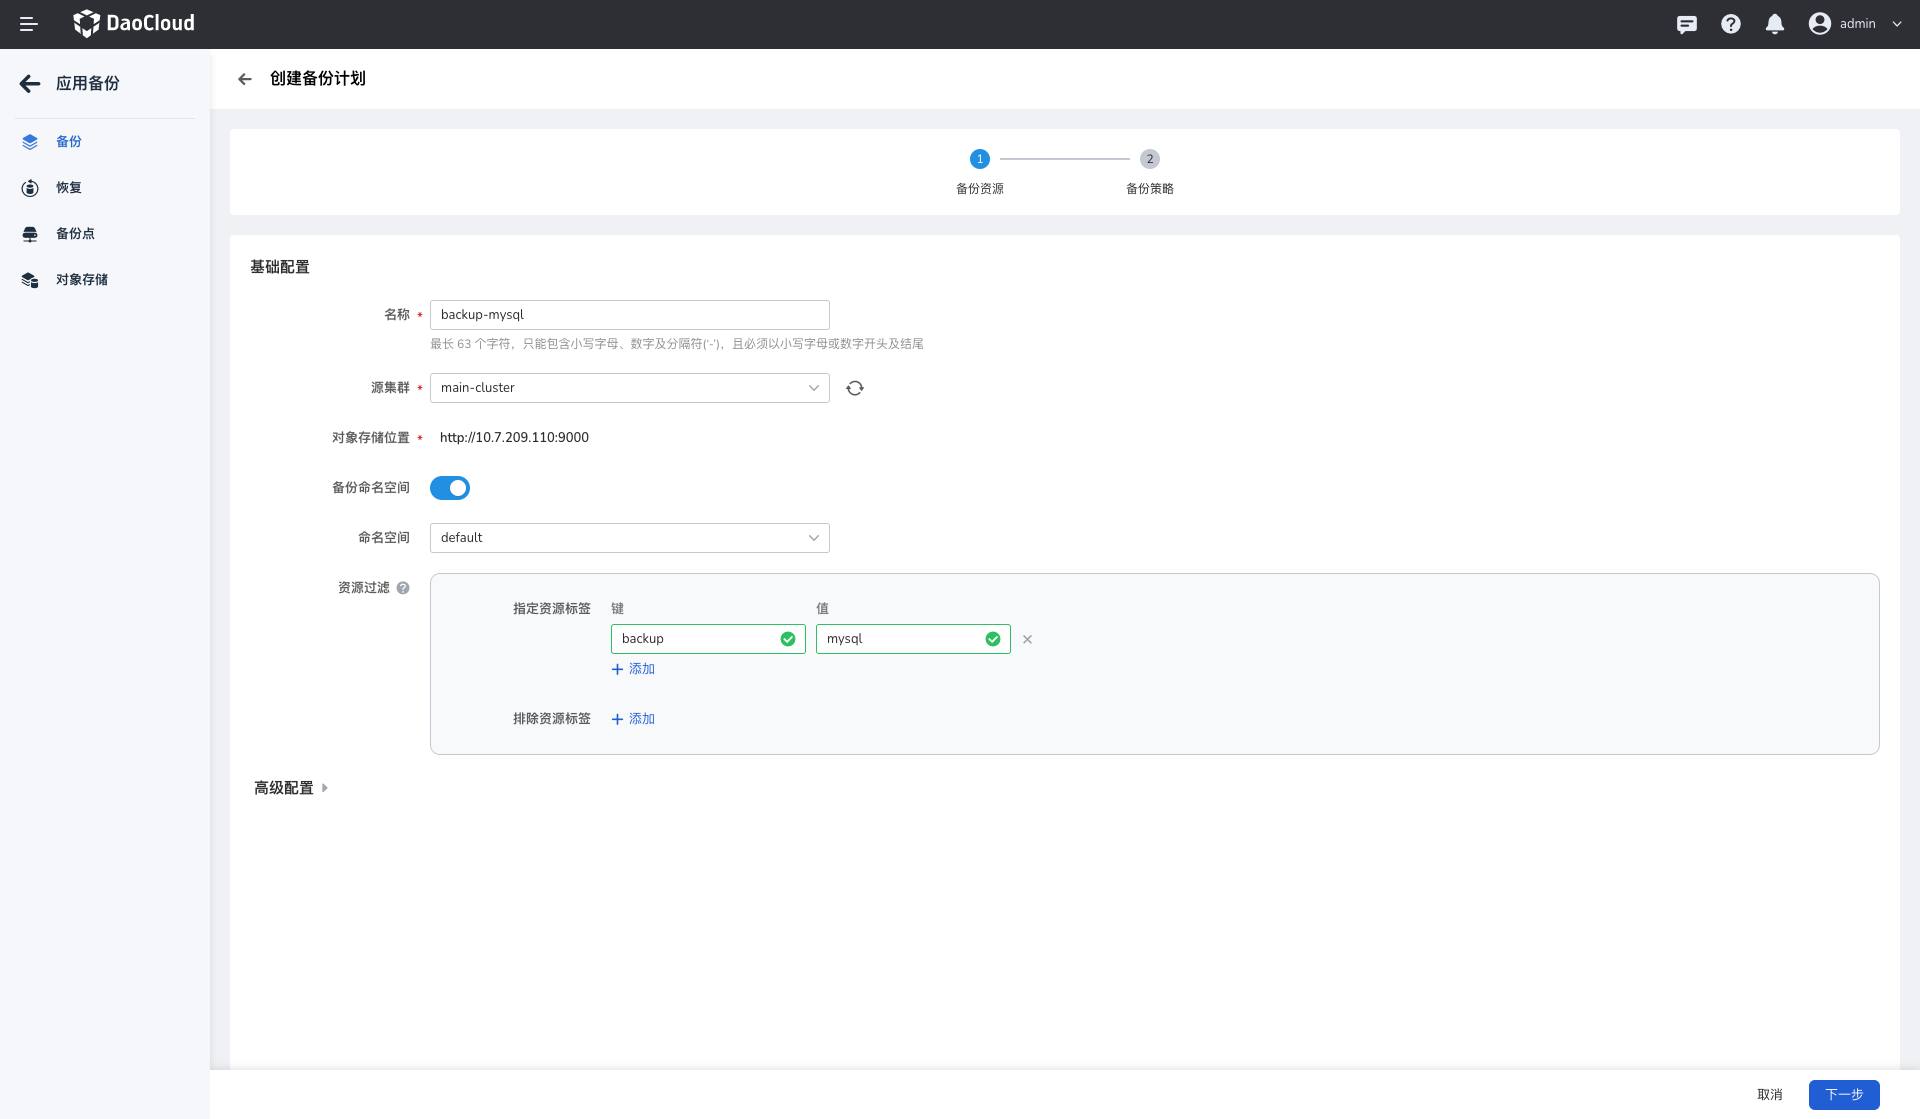
Refer to the steps described in Application Backup and the parameters below to create an application backup.
-
Name: backup-mysql (can be customized)
- Source Cluster: main-cluster
- Namespace: default
- Resource Filter - Specify resource label: backup:mysql
- After creating the backup plan, the page will automatically return to the backup plan list. Find the newly created backup plan backup-mysq and click the more options button __ ...__ in the plan. Select "Run Now" to execute the newly created backup plan.
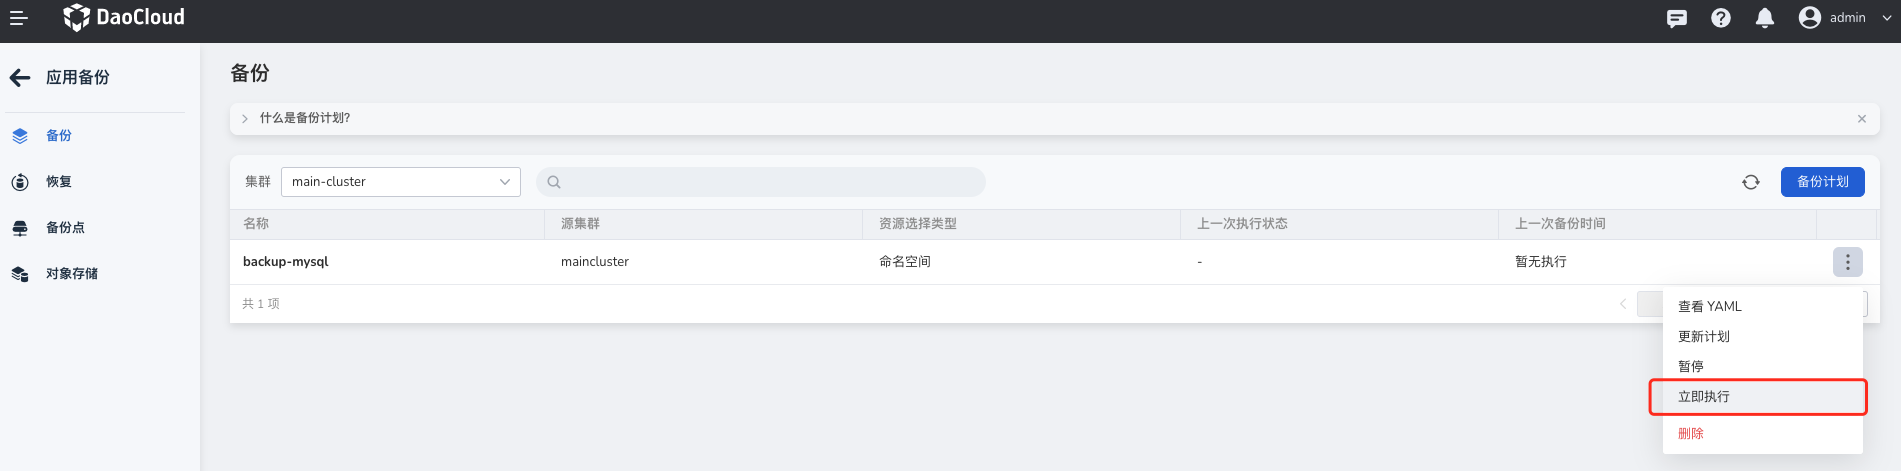
- Wait for the backup plan execution to complete before proceeding with the next steps.
Cross-Cluster Recovery of MySQL Application and Data
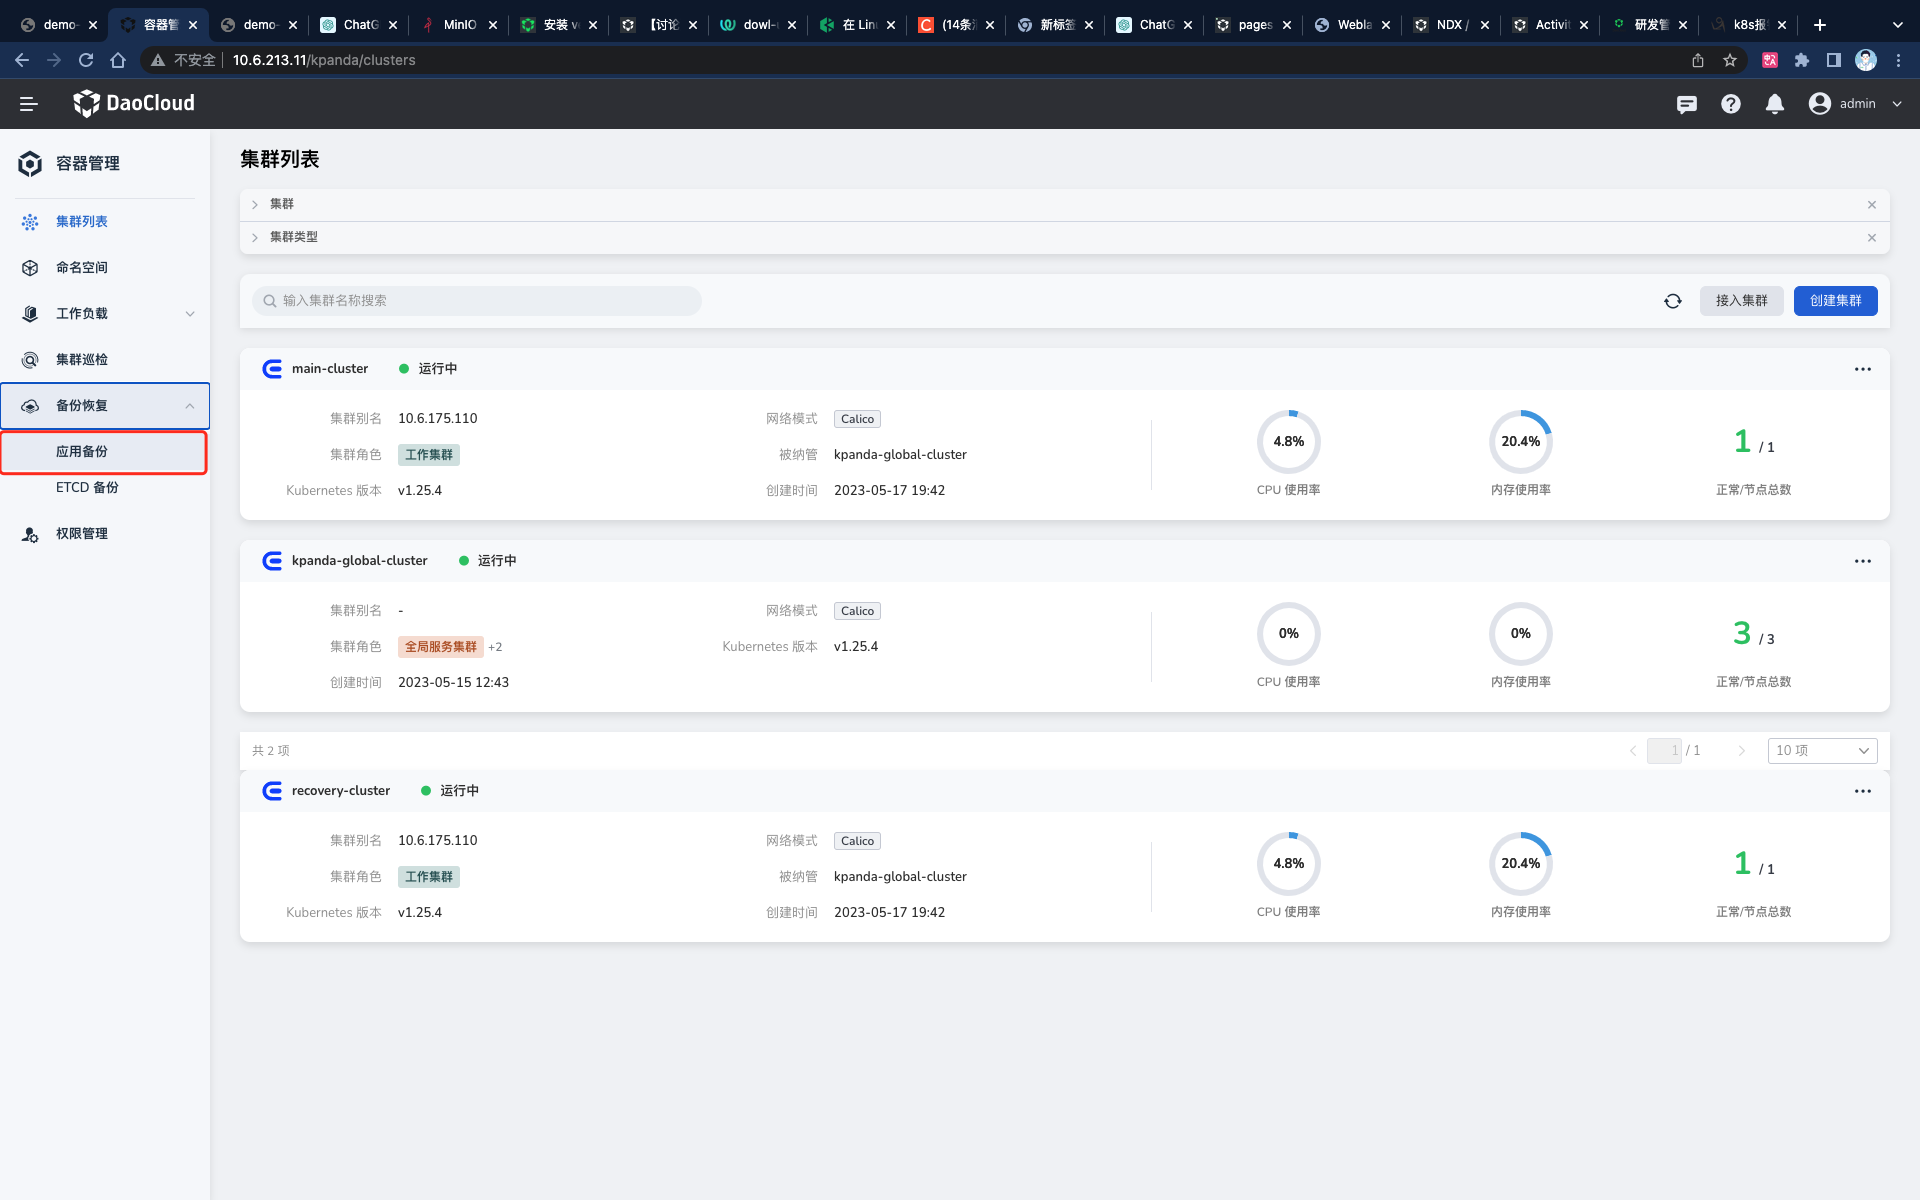
- Log in to the DCE 5.0 platform and select Container Management -> Backup & Restore -> Application Backup from the left navigation menu.
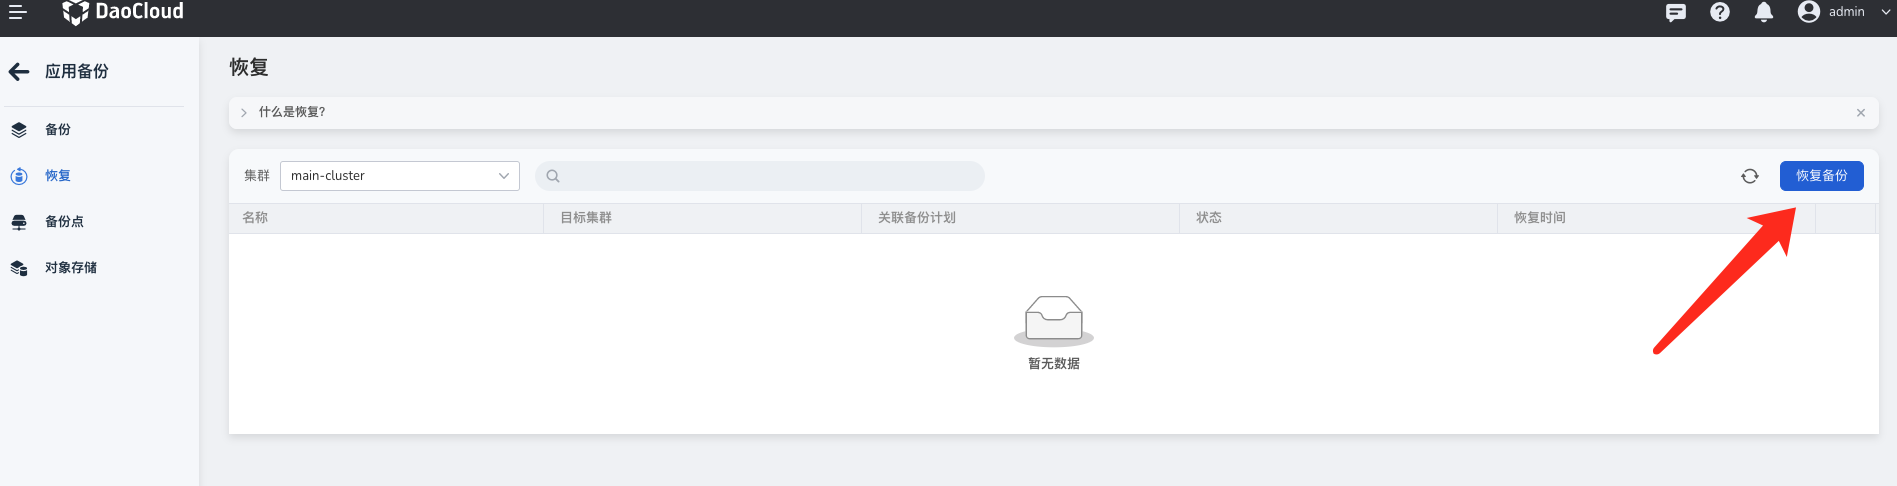
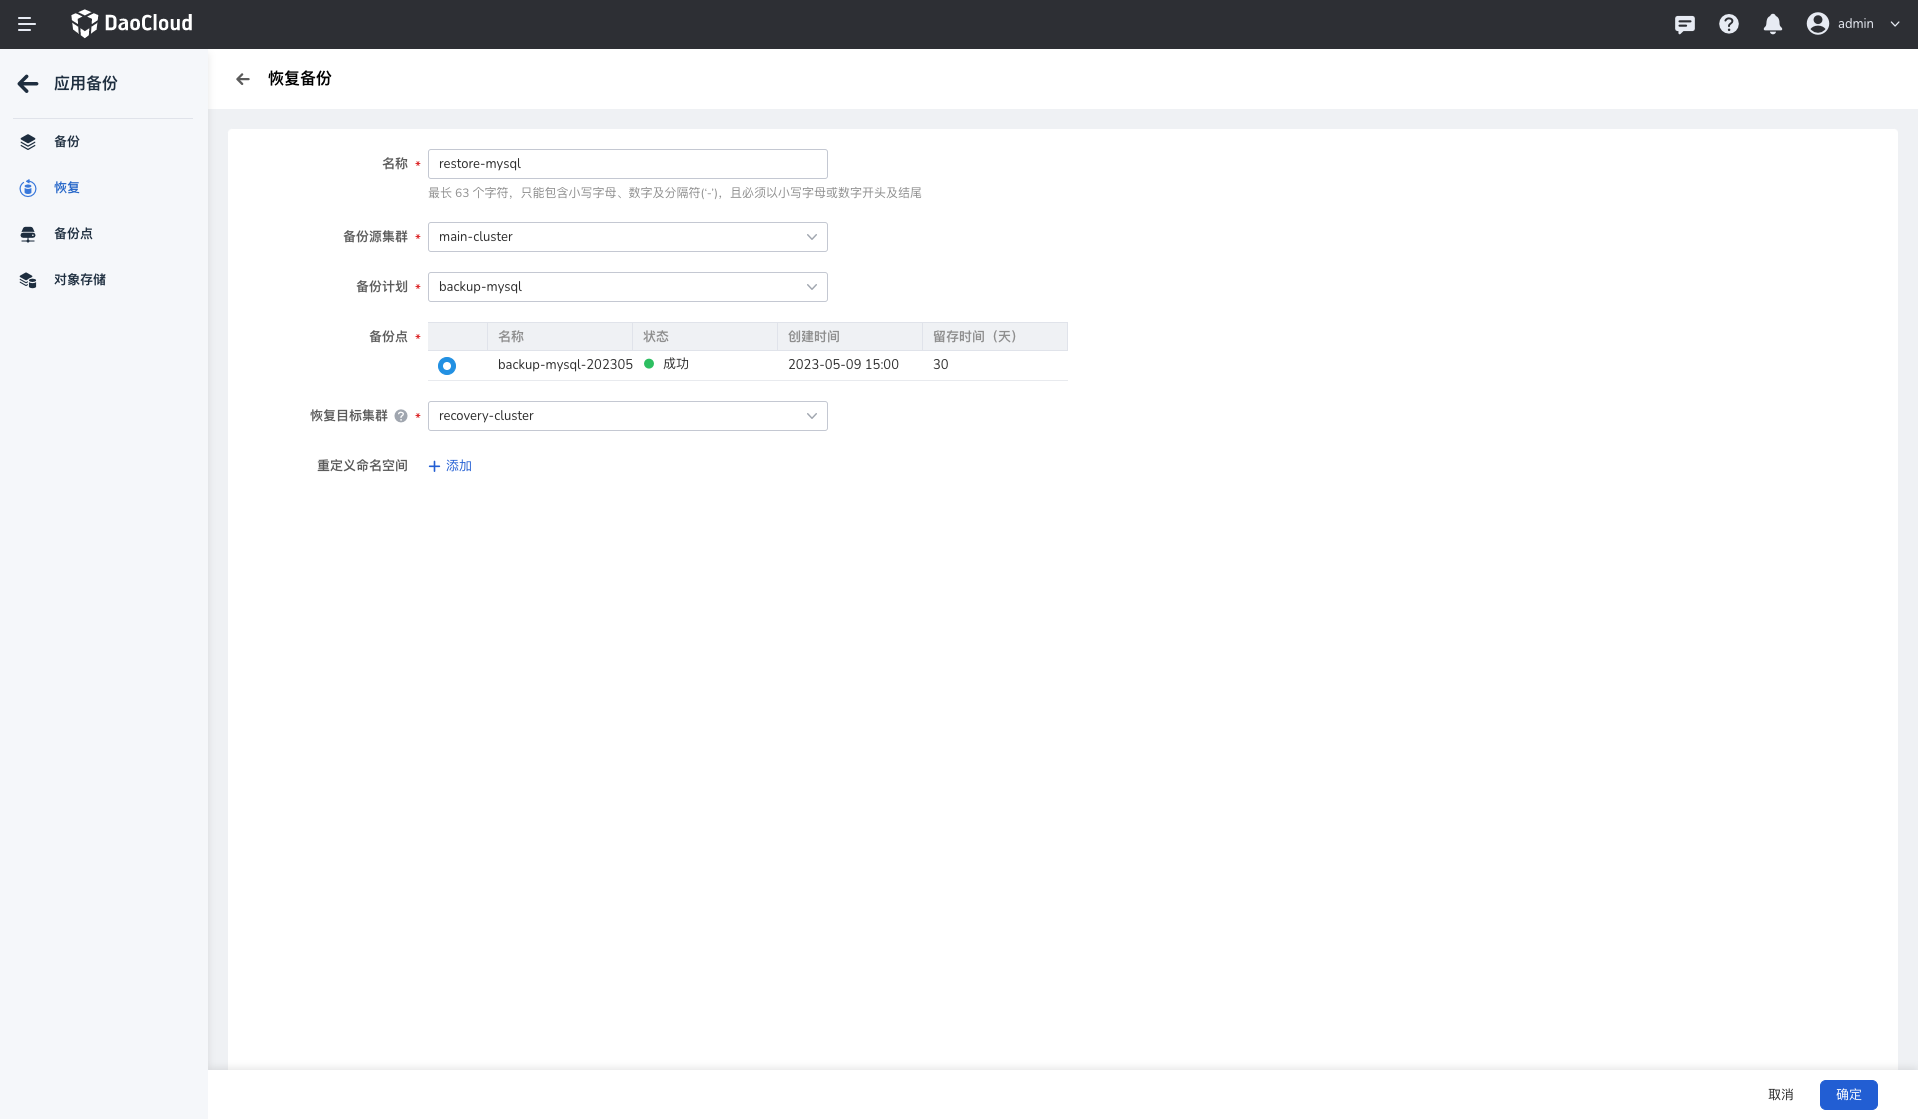
- Select Recovery in the left-side toolbar, then click Restore Backup on the right side.
-
Fill in the parameters based on the following instructions:
-
Name: restore-mysql (can be customized)
- Backup Source Cluster: main-cluster
- Backup Plan: backup-mysql
- Backup Point: default
- Recovery Target Cluster: recovery-cluster
- Refresh the backup plan list and wait for the backup plan execution to complete.
验证数据是否成功恢复
-
登录 recovery-cluster 集群的控制节点,查看 mysql-deploy 负载是否已经成功备份到当前集群。
Expected output如下:
-
Check if the data in MySQL datasheet is restored or not.
Expected output如下:
[root@g-master1 ~]# kubectl exec deploy/mysql-deploy -- mysql -uroot -pdangerous -e "SELECT * FROM test.users;"
mysql: [Warning] Using a password on the command line interface can be insecure.
user_name   age
dc09195ba   10
80ab6aa28   70
f488e3d46   23
e6098695c   93
eda563e7d   63
a4d1b8d68   17
ea47546d9   86
a34311f2e   47
740cefe17   33
ede85ea28   65
b6d0d6a0e   46
f0eb38e50   44
c9d2f28f5   72
8ddaafc6f   31
3ae078d0e   23
6e041631e   96
Success
As you can see, the data in the Pod is consistent with the data inside the Pods in the main-cluster . This indicates that the MySQL application and its data from the main-cluster have been successfully recovered to the recovery-cluster cluster.