Limited Scenario Migration from DCE 4.0 to DCE
This article introduces the DCE 4.0 -> DCE migration process in some scenarios.
Environment Preparation
- An available DCE 4.0 environment.
- An available DCE environment.
- A Kubernetes cluster available for data restoration, hereinafter referred to as the restoration cluster .
Prerequisites
-
Install the CoreDNS plugin on DCE 4.0.
-
Migrate DCE 4.0 to DCE. Refer to Integrate DCE 4.0 for the migration steps. The DCE 4.0 cluster migrated to DCE is hereinafter referred to as the backup cluster .
Note
When integrating the cluster, select DaoCloud DCE4 as the distribution.
-
Install Velero on the managed DCE 4.0 cluster. Refer to Install Velero for installation steps.
-
Migrate the restoration cluster to DCE, which can be done either by creating a cluster or by integrating a cluster.
-
Install Velero on the restoration cluster. Refer to Install Velero for installation steps.
Note
- The object storage configuration must be consistent between the Velero installed in the managed DCE 4.0 cluster and the Velero installed in the restoration cluster.
- If you need to perform Pod migration, turn on the Migration Plugin Configuration switch in the form parameters (velero 5.2.0+ supports this configuration).

Optional Configuration
If you need to perform Pod migration, execute the following steps after the prerequisites are completed. They can be ignored for non-Pod migration scenarios.
Note
The following steps are all executed in the restoration cluster managed by DCE.
Configure the Velero Plugin
-
After the Velero plugin is installed, you can execute the following YAML file to complete the configuration of the Velero plugin.
Note
When installing the Velero plugin, you must turn on the Migration Plugin Configuration switch in the form parameters.
Click to view the complete YAML example
apiVersion: v1 kind: ConfigMap metadata: name: velero-plugin-for-migration # (1)! namespace: velero # (2)! labels: # (3)! velero.io/plugin-config: "velero-plugin-for-migration" # (4)! velero.io/velero-plugin-for-migration: RestoreItemAction # (5)! data: velero-plugin-for-migration: '{"resourcesSelector":{"includedNamespaces":["kube-system"],"excludedNamespaces":["default"],"includedResources":["pods","deployments","ingress"],"excludedResources":["secrets"],"skipRestoreKinds":["endpointslice"],"labelSelector":"app:dao-2048"},"resourcesConverter":[{"ingress":{"enabled":true,"apiVersion":"extensions/v1beat1"}}],"resourcesOperation":[{"kinds":["pod"],"domain":"labels","operation":{"add":{"key1":"values","key2":""},"remove":{"key3":"values","key4":""},"replace":{"key5":["source","dest"],"key6":["","dest"],"key7":["source",""]}}},{"kinds":["deployment","daemonset"],"domain":"annotations","scope":"resourceSpec","operation":{"add":{"key1":"values","key2":""},"remove":{"key3":"values","key4":""},"replace":{"key5":["source","dest"],"key6":["","dest"],"key7":["source",""]}}}]}'- any name can be used; Velero uses the labels (below) to identify it rather than the name
- must be in the velero namespace
- the below labels should be used verbatim in your ConfigMap
- this value-less label identifies the ConfigMap as config for a plugin (i.e. the built-in restore item action plugin)
- this label identifies the name and kind of plugin that this ConfigMap is for.
Note
- Do not modify the name of the plugin configuration ConfigMap, and it must be created in the velero namespace.
- When filling in the plugin configuration, pay attention to distinguishing whether you are filling in resource resources or kind.
- After modifying the plugin configuration, restart the velero pod.
- The YAML below is a display style for the plugin configuration, and it needs to be converted to JSON and added to the ConfigMap.
Refer to the following YAML and comments for how to configure velero-plugin-for-migration:
resourcesSelector: # (1)! includedNamespaces: # (2)! - kube-system excludedNamespaces: # (3)! - default includedResources: # (4)! - pods - deployments - ingress excludedResources: # (5)! - secrets skipRestoreKinds: - endpointslice # (6)! labelSelector: 'app:dao-2048' resourcesConverter: # (7)! - ingress: enabled: true apiVersion: extensions/v1beat1 resourcesOperation: # (8)! - kinds: ['pod'] # (9)! domain: labels # (10)! operation: add: key1: values # (11)! key2: '' remove: key3: values # (12)! key4: '' # (13)! replace: key5: # (14)! - source - dest key6: # (15)! - "" - dest key7: # (16)! - source - "" - kinds: ['deployment', 'daemonset'] # (17)! domain: annotations # (18)! scope: resourceSpec # (19)! operation: add: key1: values # (20)! key2: '' remove: key3: values # (21)! key4: '' # (22)! replace: key5: # (23)! - source - dest key6: # (24)! - "" - dest key7: # (25)! - source - ""- The resources that the plugin needs to handle or ignore
- The plugin excludes the namespaces included in the backup
- The plugin does not handle the namespaces included in the backup
- The plugin handles the resources included in the backup
- The plugin does not handle the resources included in the backup
- The restore plugin skips the resources included in the backup, that is, it does not perform the restore operation. This resource needs to be included in includedResources to be captured by the plugin. This field needs to be filled with the resource kind, and is case insensitive
- The resources that the restore plugin needs to convert. Configuring the conversion of specific resource fields is not supported
- The restore plugin modifies the annotations/labels of the resource/template
- Fill in the resource kind included in the backup, and is case insensitive
- Handle the resource labels
- Add labels key1:values
- Remove labels key3:values, matching key and values
- Remove labels key4, matching only the key and not the values
- Replace labels key5:source -> key5:dest
- Replace labels key6: -> key6:dest, not matching key6 values
- Replace labels key7:source -> key7:""
- Fill in the resource kind included in the backup, and is case insensitive
- Handle the resource template annotations
- Handle the annotations or labels of the resource template spec, depending on the domain configuration
- Add annotations key1:values
- Remove annotations key3:values, matching key and values
- Remove annotations key4, matching only the key and not the values
- Replace annotations key5:source -> key5:dest
- Replace annotations key6: -> key6:dest, not matching key6 values
- Replace annotations key7:source -> key7:""
-
After obtaining the above configuration, the velero-plugin-for-dce plugin performs chained operations on resources according to the configuration. For example, after ingress is processed by resourcesConverter, it will also be processed by resourcesOperation.
Image Repository Replacement
If the image address has changed, you can configure the mapping by creating a ConfigMap in the Velero namespace to complete the replacement of the image address.
Migration resources to which this configuration applies: pod/deployment/statefulsets/daemonset/replicaset/replicationcontroller/job/cronjob.
Note
- The ConfigMap is created in the Velero namespace in the restoration cluster.
- Only one ConfigMap with the label velero.io/change-image-name: RestoreItemAction can be configured.
- The mapping rule only matches the first rule that fits, corresponding to the case in the ConfigMap.
apiVersion: v1
kind: ConfigMap
metadata:
  name: change-image-name-config # (1)!
  namespace: velero # (2)!
  labels: # (3)!
    velero.io/plugin-config: "" # (4)!
    velero.io/change-image-name: RestoreItemAction # (5)!
data:
  "case1": "1.1.1.1:5000,2.2.2.2:3000" # (6)!
  "case2": "5000,3000"
  "case3": "abc:test,edf:test"
  "case5": "test,latest"
  "case4": "1.1.1.1:5000/abc:test,2.2.2.2:3000/edf:test"
  "case5": "dev/,test/" # (7)!
- any name can be used; Velero uses the labels (below) to identify it rather than the name
- must be in the velero namespace
- the below labels should be used verbatim in your ConfigMap
- this value-less label identifies the ConfigMap as config for a plugin (i.e. the built-in restore item action plugin)
- this label identifies the name and kind of plugin that this ConfigMap is for.
- add 1+ key-value pairs here, where the key can be any words that ConfigMap accepts. the value should be
<old_image_name_sub_part><delimiter><new_image_name_sub_part>for current implementation the<delimiter>can only be "," eg: in case your old image name is 1.1.1.1:5000/abc:test - Please note that image name may contain more than one part that matching the replacing words. eg: in case your old image names are
dev/image1:devanddev/image2:dev, you want change totest/image1:devandtest/image2:devthe suggested replacing rule is: this will avoid unexpected replacement to the second "dev".
Migration Scenarios
Resource and Data Migration
The following uses business application migration as an example.
Migration Scenario: Backup and Restore of a StatefulSet + PVC Stateful Application
Known prerequisites: A stateful application (StatefulSet), such as etcd, has been deployed in a namespace in the backup cluster, and a PVC is mounted.
Backup
First back up the resources that need to be backed up in the backup cluster. The process is as follows. Before that, you can read Application Backup first:
-
Enter the Container Management module, click Backup Recovery -> Application Backup on the left navigation bar, and enter the Application Backup list page.
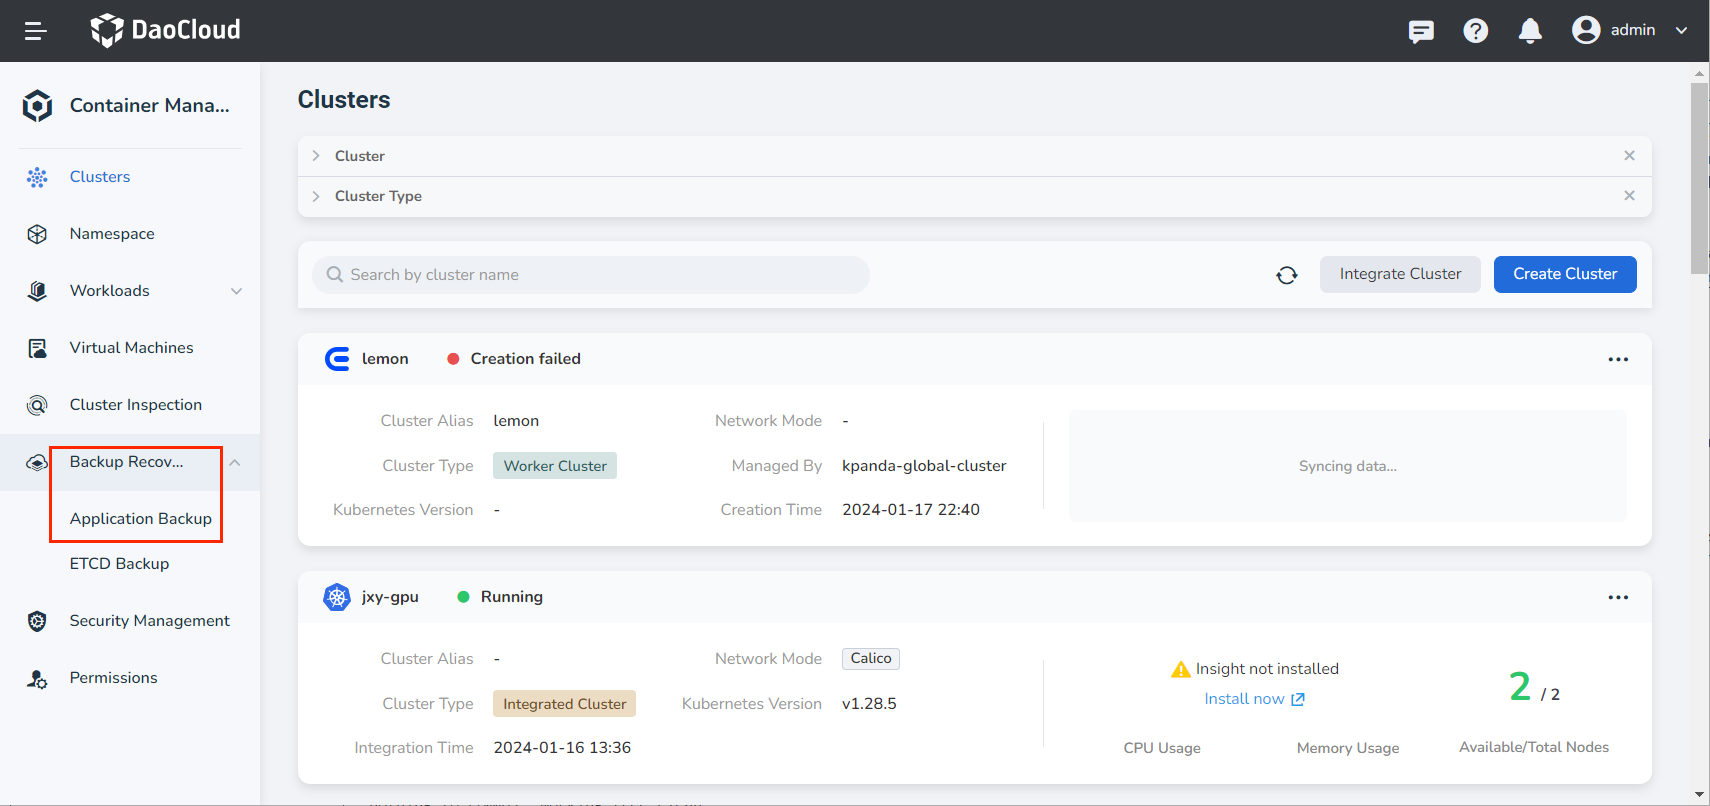
-
On the Application Backup list page, select the backup cluster. Click Backup Plan in the upper right corner to create a new backup plan.
-
Refer to the instructions below to fill in the backup configuration.
- Name: The name of the new backup plan.
- Source Cluster: The cluster where the application backup plan is to be executed.
- Object Storage Location: The access path of the object storage configured when installing velero on the source cluster.
- Namespace: The namespaces that need to be backed up, multiple selections are supported.
- Advanced Configuration: Back up specific resources in the namespace based on resource labels, such as an application, or do not back up specific resources in the namespace based on resource labels during backup.
Note
- If you need to back up resources of multiple or all namespaces in batches, select multiple or all namespaces in the namespace option.
- If you need to back up specific resources in a namespace, set labels for resource filtering.

Restore
After the data of the backup cluster is backed up, restore the resources and data in the restoration cluster. The operation steps are as follows:
-
Enter the Container Management module, click Backup Recovery -> Application Backup on the left navigation bar, and enter the Application Restore list page.
-
On the Application Restore list page, select the restoration cluster. Click Restore Backup in the upper right corner to create a restore backup task.

-
Fill in the backup restore configuration and execute the backup.

Note
- The above migration process also applies to the following resources:
- Auxiliary resources of the workload, such as secret and configmap
- Multi-service scenarios: Helm application + Redis
- If RBAC is configured for namespace resources and cluster resources, the corresponding RBAC of that category will also be migrated to DCE after the resources are migrated successfully.
- The above migration process also applies to the following resources:
Image Repository Image Migration
The following describes the steps for image repository image migration.
-
Integrate the DCE 4.0 image repository with the Kangaroo repository integration (admin). Refer to Repository Integration for the operation steps.

Note
- Use the VIP address IP of dce-registry as the repository address.
- Use the account and password of the DCE 4.0 administrator.
-
Create or integrate a Harbor repository in the administrator interface to migrate the source images.

-
Enter the Harbor repository instance, configure the target repository and synchronization rules. After the rules are triggered, Harbor will automatically pull images from dce-registry.


-
Click the name of the synchronization rule to enter the synchronization task details page, where you can view whether the image synchronization is successful.

Network Policy Migration
Calico Network Policy Migration
Refer to the resource and data migration process to migrate the Calico service in DCE 4.0 to DCE. Due to the different IPPool names, services may become abnormal. After migration, manually delete the annotations in the service YAML to ensure that the service starts properly.
Note
- In DCE 4.0, the name is default-ipv4-ippool.
- In DCE, the name is default-pool.
annotations:
  dce.daocloud.io/parcel.net.type: calico
  dce.daocloud.io/parcel.net.type: default-ipv4-ippool


Parcel Underlay Network Policy Migration
The following describes the steps for Parcel Underlay network policy migration.
Note
- During migration, the IP addresses created in DCE should be consistent with the IP addresses used in DCE 4.0, and the number of replicas created should also be consistent.
-
Install the Helm application spiderpool in the restoration cluster . Refer to Install Spiderpool for the installation process.

-
Go to the details page of the restoration cluster and select Container Network -> Network Configuration from the left menu.

-
Check the IP addresses used in DCE4, and create the same subnet IP addresses and IP pool as in DCE4 in the DCE5.0 Static IP Pool . For the use of subnets and IP pools, refer to Create a Subnet and IP Pool.


After the subnet is created, create an IP pool in the subnet details page and add the IP start address and the number of IPs.

-
Create a macvlan-type Multus CR instance and select the IP pool that was just created. For specific usage, refer to Create a Multus CR

-
Go to the Custom Resources page and manually change the
detectIPConflictfield ofspidermultusconfigs.spiderpool.spidernet.iototrue, which enables IP conflict detection.
-
Go to Workloads -> Container NIC Configuration, select the macvlan-type Multus CR that was just created for the NIC, and select the created IP pool for the NIC IP pool, then click OK to complete the creation. If the container group is Running at this point, it means it can be accessed normally.


-
Create the velero dce plugin configmap.
--- resourcesSelector: includedResources: - pods - deployments resourcesConverter: resourcesOperation: - kinds: - pod domain: annotations operation: replace: cni.projectcalico.org/ipv4pools: - '["default-ipv4-ippool"]' - default-pool - kinds: - deployment domain: annotations scope: resourceSpec operation: remove: dce.daocloud.io/parcel.egress.burst: dce.daocloud.io/parcel.egress.rate: dce.daocloud.io/parcel.ingress.burst: dce.daocloud.io/parcel.ingress.rate: dce.daocloud.io/parcel.net.type: dce.daocloud.io/parcel.net.value: dce.daocloud.io/parcel.ovs.network.status: add: ipam.spidernet.io/subnets: ' [ { "interface": "eth0", "ipv4": ["d5"] } ]' v1.multus-cni.io/default-network: kube-system/d5multus -
Verify whether the migration is successful.
-
Check whether there are annotations in the application YAML.
-
Check whether the Pod IP is within the configured IP pool.
-