Virtual Machine Configuration GPU (Nvidia)
This article will introduce the prerequisites for configuring GPU when creating a virtual machine.
The key point of configuring GPU for virtual machines is to configure the GPU Operator so that different software components can be deployed on working nodes depending on the GPU workloads configured on these nodes. Taking the following three nodes as examples:
- The controller-node-1 node is configured to run containers.
- The work-node-1 node is configured to run virtual machines with direct GPUs.
- The work-node-2 node is configured to run virtual machines with virtual vGPUs.
Assumptions, Limitations, and Dependencies
Working nodes can run GPU-accelerated containers, virtual machines with direct GPUs, or virtual machines with vGPUs, but not a combination of any.
- Working nodes can run GPU-accelerated containers, virtual machines with direct GPUs, or virtual machines with vGPUs separately, without supporting any combination forms.
- Cluster administrators or developers need to understand the cluster situation in advance and correctly label the nodes to indicate the type of GPU workload they will run.
- The working nodes running virtual machines with direct GPUs or vGPUs are assumed to be bare metal. If the working nodes are virtual machines, the GPU direct pass-through feature needs to be enabled on the virtual machine platform. Please consult the virtual machine platform provider.
- Nvidia MIG vGPU is not supported.
- The GPU Operator will not automatically install GPU drivers in virtual machines.
Enable IOMMU
To enable the GPU direct pass-through feature, the cluster nodes need to enable IOMMU. Please refer to How to Enable IOMMU. If your cluster is running on a virtual machine, consult your virtual machine platform provider.
Build vGPU Manager Image
Note: Building a vGPU Manager image is only required when using NVIDIA vGPUs. If you plan to use only GPU direct pass-through, skip this section.
The following are the steps to build the vGPU Manager image and push it to the container registry:
-
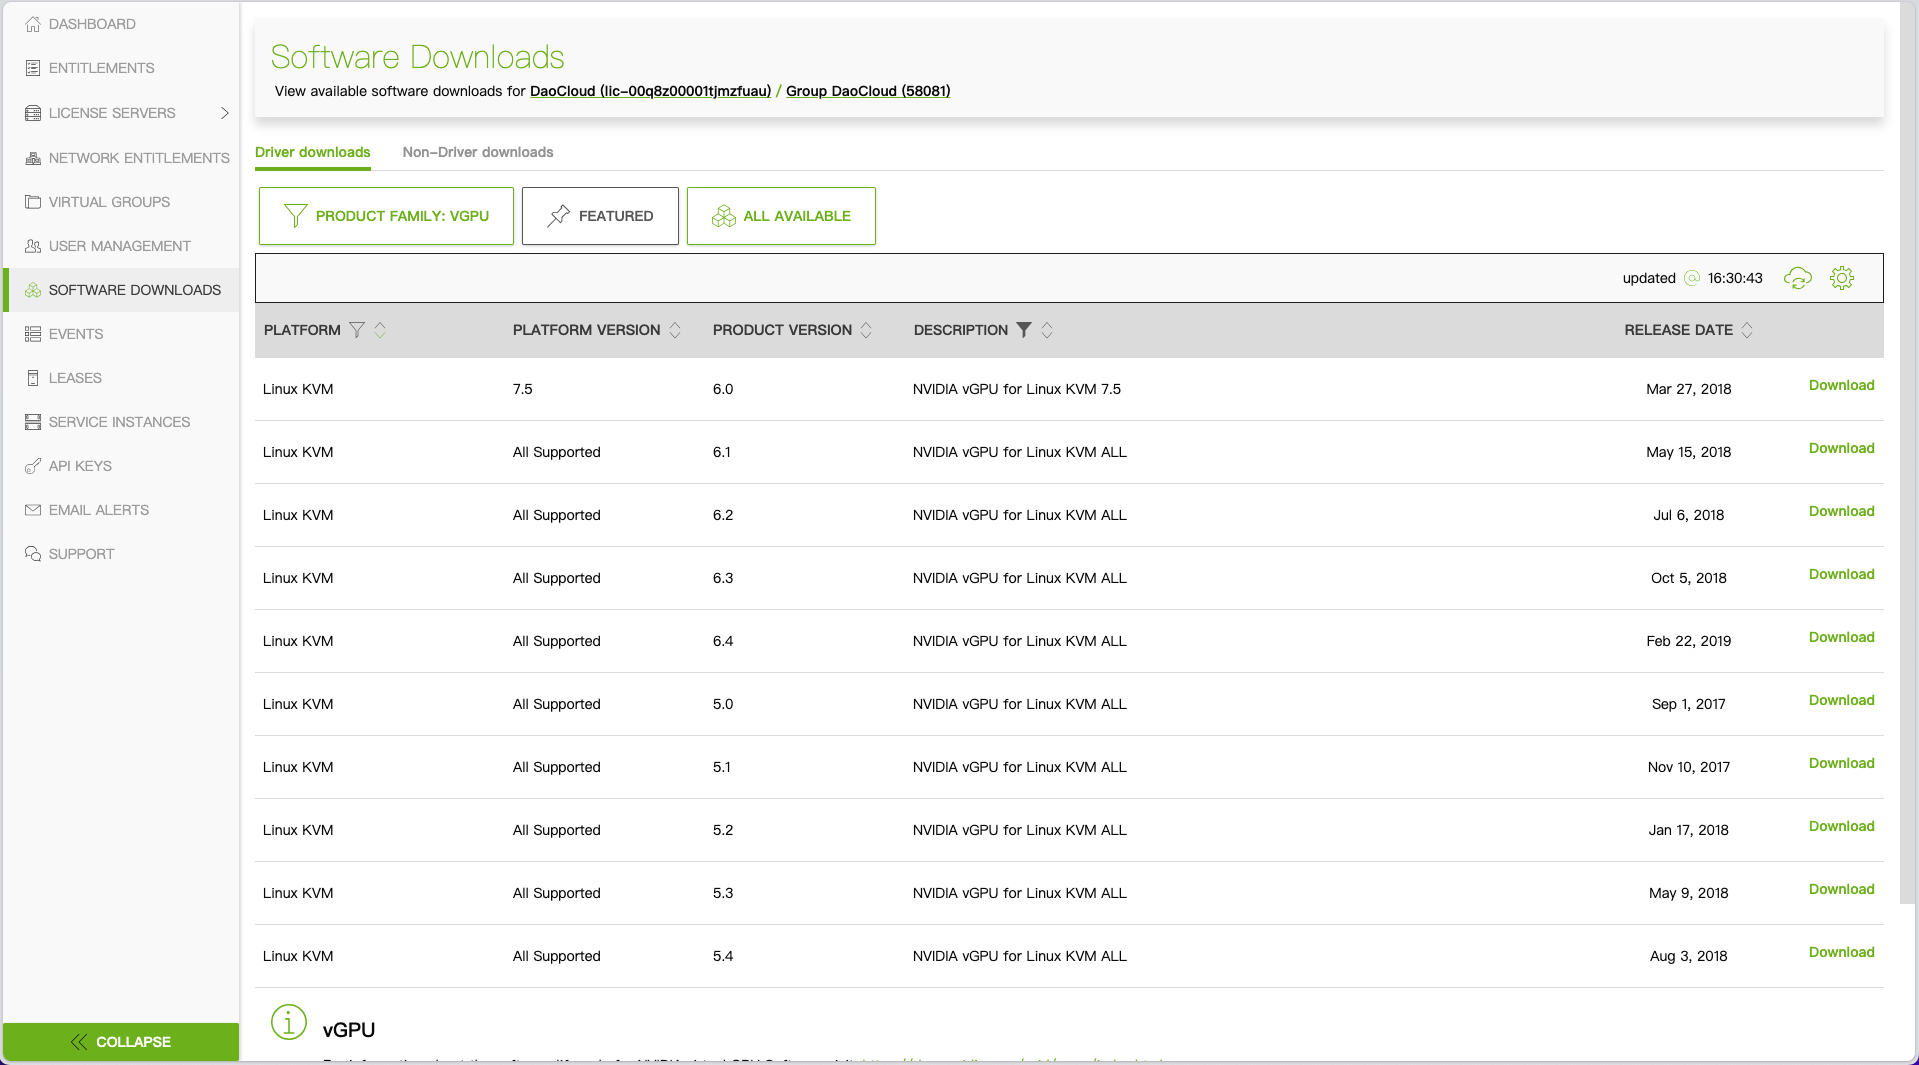
Download the vGPU software from the NVIDIA Licensing Portal.
- Log in to the NVIDIA Licensing Portal and go to the Software Downloads page.
- The NVIDIA vGPU software is located in the Driver downloads tab on the Software Downloads page.
- Select VGPU + Linux in the filter criteria and click Download to get the software package for Linux KVM. Unzip the downloaded file (
NVIDIA-Linux-x86_64-<version>-vgpu-kvm.run).
-
Clone the container-images/driver repository in the terminal
-
Switch to the vgpu-manager directory for your operating system
-
Copy the .run file extracted in step 1 to the current directory
-
Set environment variables
- PRIVATE_REGISTRY: Name of the private registry to store the driver image.
- VERSION: Version of NVIDIA vGPU Manager, downloaded from the NVIDIA Software Portal.
- OS_TAG: Must match the operating system version of the cluster node.
- CUDA_VERSION: CUDA base image version used to build the driver image.
-
Build the NVIDIA vGPU Manager Image
-
Push the NVIDIA vGPU Manager image to your container registry
Label Cluster Nodes
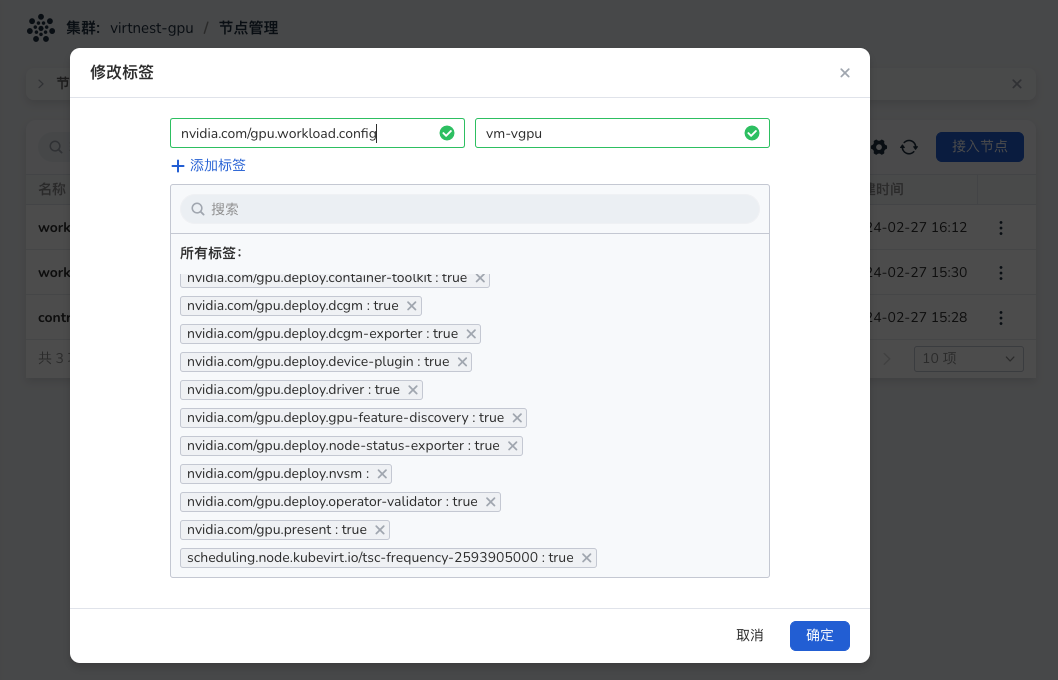
Go to Container Management , select your worker cluster and click Nodes. On the right of the list, click ┇ and select Edit Labels to add labels to the nodes. Each node can only have one label.
You can assign the following values to the labels: container, vm-passthrough, and vm-vgpu.
Install Nvidia Operator
-
Go to Container Management , select your worker cluster, click Helm Apps -> Helm Charts , choose and install gpu-operator. You need to modify some fields in the yaml.
gpu-operator.sandboxWorkloads.enabled=true gpu-operator.vgpuManager.enabled=true gpu-operator.vgpuManager.repository=<your-register-url> # (1)! gpu-operator.vgpuManager.image=vgpu-manager gpu-operator.vgpuManager.version=<your-vgpu-manager-version> # (2)! gpu-operator.vgpuDeviceManager.enabled=true- Fill in the container registry address refered in the step "Build vGPU Manager Image".
- Fill in the VERSION refered in the step "Build vGPU Manager Image".
-
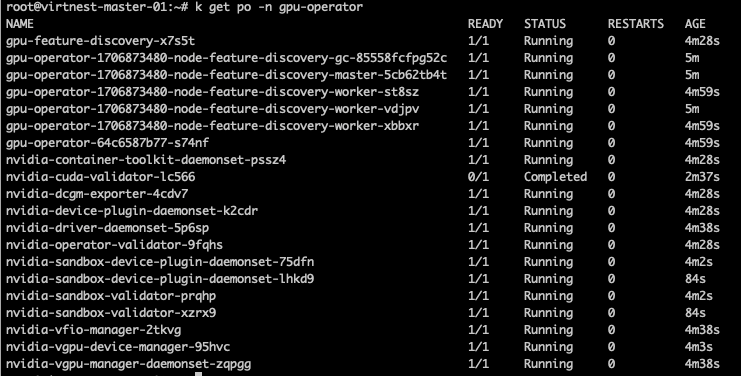
Wait for the installation to be successful, as shown in the image below:
Install virtnest-agent and Configure CR
-
Install virtnest-agent, refer to Install virtnest-agent.
-
Add vGPU and GPU direct pass-through to the Virtnest Kubevirt CR. The following example shows the key yaml after adding vGPU and GPU direct pass-through:
spec: configuration: developerConfiguration: featureGates: - GPU - DisableMDEVConfiguration # Fill in the information below permittedHostDevices: mediatedDevices: # vGPU - mdevNameSelector: GRID P4-1Q resourceName: nvidia.com /GRID_P4-1Q pciHostDevices: # GPU direct pass-through - externalResourceProvider: true pciVendorSelector: 10DE:1BB3 resourceName: nvidia.com /GP104GL_TESLA_P4 -
In the kubevirt CR yaml,
permittedHostDevicesis used to import VM devices, and vGPU should be added inmediatedDeviceswith the following structure: -
GPU direct pass-through should be added in
pciHostDevicesunderpermittedHostDeviceswith the following structure: -
Example of obtaining vGPU information (only applicable to vGPU): View node information on a node marked as
nvidia.com/gpu.workload.config=vm-vgpu(e.g., work-node-2), and thenvidia.com/GRID_P4-1Q: 8in Capacity indicates available vGPUs:# kubectl describe node work-node-2 Capacity: cpu: 64 devices.kubevirt.io/kvm: 1k devices.kubevirt.io/tun: 1k devices.kubevirt.io/vhost-net: 1k ephemeral-storage: 102626232Ki hugepages-1Gi: 0 hugepages-2Mi: 0 memory: 264010840Ki nvidia.com/GRID_P4-1Q : 8 pods: 110 Allocatable: cpu: 64 devices.kubevirt.io/kvm: 1k devices.kubevirt.io/tun: 1k devices.kubevirt.io/vhost-net: 1k ephemeral-storage: 94580335255 hugepages-1Gi: 0 hugepages-2Mi: 0 memory: 263908440Ki nvidia.com/GRID_P4-1Q: 8 pods: 110So the
mdevNameSelectorshould be "GRID P4-1Q" and theresourceNameshould be "GRID_P4-1Q". -
Obtain GPU direct pass-through information: On a node marked as
nvidia.com/gpu.workload.config=vm-passthrough(e.g., work-node-1), view the node information, andnvidia.com/GP104GL_TESLA_P4: 2in Capacity indicates available vGPUs:# kubectl describe node work-node-1 Capacity: cpu: 64 devices.kubevirt.io/kvm: 1k devices.kubevirt.io/tun: 1k devices.kubevirt.io/vhost-net: 1k ephemeral-storage: 102626232Ki hugepages-1Gi: 0 hugepages-2Mi: 0 memory: 264010840Ki nvidia.com/GP104GL_TESLA_P4: 2 pods: 110 Allocatable: cpu: 64 devices.kubevirt.io/kvm: 1k devices.kubevirt.io/tun: 1k devices.kubevirt.io/vhost-net: 1k ephemeral-storage: 94580335255 hugepages-1Gi: 0 hugepages-2Mi: 0 memory: 263908440Ki nvidia.com/GP104GL_TESLA_P4: 2 pods: 110So the
resourceNameshould be "GRID_P4-1Q". How to obtain thepciVendorSelector? SSH into the target node work-node-1 and use the command "lspci -nnk -d 10de:" to get the Nvidia GPU PCI information, as shown in the image above. -
Editing kubevirt CR note: If there are multiple GPUs of the same model, only one needs to be written in the CR, listing each GPU is not necessary.
# kubectl -n virtnest-system edit kubevirt kubevirt
spec:
  configuration:
    developerConfiguration:
      featureGates:
      - GPU
      - DisableMDEVConfiguration
    # Fill in the information below
    permittedHostDevices:
      mediatedDevices:                    # vGPU
      - mdevNameSelector: GRID P4-1Q
        resourceName: nvidia.com/GRID_P4-1Q
    pciHostDevices:                       # GPU direct pass-through, in the above example, TEESLA P4 has two GPUs, only register one here
      - externalResourceProvider: true
        pciVendorSelector: 10DE:1BB3
        resourceName: nvidia.com/GP104GL_TESLA_P4
Create VM YAML and Use GPU Acceleration
The only difference from a regular virtual machine is adding GPU-related information in the devices section.
Click to view complete YAML
apiVersion: kubevirt.io/v1
kind: VirtualMachine
metadata:
  name: testvm-gpu1
  namespace: default
spec:
  dataVolumeTemplates:
  - metadata:
      creationTimestamp: null
      name: systemdisk-testvm-gpu1
      namespace: default
    spec:
      pvc:
        accessModes:
        - ReadWriteOnce
        resources:
          requests:
            storage: 10Gi
        storageClassName: www
      source:
        registry:
          url: docker://release-ci.daocloud.io/virtnest/system-images/debian-12-x86_64:v1
runStrategy: Manual
template:
    metadata:
      creationTimestamp: null
    spec:
      domain:
        cpu:
          cores: 1
          sockets: 1
          threads: 1
        devices:
          disks:
          - bootOrder: 1
            disk:
              bus: virtio
            name: systemdisk-testvm-gpu1
          - disk:
              bus: virtio
            name: cloudinitdisk
        gpus:
        - deviceName: nvidia.com/GP104GL_TESLA_P4
            name: gpu-0-0
        - deviceName: nvidia.com/GP104GL_TESLA_P4
          name: gpu-0-1
        interfaces:
        - masquerade: {}
          name: default
      machine:
        type: q35
      resources:
        requests:
          memory: 2Gi
    networks:
    - name: default
      pod: {}
    volumes:
    - dataVolume:
        name: systemdisk-testvm-gpu1
      name: systemdisk-testvm-gpu1
    - cloudInitNoCloud:
        userDataBase64: I2Nsb3VkLWNvbmZpZwpzc2hfcHdhdXRoOiB0cnVlCmRpc2FibGVfcm9vdDogZmFsc2UKY2hwYXNzd2Q6IHsibGlzdCI6ICJyb290OmRhbmdlcm91cyIsIGV4cGlyZTogRmFsc2V9CgoKcnVuY21kOgogIC0gc2VkIC1pICIvI1w/UGVybWl0Um9vdExvZ2luL3MvXi4qJC9QZXJtaXRSb290TG9naW4geWVzL2ciIC9ldGMvc3NoL3NzaGRfY29uZmlnCiAgLSBzeXN0ZW1jdGwgcmVzdGFydCBzc2guc2VydmljZQ==
        name: cloudinitdisk