如何将客户系统集成到 DCE 5.0(OEM IN)
OEM IN 是指合作伙伴的平台作为子模块嵌入 DCE 5.0,出现在 DCE 5.0 一级导航栏。 用户通过 DCE 5.0 进行登录和统一管理。实现 OEM IN 共分为 5 步,分别是:
具体操作演示请参见:OEM IN 最佳实践视频教程。
Note
以下使用两套 DCE 5.0 来做嵌套演示。实际场景需要自己解决客户系统的如下问题: 1. 客户系统需要自己添加一个 subpath,用于区分哪些是 DCE 5.0 的服务,哪些是客户系统的服务。 2. 提供客户系统的 jwksUri 发现地址(如果客户系统使用了 HTTP Headers Authorization 字段作为 TOKEN 校验) 3. 提供客户系统的 TLS 证书(如果客户系统使用了 TLS,并且 TLS 证书是自签的)
环境准备
-
部署两套 DCE 5.0 环境:
http://192.168.1.6:30444作为 DCE 5.0http://192.168.1.6:30080作为客户系统
应用过程中对客户系统的操作请根据实际情况进行调整。
-
规划客户系统的 subpath 路径:
http://192.168.1.6:30080/external-anyproduct/(强烈建议使用辨识度高的名称作为 subpath,不能与主 DCE 5.0 的 HTTP router 发生冲突!!!)
Note
- 本文采用了 HTTP 的方式部署 DCE 5.0,实际应用中可以使用 HTTP,或者使用公网的 TLS 证书。请勿使用自签的 TLS 证书。
- 本文中的
/external-anyproduct是客户系统的 subpath,请将它替换成你的 subpath。 - 本文中
http://192.168.1.6:30444是 DCE 5.0 的访问地址,http://192.168.1.6:30080是客户系统的访问地址,请将它替换成你的 DCE 5.0 访问地址和客户系统访问地址。
统一域名
为客户系统配置 subpath
- ssh 登录到客户系统服务器。
-
使用 vim 命令创建
subpath-envoyfilter.yaml文件subpath-envoyfilter.yamlapiVersion: networking.istio.io/v1alpha3 kind: EnvoyFilter metadata: name: subpath-envoyfilter namespace: istio-system spec: workloadSelector: labels: istio: ingressgateway configPatches: - applyTo: HTTP_FILTER match: context: GATEWAY listener: filterChain: filter: name: envoy.filters.network.http_connection_manager subFilter: name: envoy.filters.http.router patch: operation: INSERT_BEFORE value: name: envoy.lua typed_config: "@type": type.googleapis.com/envoy.extensions.filters.http.lua.v3.Lua inlineCode: |- function envoy_on_request(request_handle) local path = request_handle:headers():get(":path") # 请改为你需要的 subpath 路径 local mysubpath = "/external-anyproduct" if string.sub(path,1,string.len(mysubpath)) ~= mysubpath then return end local _, _, rest = string.find(path, "/[^/]+/(.*)") if rest then request_handle:headers():replace(":path", "/" .. rest) end end --- apiVersion: security.istio.io/v1beta1 kind: AuthorizationPolicy metadata: # Please edit the object below. Lines beginning with a '#' will be ignored, name: mysubpath namespace: istio-system spec: rules: - to: - operation: paths: # 请改为你需要的 subpath 路径 # 注意,此配置仅适用开发环境,请勿用于生产环境,因为可能会造成 AuthN 失效!!! - /external-anyproduct* - from: - source: requestPrincipals: - "*" selector: matchLabels: app: istio-ingressgateway -
使用 kubectl 命令应用 subpath-envoyfilter.yaml:
-
使用 helm 命令获取 ghippo 版本号:
-
使用 helm 命令获取 helm values:
-
使用 vim 命令,编辑
dce5-slave-values.yaml文件:dce5-slave-values.yamlUSER-SUPPLIED VALUES: USER-SUPPLIED VALUES: null anakin: replicaCount: 1 apiserver: replicaCount: 1 auditserver: replicaCount: 1 controllermanager: replicaCount: 1 global: # 改为主 DCE 5.0 的域名(IP)+ subpath</font> reverseProxy: http://192.168.1.6:30444/external-anyproduct storage: audit: - driver: mysql dsn: audit:changeme@tcp(ghippo-mysql.ghippo-system.svc.cluster.local:3306)/audit?charset=utf8mb4&multiStatements=true&parseTime=true builtIn: true ghippo: - driver: mysql dsn: ghippo:changeme@tcp(ghippo-mysql.ghippo-system.svc.cluster.local:3306)/ghippo?charset=utf8mb4&multiStatements=true&parseTime=true keycloak: - driver: mysql dsn: keycloak:changeme@tcp(ghippo-mysql.ghippo-system.svc.cluster.local:3306)/keycloak?charset=utf8mb4 keycloakx: replicas: 1 ui: replicaCount: 1 -
使用 helm 命令,应用
dce5-slave-values.yaml配置(注意:替换版本号): -
使用 kubectl 重启 ghippo Pod,使配置生效:
为 DCE 5.0 配置客户系统的 jwksUri 发现地址
- ssh 登录到 DCE 5.0 服务器。
-
使用 vim 命令创建
external-svc-anyproduct.yaml文件external-svc-anyproduct.yamlapiVersion: networking.istio.io/v1beta1 kind: ServiceEntry metadata: name: external-svc-anyproduct namespace: istio-system spec: exportTo: - "*" addresses: - 172.168.1.6 hosts: - external.svc.anyproduct ports: # 改为客户系统的端口号 - number: 30080 name: http protocol: HTTP location: MESH_EXTERNAL resolution: STATIC endpoints: # 改为客户系统的域名(或IP) - address: 192.168.1.6 ports: # 改为客户系统的端口号 http: 30080 -
使用 kubectl 命令应用 external-svc-anyproduct.yaml:
-
使用 kubectl 命令,修改 DCE 5.0 RequestAuthentication CR 资源:
external-svc-anyproduct.yamlapiVersion: security.istio.io/v1 kind: RequestAuthentication metadata: name: ghippo namespace: istio-system spec: jwtRules: # 新增规则1 - forwardOriginalToken: true # 主 DCE 5.0 的域名(或IP)+ subpath + /auth/realms/ghippo issuer: http://192.168.1.6:30444/external-anyproduct/auth/realms/ghippo # 主 DCE 5.0 的域名(或IP)+ subpath + /auth/realms/ghippo/protocol/openid-connect/certs jwksUri: http://192.168.1.6:30444/external-anyproduct/auth/realms/ghippo/protocol/openid-connect/certs?1692515854 # 新增规则2 - forwardOriginalToken: true issuer: ghippo.io # 主 DCE 5.0 的域名(或IP)+ subpath + /apis/ghippo.io/v1alpha1/certs jwksUri: http://192.168.1.6:30444/external-anyproduct/apis/ghippo.io/v1alpha1/certs?1692515854 - forwardOriginalToken: true issuer: http://192.168.1.6:30444/auth/realms/ghippo jwksUri: http://ghippo-keycloakx-http.ghippo-system.svc.cluster.local/auth/realms/ghippo/protocol/openid-connect/certs?1692515854 - forwardOriginalToken: true issuer: http://ghippo-keycloakx-http.ghippo-system.svc.cluster.local/auth/realms/ghippo jwksUri: http://ghippo-keycloakx-http.ghippo-system.svc.cluster.local/auth/realms/ghippo/protocol/openid-connect/certs?1692515854 - forwardOriginalToken: true issuer: ghippo.io jwksUri: http://ghippo-apiserver.ghippo-system.svc.cluster.local:80/apis/ghippo.io/v1alpha1/certs?1692515854 selector: matchLabels: app: istio-ingressgateway
打通用户体系
将客户系统与 DCE 5.0 平台通过 OIDC/OAUTH 等协议对接,使用户登录 DCE 5.0 平台后进入客户系统时无需再次登录。
-
在两套 DCE 5.0 的场景下,可以在 DCE 5.0 中通过
全局管理->用户与访问控制->接入管理创建 SSO 接入。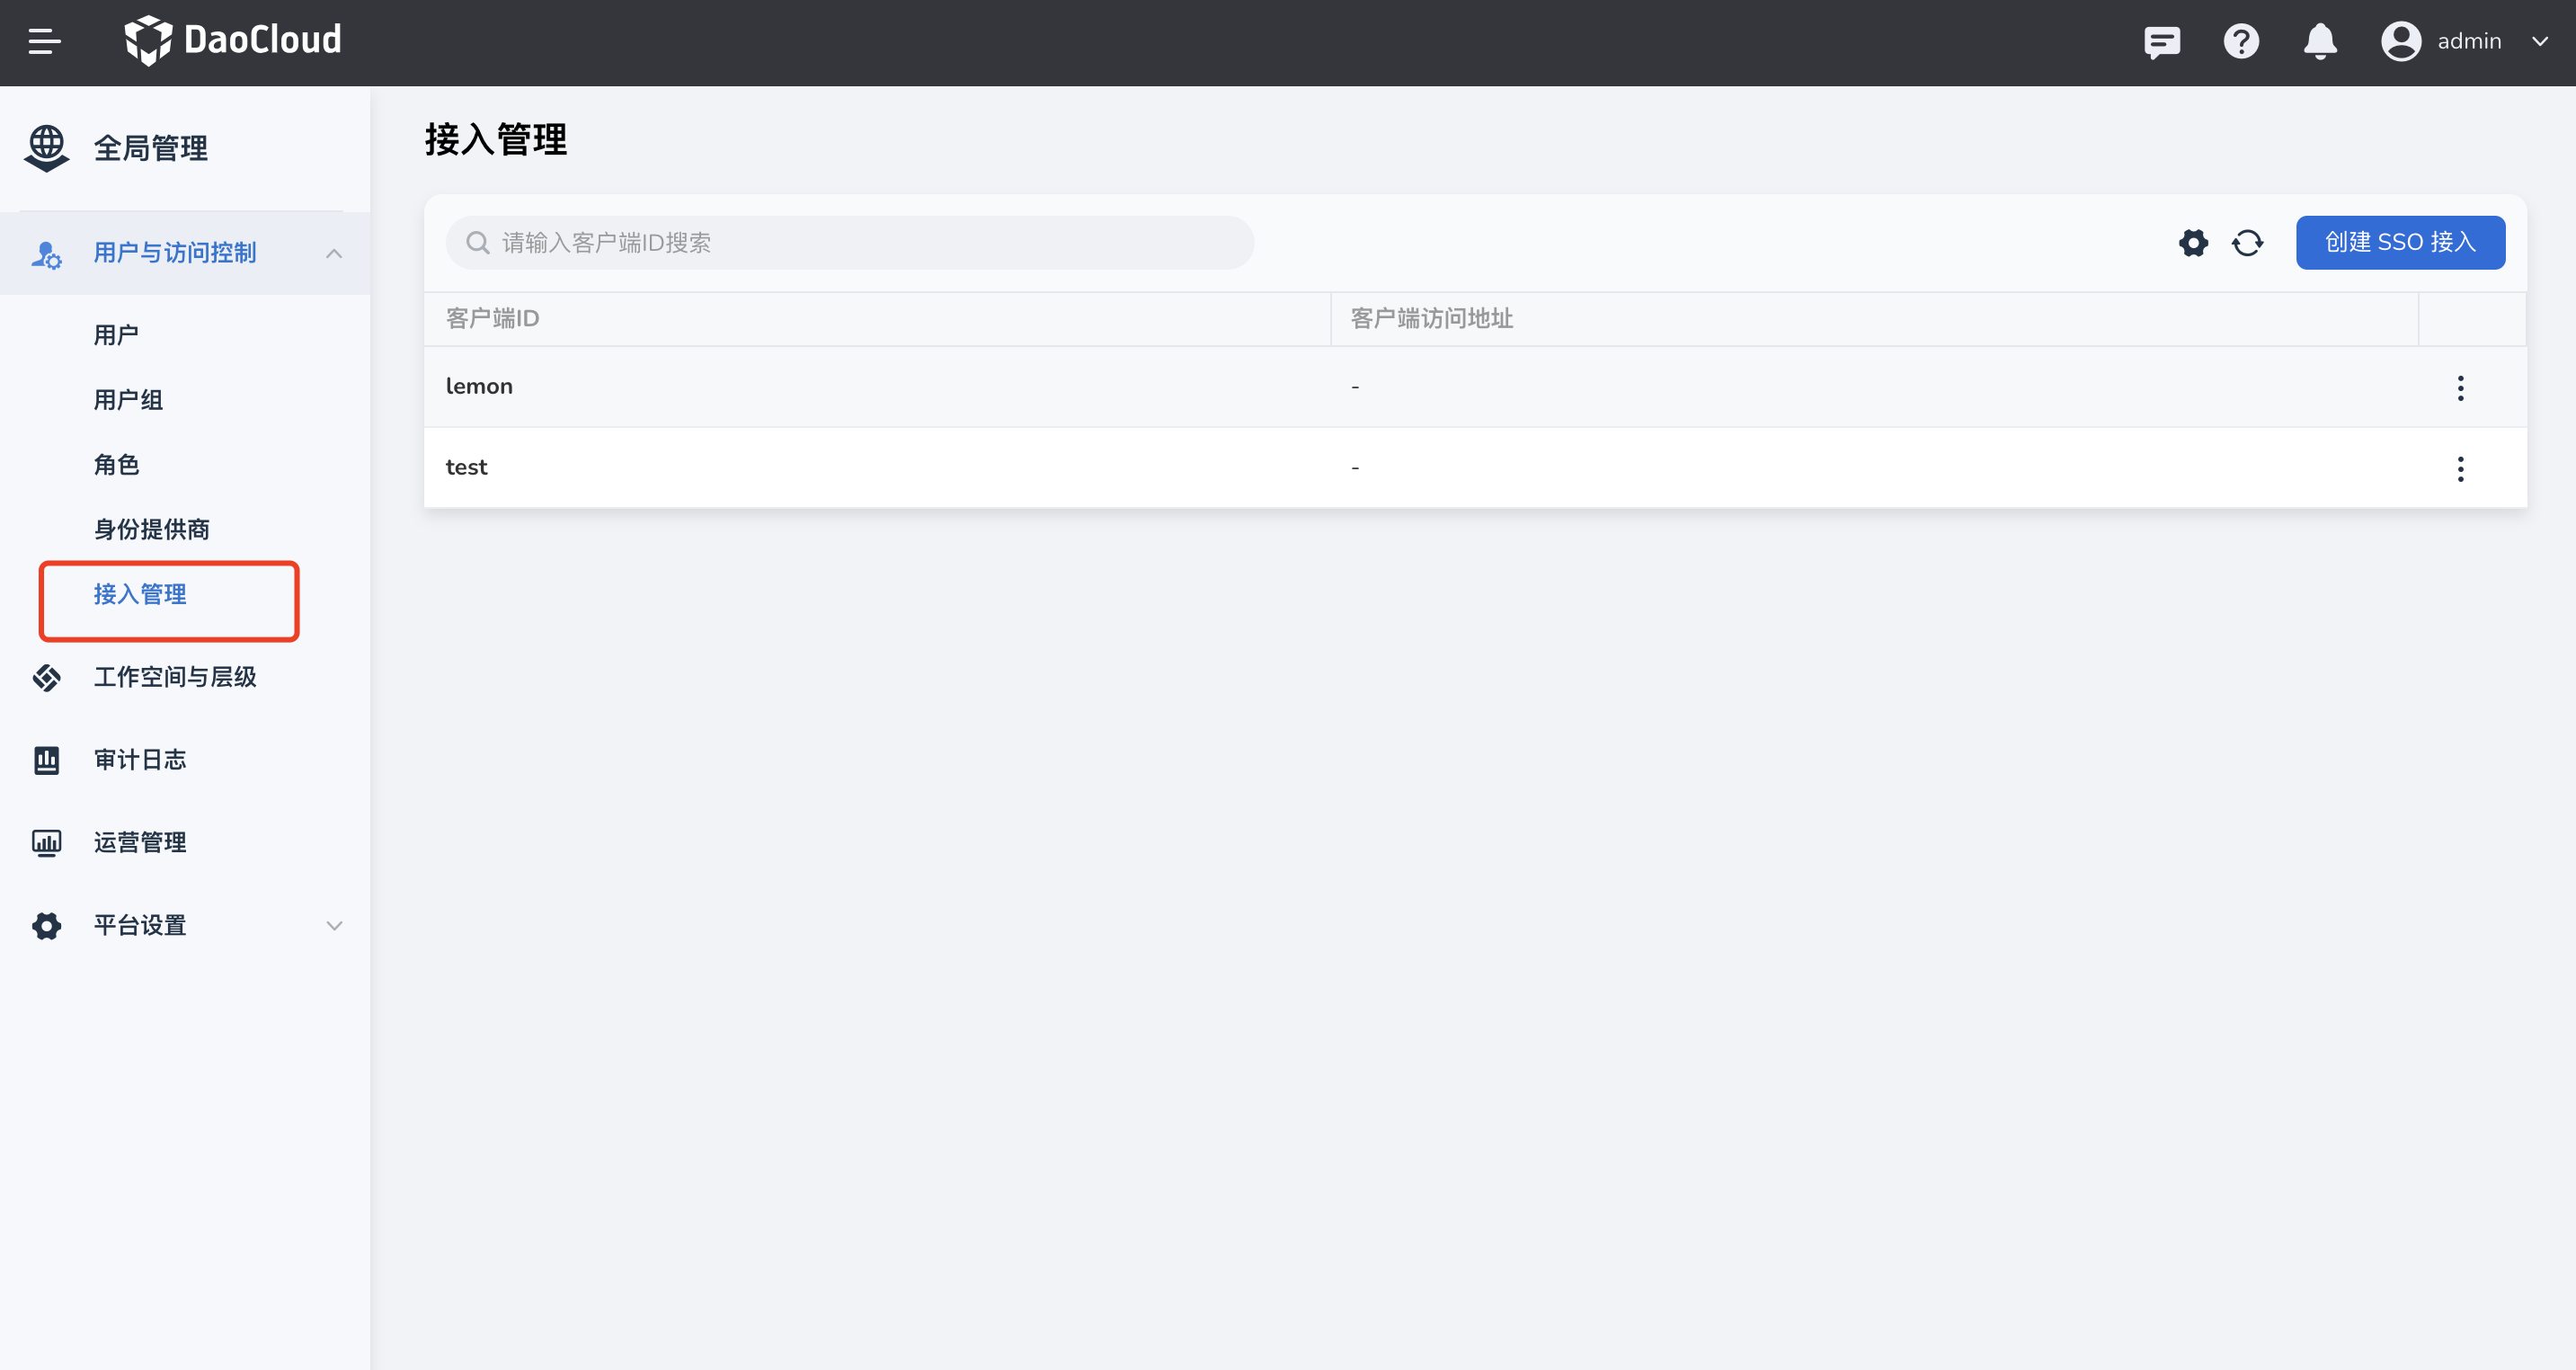
-
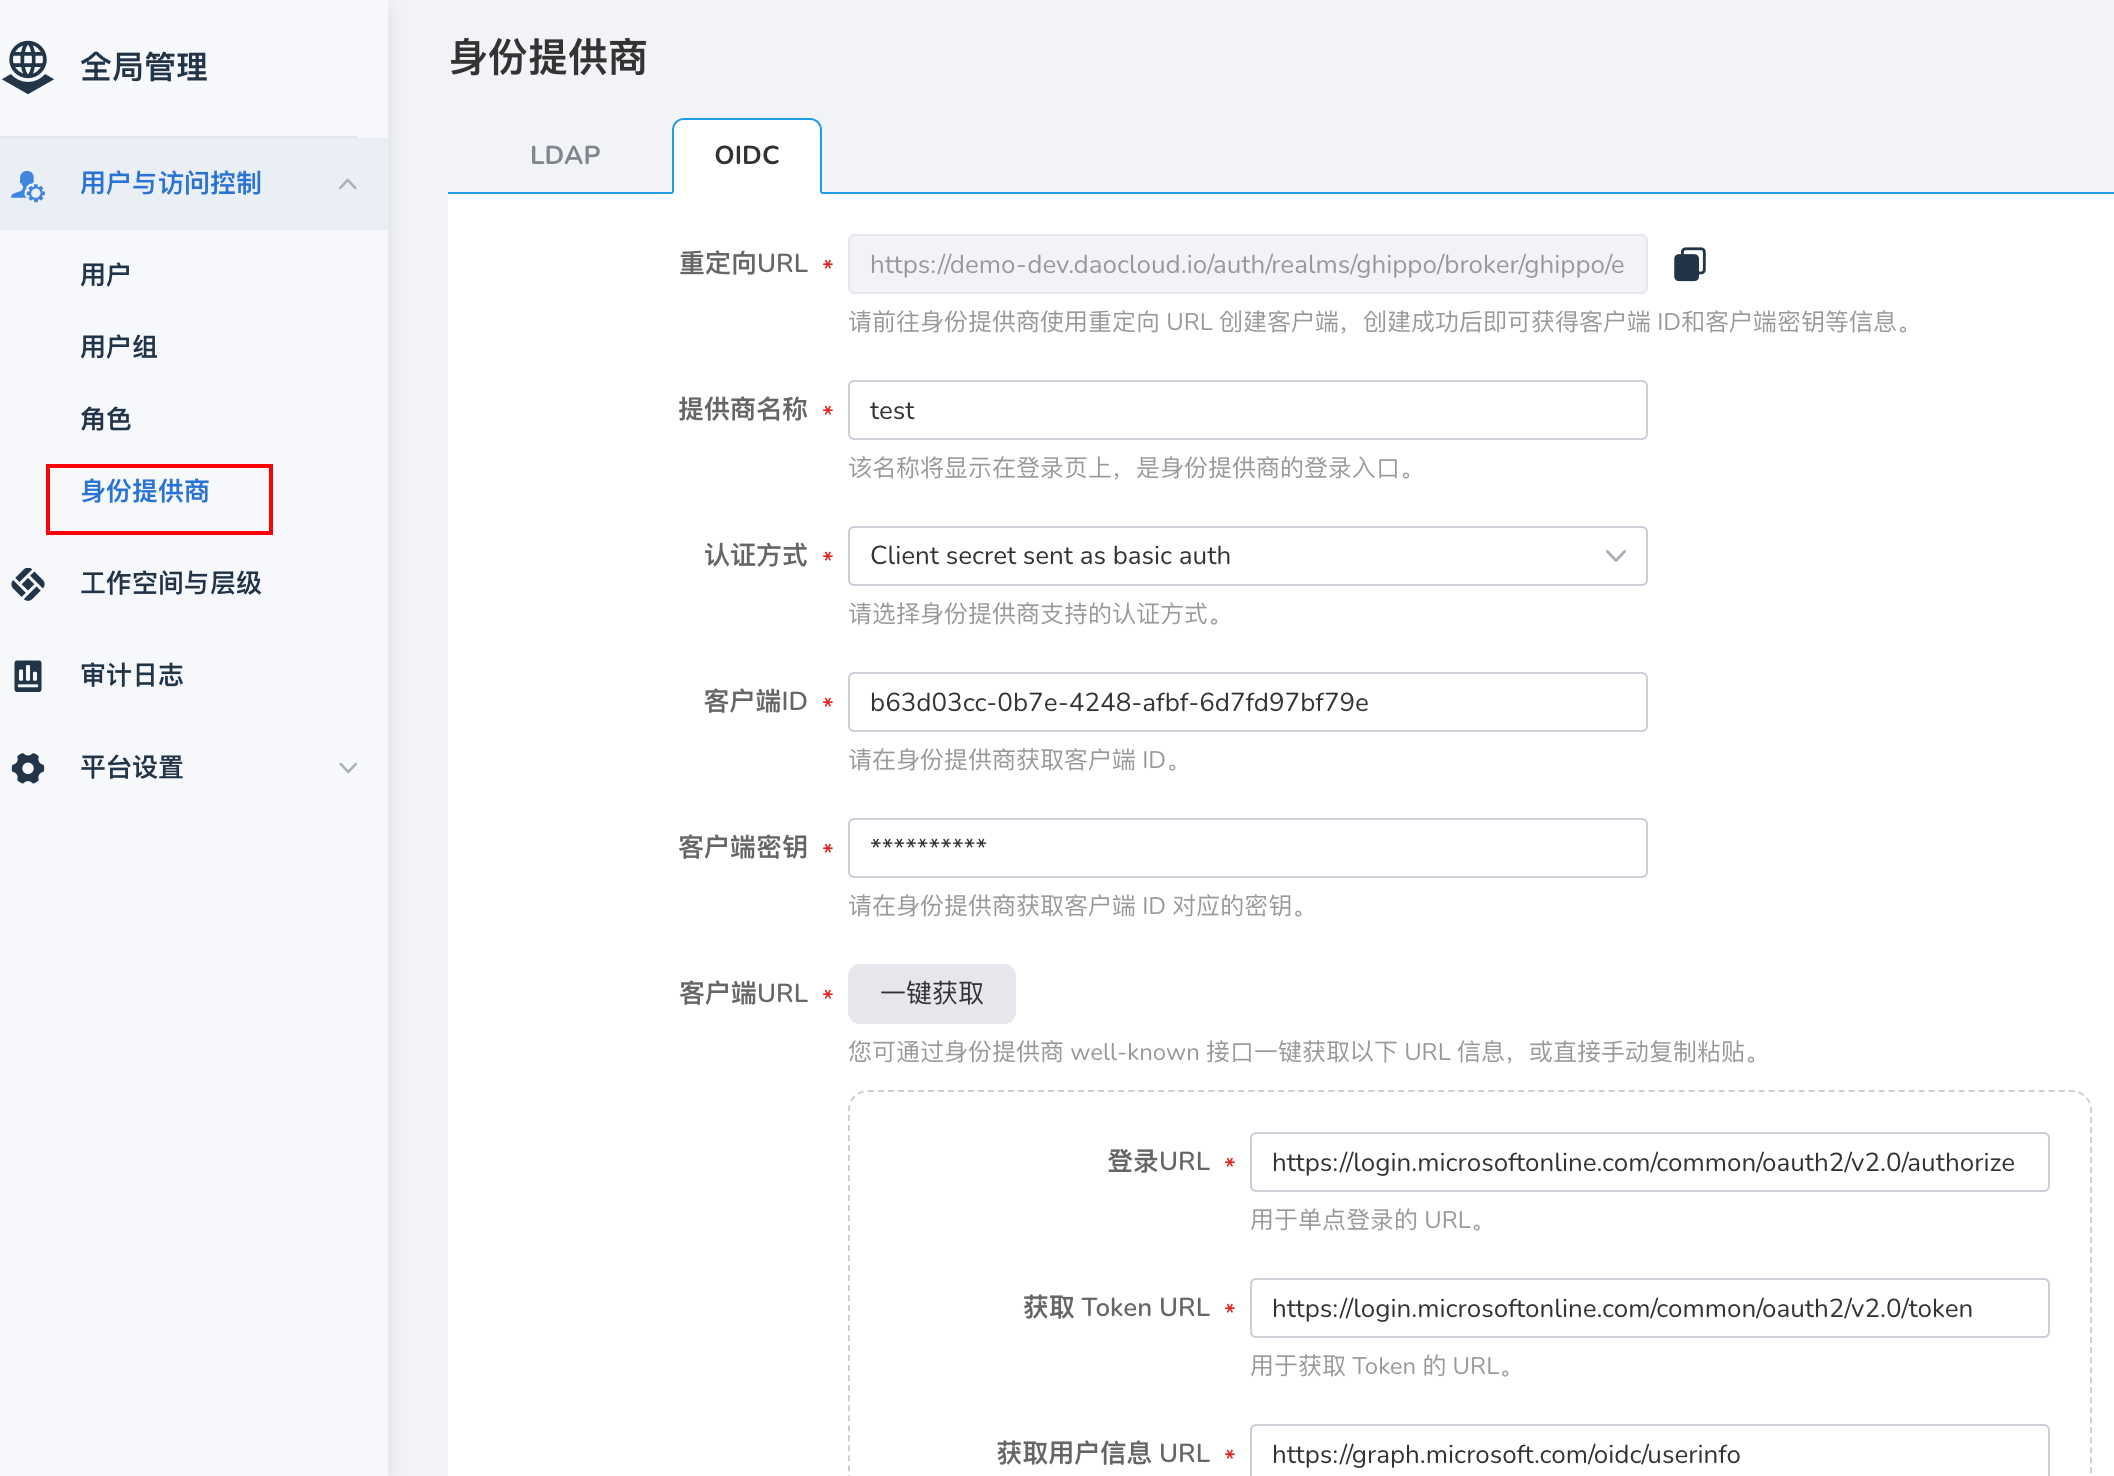
创建后将详情中的客户端 ID、密钥、单点登录 URL 等填写到客户系统的
全局管理->用户与访问控制->身份提供商->OIDC中,完成用户对接。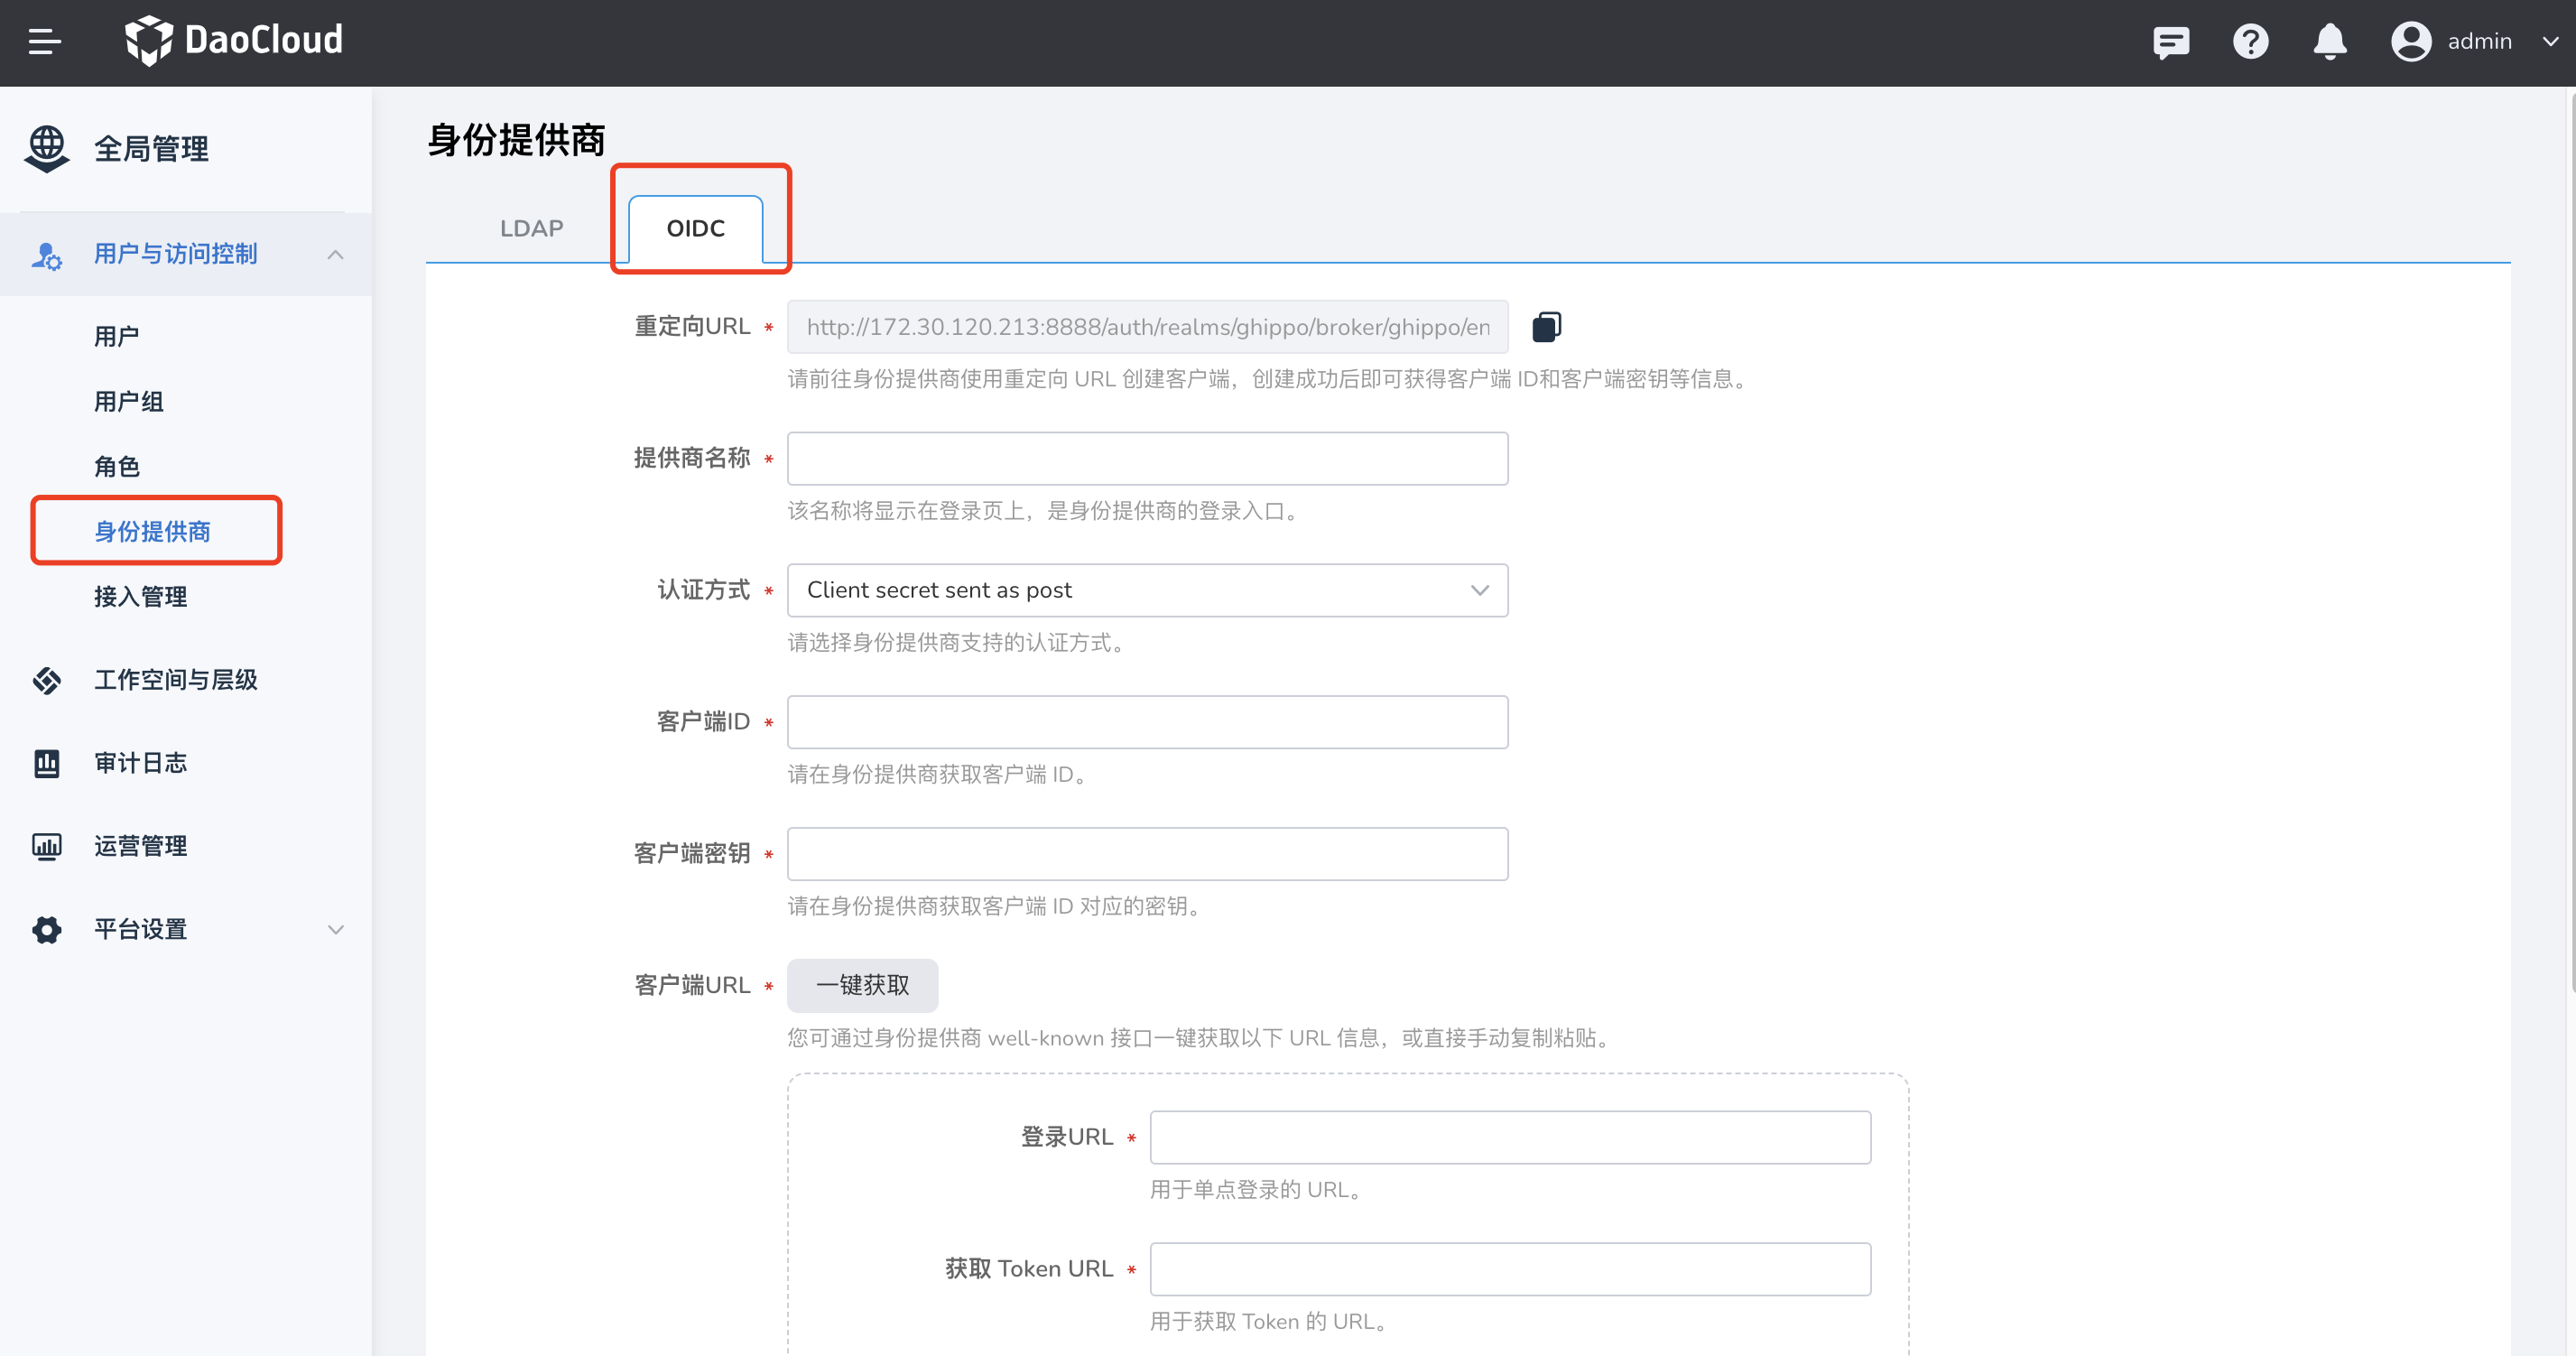
-
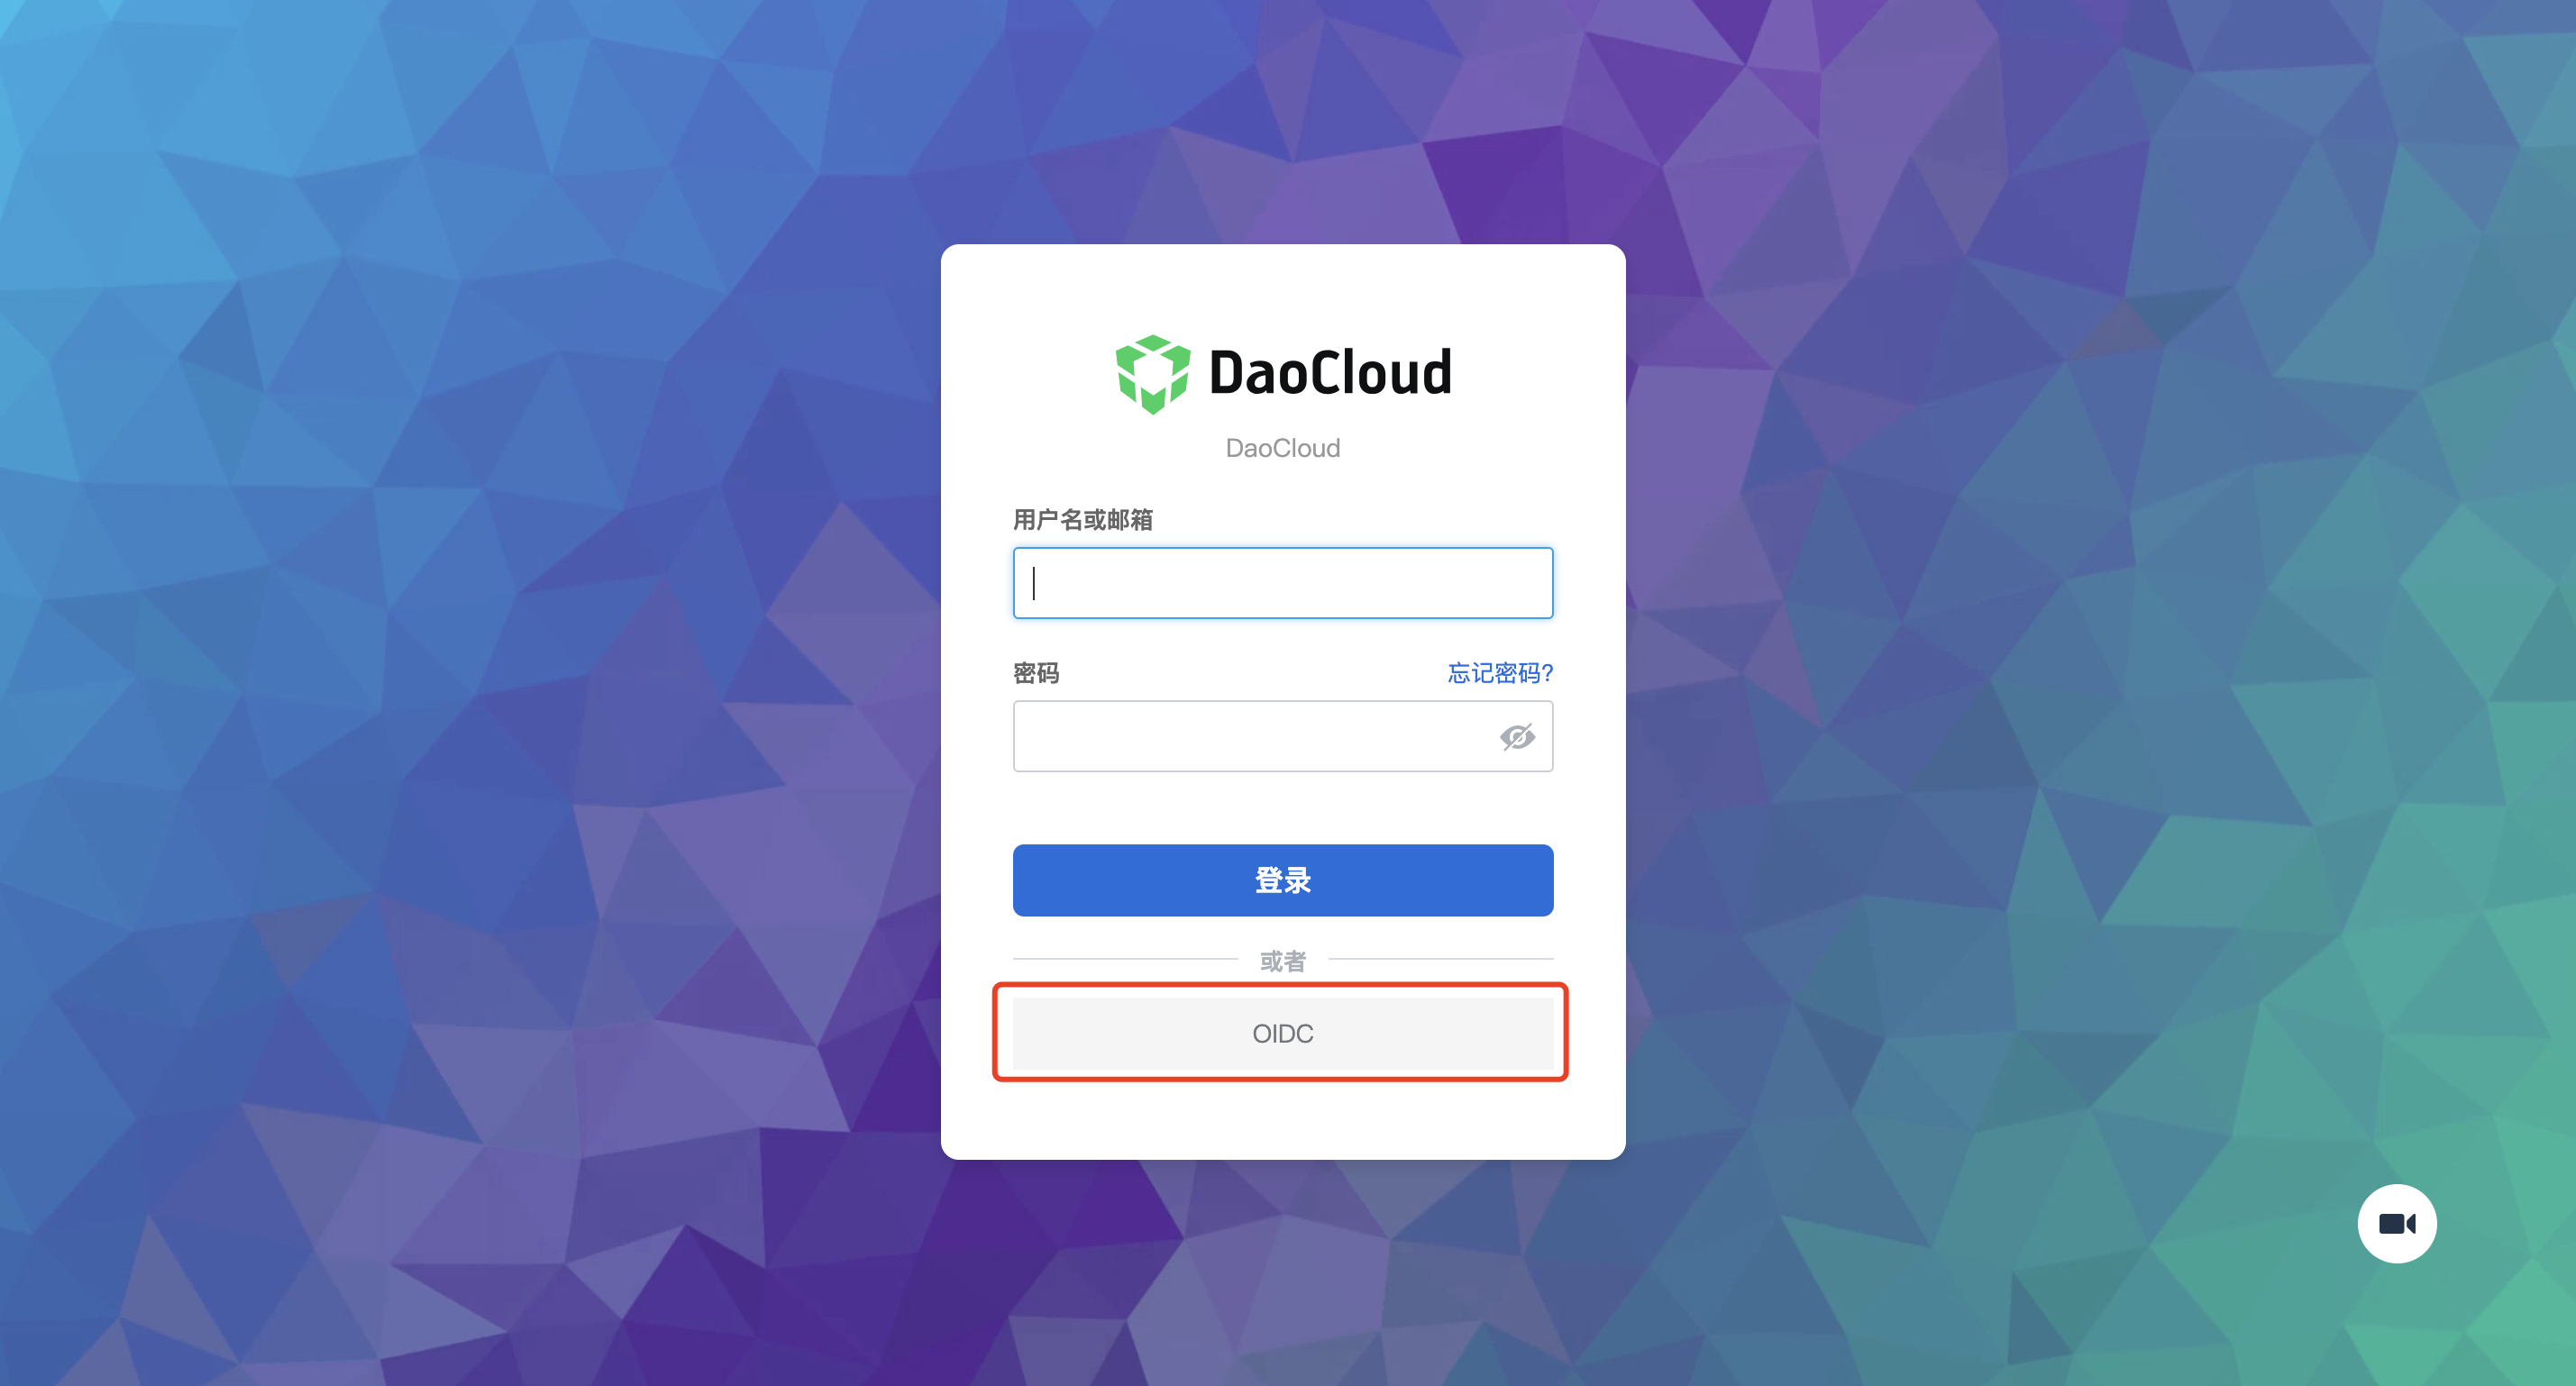
对接完成后,客户系统登录页面将出现 OIDC(自定义)选项,首次从 DCE 5.0 平台进入客户系统时选择通过 OIDC 登录, 后续将直接进入客户系统无需再次选择。
对接导航栏
参考文档下方的 tar 包来实现一个空壳的前端子应用,把客户系统以 iframe 的形式放进该空壳应用里。
-
下载 gproduct-demo-main.tar.gz 文件,将 src 文件夹下 App-iframe.vue 中的 src 属性值改为用户进入客户系统的绝对地址,如:
src="http://192.168.1.6/external-anyproduct" (DCE 5.0 地址 + subpath)或相对地址,如:src="./external-anyproduct/insight"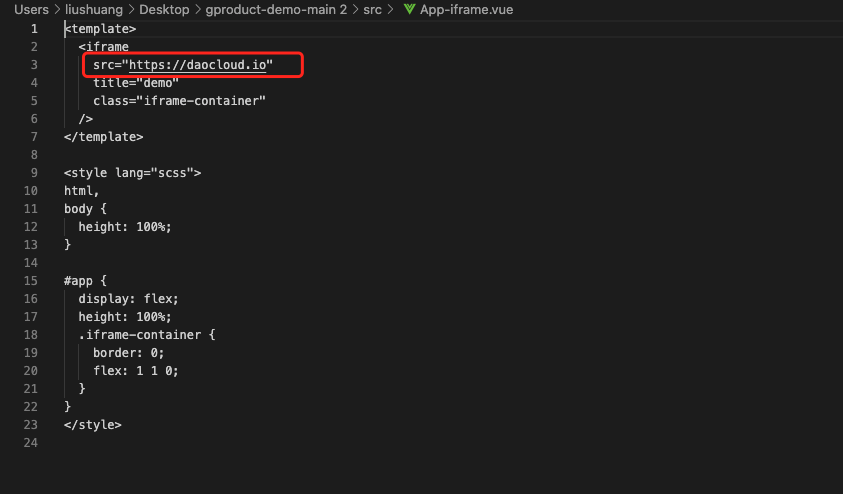
-
删除 src 文件夹下的 App.vue 和 main.ts 文件,同时将:
- App-iframe.vue 重命名为 App.vue
- main-iframe.ts 重命名为 main.ts
-
编辑 demo.yaml 文件
demo.yamlkind: Namespace apiVersion: v1 metadata: name: gproduct-demo --- apiVersion: apps/v1 kind: Deployment metadata: name: gproduct-demo namespace: gproduct-demo labels: app: gproduct-demo spec: ... --- apiVersion: v1 kind: Service metadata: name: gproduct-demo namespace: gproduct-demo spec: ... --- apiVersion: ghippo.io/v1alpha1 kind: GProductNavigator metadata: name: gproduct-demo spec: ... --- apiVersion: ghippo.io/v1alpha1 kind: GProductProxy metadata: name: gproduct-demo spec: gproduct: gproduct-demo proxies: ... # 添加一条规则,'/external-anyproduct' 替换成你的 subpath - match: uri: prefix: /external-anyproduct destination: host: external.svc.anyproduct # 端口号替换成客户系统的端口号(ServiceEntry 定义的端口号) port: 30080 authnCheck: false -
按照 readme 步骤构建镜像(注意:执行最后一步前需要将
demo.yaml中的镜像地址替换成构建出的镜像地址)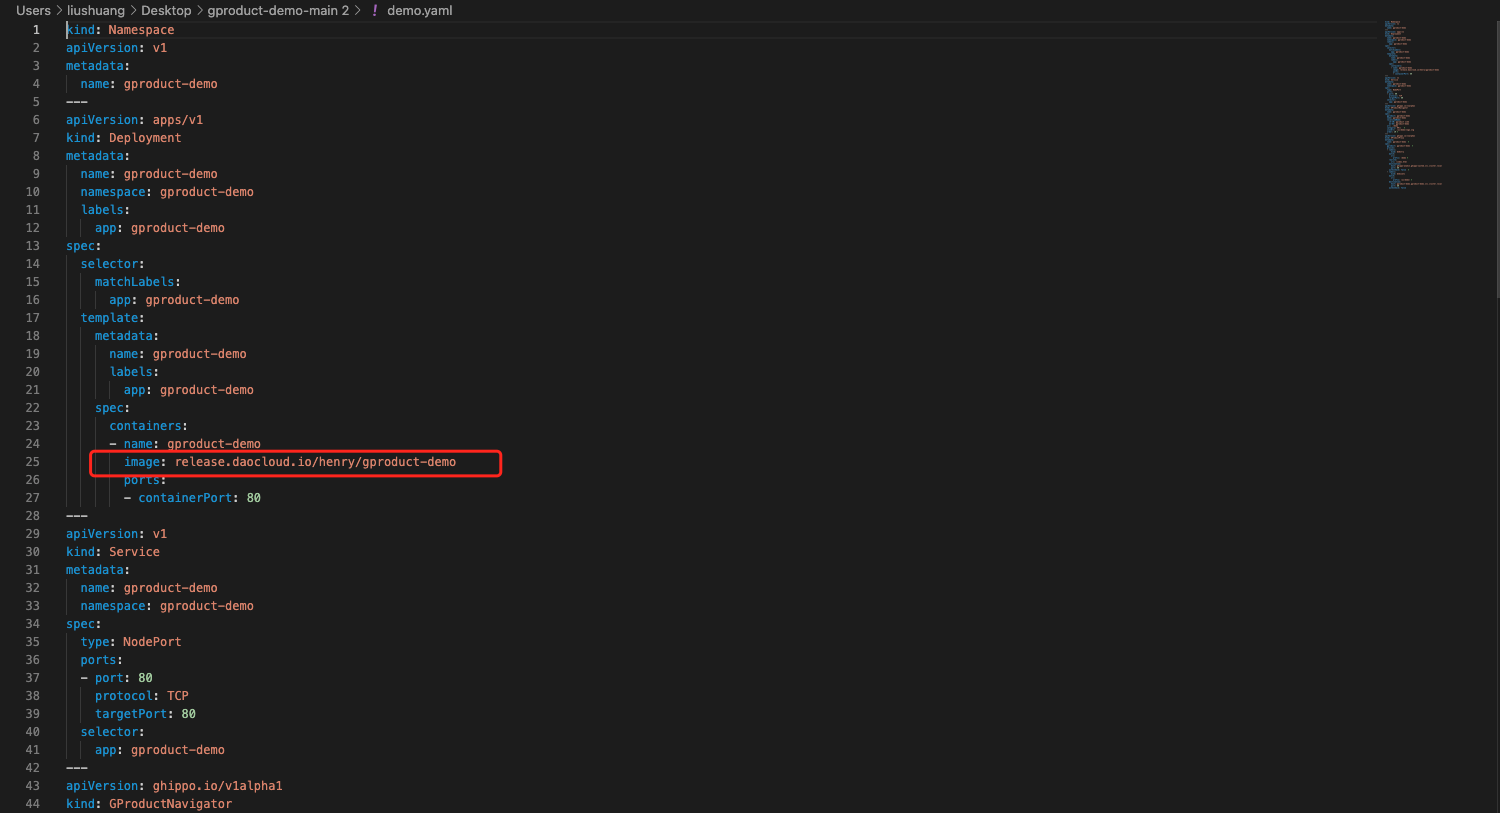
对接完成后,将在 DCE 5.0 的一级导航栏出现客户系统,点击可进入客户系统。
定制外观
Note
DCE 5.0 支持通过写 CSS 的方式来实现外观定制。实际应用中客户系统如何实现外观定制需要根据实际情况处理。
登录客户系统,通过全局管理 -> 平台设置 -> 外观定制可以自定义平台背景颜色、logo、名称等, 具体操作请参照外观定制。
打通权限体系(可选)
方案思路一:
定制化团队可实现一定制模块,DCE 5 将每一次的用户登录事件通过 Webhook 的方式通知到定制模块, 定制模块可自行调用 AnyProduct 和 DCE 5.0 的 OpenAPI 作该用户的权限信息同步。
方案思路二:
通过 Webhook 方式,将每一次的授权变化都通知到 AnyProduct (如有需求,后续可实现)。
AnyProduct 使用 DCE 5.0 的其他能力(可选)
方法为:调用 DCE 5.0 OpenAPI